Thanks for the message! More photos soon and a lot of cram-fu expected :POriginally Posted by Thalan the Exiled


Thanks for the message! More photos soon and a lot of cram-fu expected :P
Hello!
I tried and painted quickly the chassis prototype using technique depicted by Martin Bayer (https://www.youtube.com/watch?v=GrepVM8liF8). It's not perfect and it's not intended to. BTW, I'm not sure to be able to make a better job
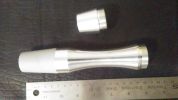
As said before: the prototype works well but is not perfect. For instance, chassis is "too big" to fit the TCSS parts and some scratchs are visible on the paint because of the attrition when inserting the crystal chamber in the tube.
Prototype.jpg
The final part would be smaller about 0.2mm and I improved a lot of things that were not printable.
Crystal_Chamber_v43.jpg
The crystal is supposed to change the soundfonts of the saber and a micro-switch is placed for this. It is triggered by a mobile crystal holder attached to a flexible piece of plastic. It worked fine on the prototype. In the actual crystal chamber, I may use a metallic part to be sure it won't break.
Détail languette.jpg
More news to come!
Last edited by Anoril; 04-19-2017 at 08:32 AM.

I actually used a similar technique with iron for a chassis. I ended up rubbing it down with my needle nose pliers, mostly on a whim. Most people are shocked that it's a 3D printed piece of plastic, even if I think it's obvious.
That's true: initially, it's plain grey, but when rubbing it with care (not on my pics) it ends up very... shiny and realistic

Wiring is likely going to give you the most trouble with a cramfu design. Wires rarely follow where you want as they tend to "spring".
-Denzil

Very cool!

Why are people still harping on this? He's clearly demonstrated that he knows what he's doing, and can handle whatever arises!
Haha! Thanks for the encouragements, but I'm not that sure of what I'm doing!
I start tomorrow...
I want to see your wiring diagram, please? I anticipate I'll learn something from it!
Hi! You can find it on the first page of this thread, but I place it there again: (or I don't understand your request ^_^)
Attachment 15276
I can make a clearer one, if you want, or a parted one with every feature on a single diagram
Regards
 Posting Permissions

 Reply With Quote
Bookmarks