Page 1 of 2 1 2 LastLast
Results 1 to 10 of 13

Thread: Chassis Discussion

  1. #1

    Default Chassis Discussion

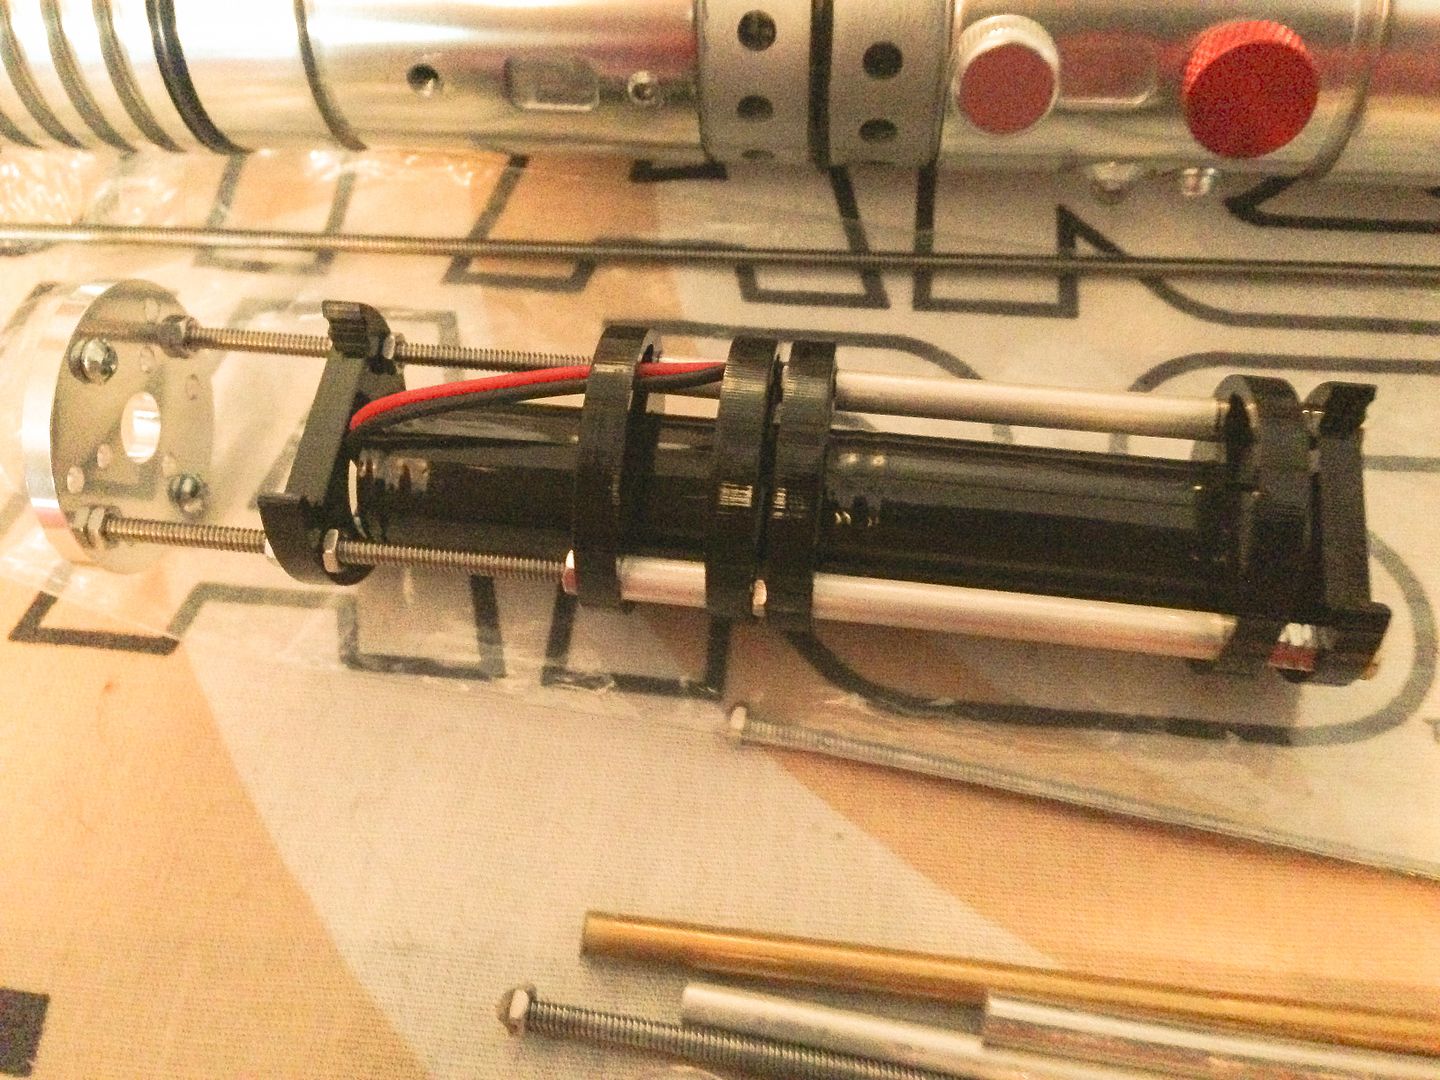
    I would like to see some examples of chassis that others have designed for their sabers. In the interests of that, here is a description of my chassis and an image.
    Here is an image of my lightsaber chassis. My saber is very basic, so the chassis is simply a 4 x AA battery holder and a 1000mA buckpuck. The wires have been hot glued to the battery holder to keep them still. There are only five lines involved:
    1) Battery (-) to Buckpuck (-) (This is soldered and then insulated by shrink tubing which is glued down to the battery holder.)
    2) Battery (+) to Latching Switch
    3) Latching Switch to Buckpuck (+)
    4) LED (+) to Buckpuck LED (+)
    5) LED (-) to Buckpuck LED (-)
    Lines two through five are brought to a connector ( http://www.thecustomsabershop.com/4-...ctor-P457.aspx ). This is my chassis:

    Buckpuck Chassis.jpg

  2. #2

    Default

    All you need to do is look through the gallery, many builds show chassis in some cases, and look at the various examples of how chassis disk are assembled in the store, and you should have all the ideas you need.
    TCSS MODERATOR
    All n00bs READ these first (PLEASE)!!!:
    1. Forum Guidelines
    2. FJK’s “Down and Dirty” guide to Ohm’s Law

    "Yeah, yeah, I've heard it all before... you want blindingly bright, super loud, running 1138 blinkies off of the cheapest sound card you can find AND you want all of it to run on a battery the size of a dime, and run for a very, VERY long time. That one cracks me up every time..."
    My email: fjk_tcss@yahoo.com

  3. #3

    Default

    Here is a chassis I recently built for a Graflex saber.


    A TCSS Graflex blade holder leads to the chassis disks capable of holding a Petit Crouton and an 18500/18650 battery. This then leads to my crystal chamber which utilizes a custom designed chassis disk that Tim cut for me. It then ends with the disk that can hold a speaker mount v4.

    I'm actually currently awaiting parts for a new chassis I'm building for my personal MHS saber. I'll post pics of that too once it has been completed.


    Welcome to saber building. You've taken your first step into a larger world.

    "Don't get the idea that your [lightsaber] is a quick little project to be slapped together." - Luke Skywalker

  4. #4

    Default

    Thank you Forgetful Jedi Knight and Machinimax.

  5. #5

    Default

    Here's a pic of that MHS chassis I was talking about.


    I still have to cut a couple pieces of aluminum to slide on the threaded rods but you get the idea.

    I'm using the chassis disks that hold a PC and an 18500/18650. A Crystal Focus is going in place of a PC but the width and height of the boards are the same anyway. I'm using a pair of the disks meant to hold a PC and 14500 to sandwich the battery pack and keep it from sliding.


    Welcome to saber building. You've taken your first step into a larger world.

    "Don't get the idea that your [lightsaber] is a quick little project to be slapped together." - Luke Skywalker

  6. #6

    Default

    Here is my chassis (mockup'd before wiring the boards)

    I'm using:
    Speaker mount v5
    A pair of Acrylic Chassis Discs for PC 2.0 and 18500/18650 pack - S2 (the CF7 is just a smidgen longer then the PC2/3)
    A pair of modified Acrylic Chassis Disc for NB and 18500/18650 pack - S3 (the CeX doesn't have a stock disc available, so, some careful work with a fine toothed bandsaw was needed)
    And a pair of Acrylic Chassis Disc 2 hole to 3 hole adapter - S9 (to space and mount the 10 LED bar graph I'm going to use for the accents/PLI & the inner most will be cut to allow for switch placement above the battery and bar graph)

    I wanted run time, so I got the largest honking battery Tim had in stock at the time (an 18650 stick pack), and I didn't quite realize that this configuration would eat up so much space.
    Eh, live and learn!

    image.jpg
    image.jpg
    image.jpg

  7. #7

    Default

    BigKevin61 - That looks pretty cool! What will the PLI be visible through? And do you have a pic of the saber this chassis is going into?

  8. #8

    Default

    Quote Originally Posted by craig139 View Post
    BigKevin61 - That looks pretty cool! What will the PLI be visible through? And do you have a pic of the saber this chassis is going into?
    Sorry for a late response, life is way to busy now that I'm covering for another position at work (nothing like twice the work, for the same pay).

    The middle section of my saber is a 4" fluted extension, and I will be drilling out a window in one of the flutes. As much as I would have loved to have Tim do that for me in my original order, with such a VERY narrow margin of error, I didn't even know if my design idea would "fit" until I got the parts in hand.

  9. #9

    Default

    Understandable. Thanks for the reply.

  10. #10

    Default

    Here is my home-made chassis I'm going to use in my GF's stunt saber. It's made of core ply and foam tape. I'll trim the core ply to allow it to slide out of the tube but remain snug.

    IMG_20140730_192623385_HDR_zpsw98gzpyw.jpg

    It was a little longer than expected, so I may have to buy an extension, or possibly trim off some of the core ply on the rear of the battery pack and just get a longer pommel. Currently, it houses the battery pack, momentary to latching converter, and a 1000ma buckpuck.

Bookmarks

Posting Permissions

  • You may not post new threads
  • You may not post replies
  • You may not post attachments
  • You may not edit your posts
  •