Page 1 of 2 1 2 LastLast
Results 1 to 10 of 13

Thread: Some wiring questions

  1. #1

    Default Some wiring questions

    Hi, I'm in the early stages of my first lightsaber and wanted to ask a few things about some of the electronics. It's a fairly simple design right now, one that can easily be adapted since it's just a pair of tubes right now. I'm refraining from drilling holes in anything until the first set of parts I ordered arrive. It's a hardware saber with a 1.5" sink tube adapter for the blade holder and a 1-1/4"* PVC pipe outside to create an emitter cover and grip in one. I originally wasn't sure if I was going to make it an LED saber or not, but halfway through, I saw that the LED and sound parts weren't even half as expensive as I remembered them being.

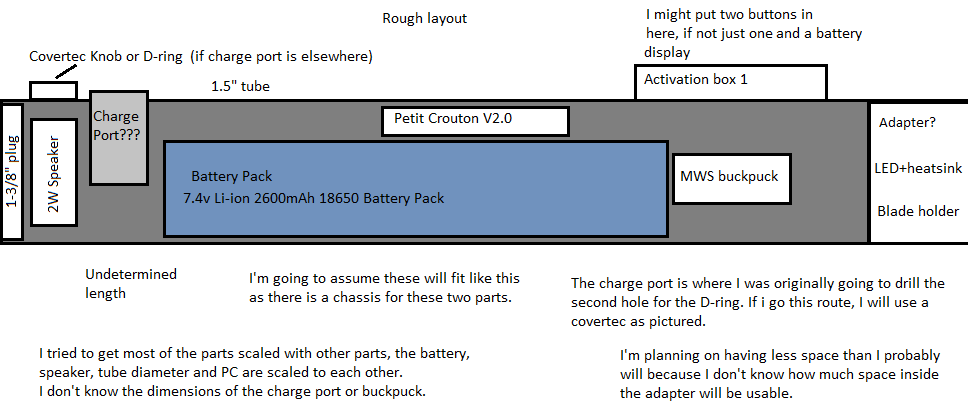
    I was wondering if anyone could tell me where they think the ideal placement for a charger would be on the hilt. I was thinking of placing it near the pommel, but I'm not sure if the battery pack would leave enough room between it and the inner wall of the hilt for that. Or would I be better placing it in the middle of the hilt, closer to the end of the battery pack? Other thought was placing it just above the activation button or even inside the activation box itself and hiding it with the card instead of a kill plug, but I think I can see that being a problem with it wearing down the card over time.

    Is there a way to integrate the buttons into an activation box 1? Or if someone can link me into some build threads that show detailed pictures of them working with an activation box 1, that would be just as good.

    Would you say this is a correct purchase list for electronics? Or am I missing something?
    -Rebel Star LED & MHS Heatsink Module (Green or Royal Blue, undecided)
    -7.4v Li-ion 2600mAh 18650 Battery Pack
    -Petit Crouton sound module
    -MWS 1000mA Buckpuck (if the Crouton isn't in stock when I go to order my electronics)
    -2W bass speaker
    -2.1mm power jack
    -Heat shrink, switches/buttons and wires.
    -Li-ion smart charger (and adapter)

    *PVC pipe measurements are odd... I fit a 1-1/4" pipe over the outside of a 1-1/2" OD sink tube...

  2. #2

    Default

    I'll lay out what I see that needs adjusting, but I'm still a new guy, so feel free to ignore me. Also, the search function is your friend. Might do a search for "Activation Box" and see what comes up.

    1. If you wind up going the Buck Puck route, you won't need a speaker, since you won't have sound.
    2. It'd be some serious pro level Cram-Fu to get a recharge port into that box. I'd say you're better off working with it in hilt. You could always go with one in the pommel, if you wanted to. Plan-Fu is also your friend. It makes for a much easier job of assembly later on. Best bet (in my opinion) would be to wait until you have your electronics in hand, so that you can see dimensions in real time, rather than measuring and guessing.

    But in the end, it's all about what you think would work best. It's your saber. Build it how you want it.
    "Bacon and cheese>squeezed lemon." - FenderBender
    "But, ya know...rules are made to be broken." - Yoshi-Taka
    LDM's Recipe For Noobs. Totally Worth The Read.

  3. #3

    Default

    The batteries are about an inch in diameter, so if I have it sitting off to the side instead of perfectly centered, I should be able to fit both. Or I could just move the battery a little further up the hilt by about an inch or however much space the charge port needs. The batteries are about 5.25" in length and my estimate (before I get my adapter and blade holder) is that I will have about 7 inches of space before the LED and heatsink.

    About the speaker, I wanted to have some of the parts already in place so when I do order the Crouton I can install it without too much rearranging. I was even going to cut out a scrap piece of plastic to the dimensions of the Crouton's board to use as a placeholder if I don't use chassis parts to define a space for it beforehand. The buckpuck is just going to be temporary until I can order a Crouton and install it.

    Another issue I am having with the planning is that I'm not sure how I'm going to secure the parts into the hilt so they don't go bumping around when I move the hilt. I'm not sure I can use the chassis parts since I'm not using an MHS body because those will leave open space as well. Unless there is a way to fit something in between the sink tube and the chassis parts.

    This is what I have so far, I made no attempt to scale the outside parts, except the length (but not height) of the activation box 1. EDIT: And the buckpuck is only going to be there if the Crouton isn't. I should have noted that on the picture.


    I can only plan with the information I have, hence why I created this thread to get more information to update my planning.

  4. #4

    Default

    This is awesome, sir. You seem to plan your sabers exactly like I do (down to the design program). Planning is always a plus. You can always use some PVC between your chassis disks and your actual tube. Or use something like polyethylene foam (pool noodles) to line the interior and take up your extra space.
    "Bacon and cheese>squeezed lemon." - FenderBender
    "But, ya know...rules are made to be broken." - Yoshi-Taka
    LDM's Recipe For Noobs. Totally Worth The Read.

  5. #5

    Default

    That's the hard part, finding PVC that actually fits between two different size pieces. What's the outside diameter of the chassis pieces, anyways? Might be able to start my search after Christmas before I order anymore parts.

    Also, I have a question. What exactly is an anti-vandal switch? I tried looking up what they were and all I found were online stores selling them with little to no description beyond the fact that it was an illuminated switch.

  6. #6

    Default

    Quote Originally Posted by Aervain View Post
    That's the hard part, finding PVC that actually fits between two different size pieces. What's the outside diameter of the chassis pieces, anyways? Might be able to start my search after Christmas before I order anymore parts.

    Also, I have a question. What exactly is an anti-vandal switch? I tried looking up what they were and all I found were online stores selling them with little to no description beyond the fact that it was an illuminated switch.
    The outside diameter of the main chassis pieces are 1.24".

    Anti Vandal switches basically are switches that you can't easily turn off - that was the big appeal (that and the lit dot or ring) of the latching version when they first made the saber building scene.
    TCSS MODERATOR
    All n00bs READ these first (PLEASE)!!!:
    1. Forum Guidelines
    2. FJK’s “Down and Dirty” guide to Ohm’s Law

    "Yeah, yeah, I've heard it all before... you want blindingly bright, super loud, running 1138 blinkies off of the cheapest sound card you can find AND you want all of it to run on a battery the size of a dime, and run for a very, VERY long time. That one cracks me up every time..."
    My email: fjk_tcss@yahoo.com

  7. #7

    Default

    So, if I find a way to secure a 1.25" sink tube inside the 1.5" sink tube, I would have a great holder for the chassis in there. Either that or I can find a PVC pipe that has a roughly 1.5" outside diameter and ~1.25" inside diameter (not sure if that exists.)

    I have two plans for what kinds of switches I'm going to use, but I have to wait for my activation box 1 to arrive before I can make any decisions on which plan to go with. I need to see what it should look like so I know what kind of switch(es) I can fit in there. If I can't fit two switches, I might just go with one and put a pair of blinking LEDs on the box kind of like the RotJ Luke Skywalker lightsaber. Or might not put any switches on the box and put a battery display.

    Also ordered the box from the scratch and dent section, so I'm not sure how bad it will be until it gets here. Hoping it isn't too bad.

  8. #8

    Default

    I have several of the chassis discs on hand, and they do not fit inside the 1.25" sink drain pipes....the I.D.(~1.19") of the pipes is too small for that to work.

    Got a question? Start Here. Have you tried the Thread Index yet? Most questions can be answered there.

  9. #9

    Default

    Okay, so that idea is a bust... I also checked for PVC pipe that would securely fit inside the sink tube with minimal luck. Going to need to find another way to mount the parts inside. I might be able to just make my own chassis parts using some leftover sheet plastic I have.

    EDIT: I do have a question regarding a part now. What is the kill plug? I can't find much info on what it does, but I saw one video where someone pulled what looked like the kill plug out and the lightsaber made a sound. Is this just a cover for the charge port or does it actually cut power to the entire saber?
    Last edited by Aervain; 12-24-2012 at 07:38 PM. Reason: New question.

  10. #10

    Default

    Quote Originally Posted by Aervain View Post
    EDIT: I do have a question regarding a part now. What is the kill plug? I can't find much info on what it does, but I saw one video where someone pulled what looked like the kill plug out and the lightsaber made a sound. Is this just a cover for the charge port or does it actually cut power to the entire saber?[/B]
    From reading the Petit Crouton manual, when a kill plug is put into the charging port of a PC or NB, it breaks contact of a switch inside the port, which signals the board to shut down completely. This gives you an "all-the-way-off" switch, which you can use to either save battery power during storage, or to turn the board completely off so you can do things that shouldn't be done when the board is on (e.g., change the LED). The sound that's made when the kill plug is removed is the "boot sound" - you can either place a boot sound file on the card, or, if there is no file, it will beep.

Bookmarks

Posting Permissions

  • You may not post new threads
  • You may not post replies
  • You may not post attachments
  • You may not edit your posts
  •