


Praxis
I am horrible at naming sabers btw. It took me months to find something somewhat fitting. I did see the need to identify them so I broke down & gave it a name.
The definition of praxis:
Praxis is the process of realization of knowledge through first hand experience. And through practice and experimentation of ideas wisdom is gained. It is also the process of gaining wisdom through walking the path of life, much like jedi following the will of the force.
So it seems a fitting name for this saber from which I learned a lot, and used a slow step by step process on. On the prototype for the SSR90 I tried to design it out on paper before building it. It became clear that I could not foresee all of the problems that would arise during that build much less an even more complicated design like this.
I took a different approach on this design and developed one section at a time and solved problems as they arose. I focused on the largest parts first. The crystal chamber is the heart and the center of the saber so I started there. The battery section was the next biggest part and so on. These parts I tried to make as compact as possible no matter what had to be done. If I could do it, it was done, and it was quite some work.
Around these parts I tried to cram as much of the supporting components as possible. For me there is no substitute for time to think about a design to refine it into something special. For or every 2 steps forward there was 1 step back, but that in return gave me more time to refine!
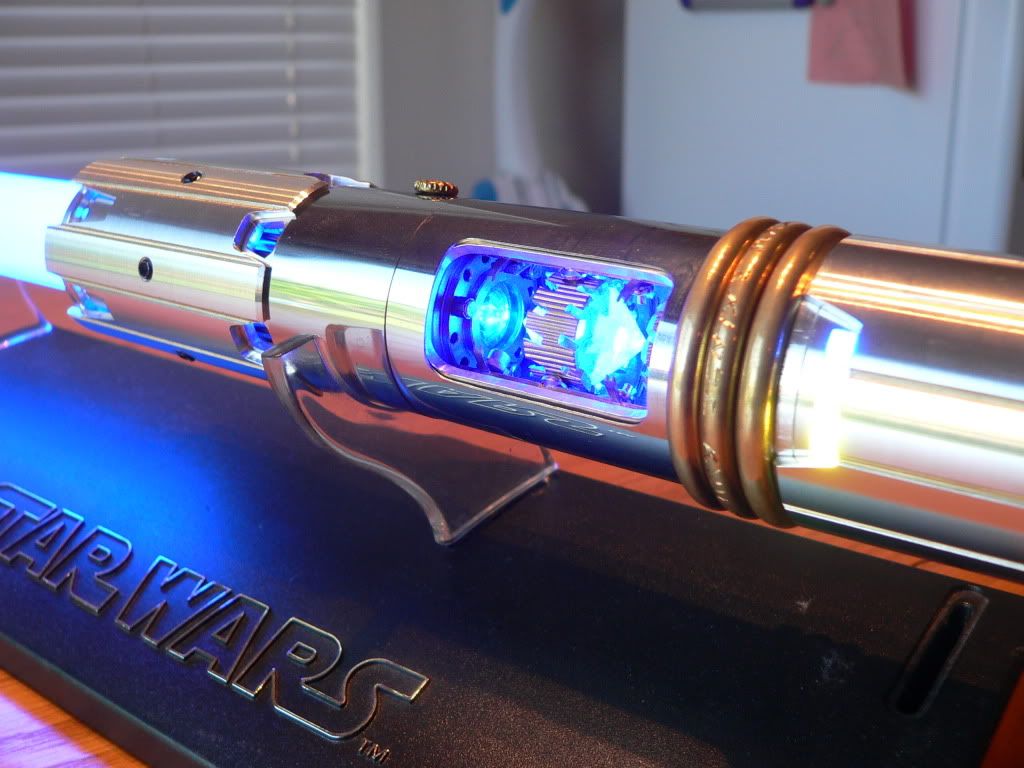
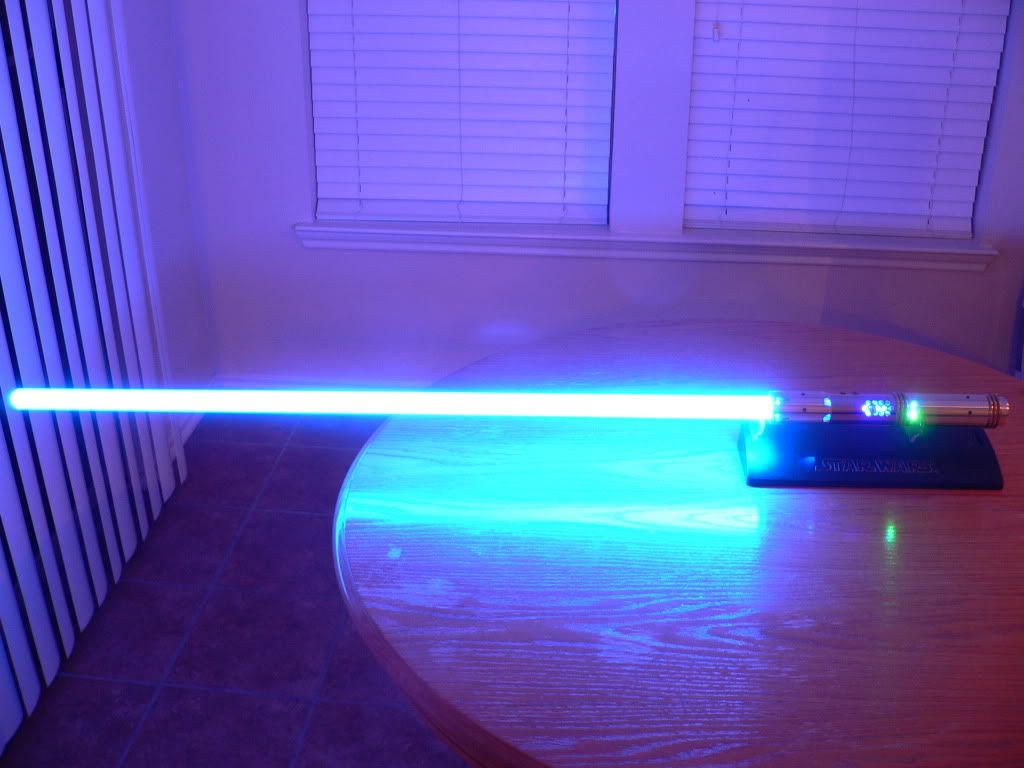
The beauty of the SSR90 sending light shimmering off anything near it looks awesome. And opening the crystal chamber in a hilt I am very proud to have designed and constructed is hard to describe.
There were many times I thought I might not be able to pull off a sub 12 inch hilt with all the stuff I wanted to put in it, and did not think it would look as great to me as it does.
The first of this design, a similar sister saber (one that uses the first green chamber I have posted before), took about 400 hrs to iron out the internal design problems. And that is not including the work on the SSR90 Prototype. This saber took about 300 hours to complete. Considerably less once I had an idea what to do but still a LOT of work.
This saber started as a Mace Windu sort of looking design and slowly took on a different look. It mostly changed to accommodate the internal component layout.
I tried to give it a traditional layout, power cell at the bottom, crystals and lenses in the middle, and blade controls/ parts at the top.
For this saber I wanted to push the limits. I wanted a well rounded unique looking saber to be my unicorn. I wanted it to be a show piece in the way that It would have some beautiful realistic internal detail that would be nice to look at. I also wanted it to be tough enough to play around with it , and not have it be just a decoration on the wall so to speak.
Yes, to many smiths this probably sounds like the old (I want it all in a small hilt and it will wash the dishes). But I was determined make a normal size hilt with a lot of function and features.
In the beginning I felt limited only being able to use the few tools I have and MHS parts but now that Im done I dont feel that way. The MHS system worked out great in the end to be able to do just what I wanted to do. Thanks to Tim at TCSS, those behind the PC, George at TaskLED, Luminus, and those who help each other out on the forums for paving the way for this vision.
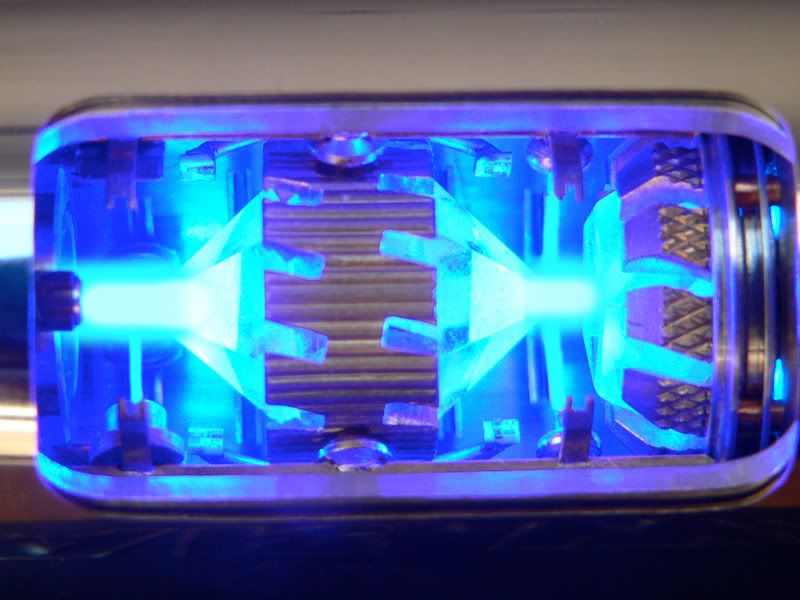
Call me a lumen junky but once I saw a SSR90 in action I was hooked. Then I saw a 445nm blue laser and again wow. I like to use lasers for chambers. They create a lighting effect that LEDs do not. You cant see it through cameras but they add a sparkling light effect to the crystals. The color of the blue laser diode is a really beautiful deep blue at 445nm and I had an idea for a new crystal chamber that could make use of some parts I had gathered from disassembled electronic junk. So I set out to make a blue crystal chamber. I took all the little things I liked from others work on the forums and SW artists sketches and started the new chamber. I credit inspiration to Roland, Yoda, & Sloth on the forums.
After completing the saber I stopped by Degobah to see what Master Yoda thought of it.
He loved it!
So onto the saber.
I am VERY proud to present PRAXIS.
That statement doesnt do justice to how I feel about this saber turned out. And after hundreds of hours of work words still fail me. Hopefully the pictures and videos can convey some of my sentiment.
Specs:
Soundboard : PC L Lightmeat
Blade System : 25 Watt Blue SSR90 Driven by 6.6 Amp Buck Driver with Blade Effects Controlled Via PWM Signal From PC L
Narrow Beam Optic and 38 Inch Trans White Thin Wall Blade
Full Power, or Half Power Double Run Time Modes
Fan Driven Forced Air LED Cooling System
Crystal Chamber : Brass, Aluminum, Copper Crystal Chamber Chassis.
Three Crystal Chamber, Two Quartz, One Blue Topaz.
Illuminated by a Blue laser at 300mw & Five Accent LEDS
Always Visible Crystal Chamber Viewing System Using Revolving Two Way Display Door (Protected Normal, and Maintenance Open Positions).
Accent Lighting : 7 LED Multi Color LED Display with 2 RGB 1 Blue.
Three x Blue .5 Watt Internal/External Blade Power Aura accent LEDs (Driven by PC L Driver).
Power System : 2 x 2900mah 18650 Batteries.
3 Momentary Switches. One for Primary Power, Blade Ignition, and Auxiliary Effects
1 Pololu Board
1 D2Flex Board
1.3mm Recharge Port
Speaker System : Passive Crossover Two Speaker Sound, One 28mm Speaker and One 18mm Speaker
Custom Brass Auxiliary Effects Switch Knob and Blade Ignition Switch Knob
Custom Gold Primary Power On Switch Knob
Custom Brass Belt Clip Ring
Custom Engraved Solid Brass Trim Rings
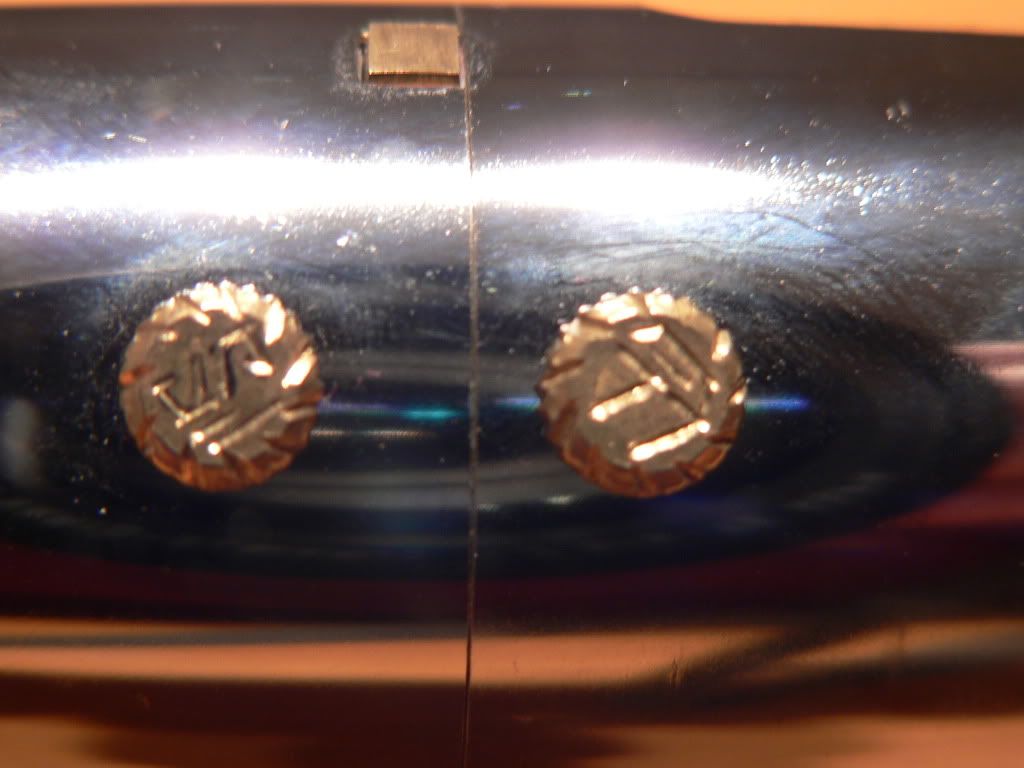
Solid Brass Engraved Shroud Thumb Screws
11.7 inches length
Praxis incorporates all of the function that I have found to make a good saber. Bright blade, detailed crystal chamber, optimized sound, blinky , effects, duel able (although I wouldnt go crazy full speed with it), decent run time, wearable. Its not as detailed or polished on the outside as a lot of sabers but there is some detail on the inside!
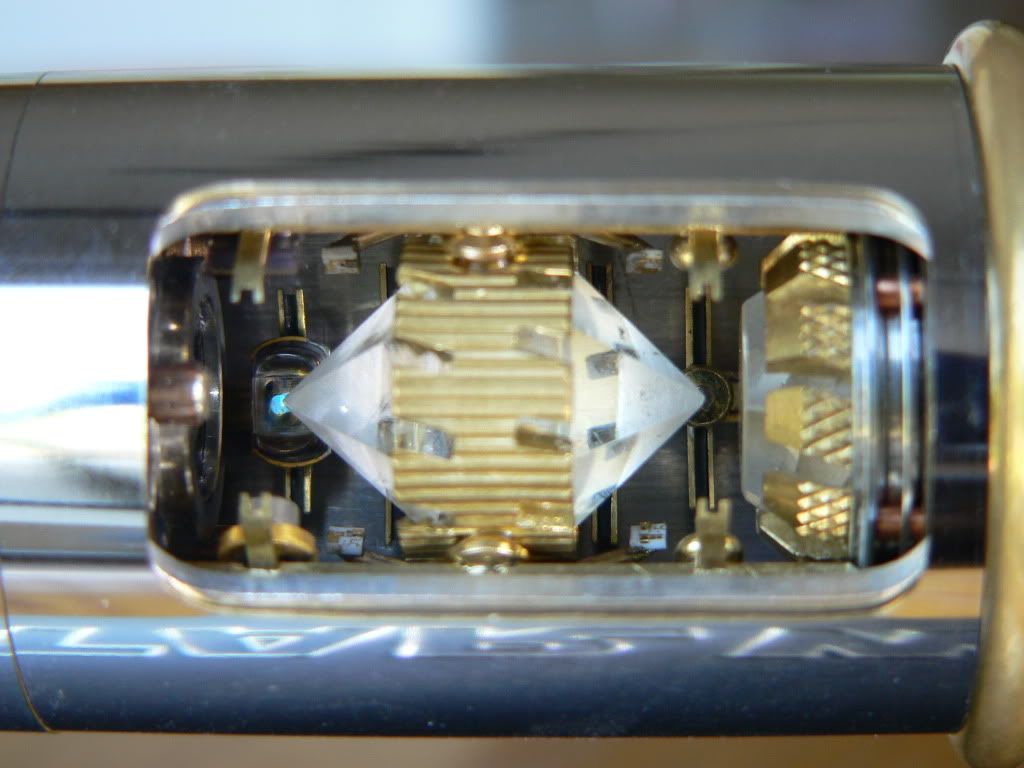
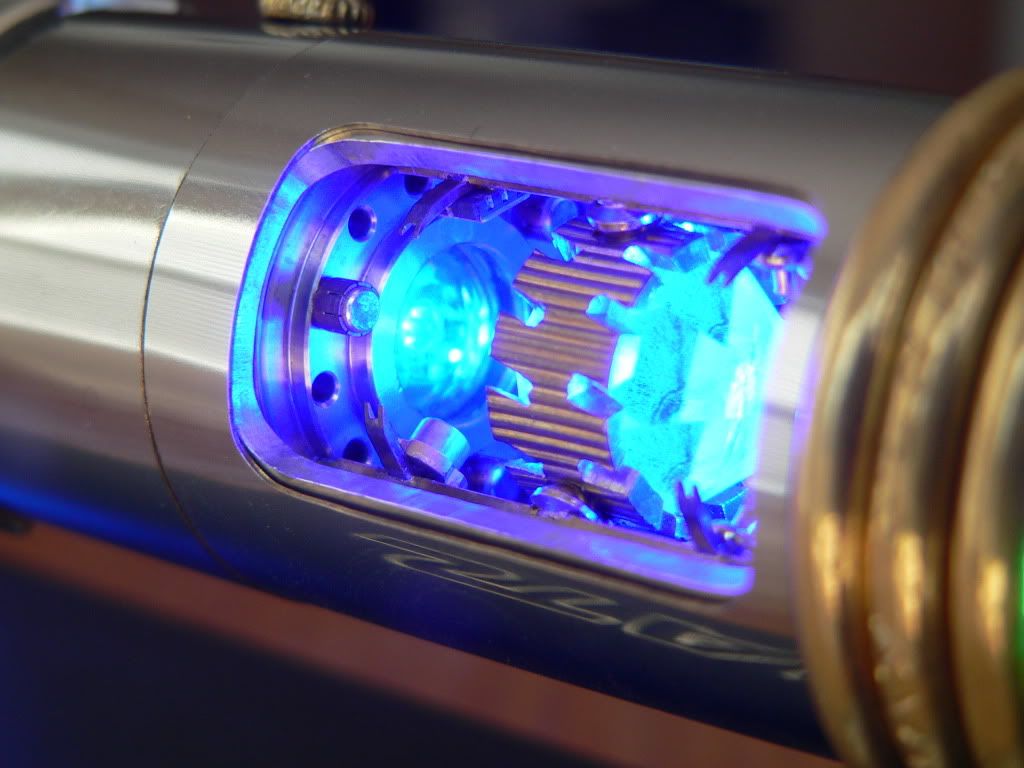
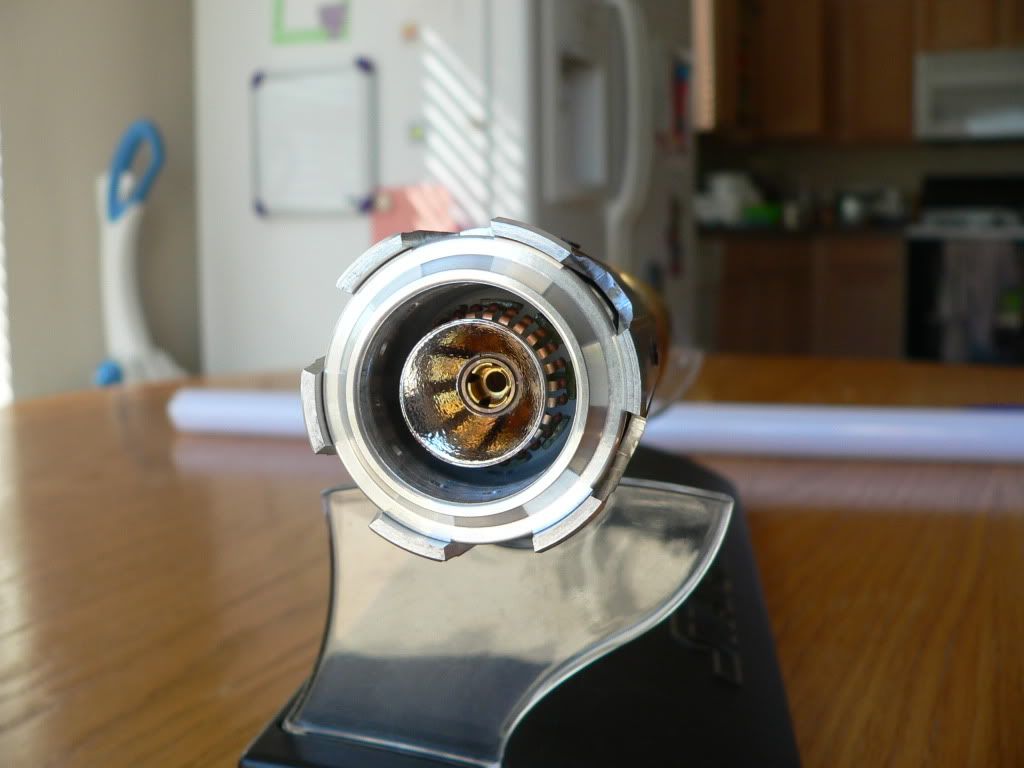
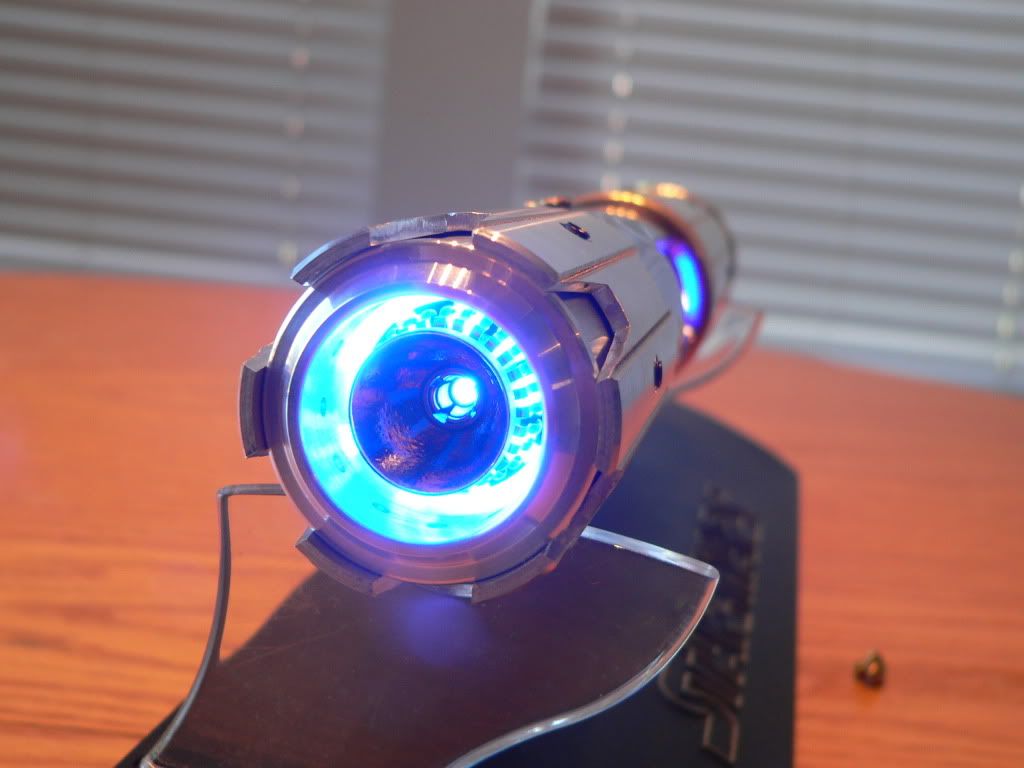
Chamber off
The crystal chamber is the heart of this saber and where I started. From info gathered about them from SW drawings & written material I constructed the chambers to appear to be able to focus, monitor, and control light/energy via lenses, crystals, and sensors. I tried to give the appearance that it would be able to do these futuristic functions by not using easy to recognize parts, and hiding common components from sight. This is one of the main reason for using lasers as they can project light from a greater distance than a LED. It is a blue 445nm 1 watt diode running at .3 watts. It lights up the chamber from under the 12 sided crystal. The light is diffused by not using a focusing lens and a rough finish on the bottom of that crystal. This disperses the light and eliminates the harmful effects possible with laser diodes.
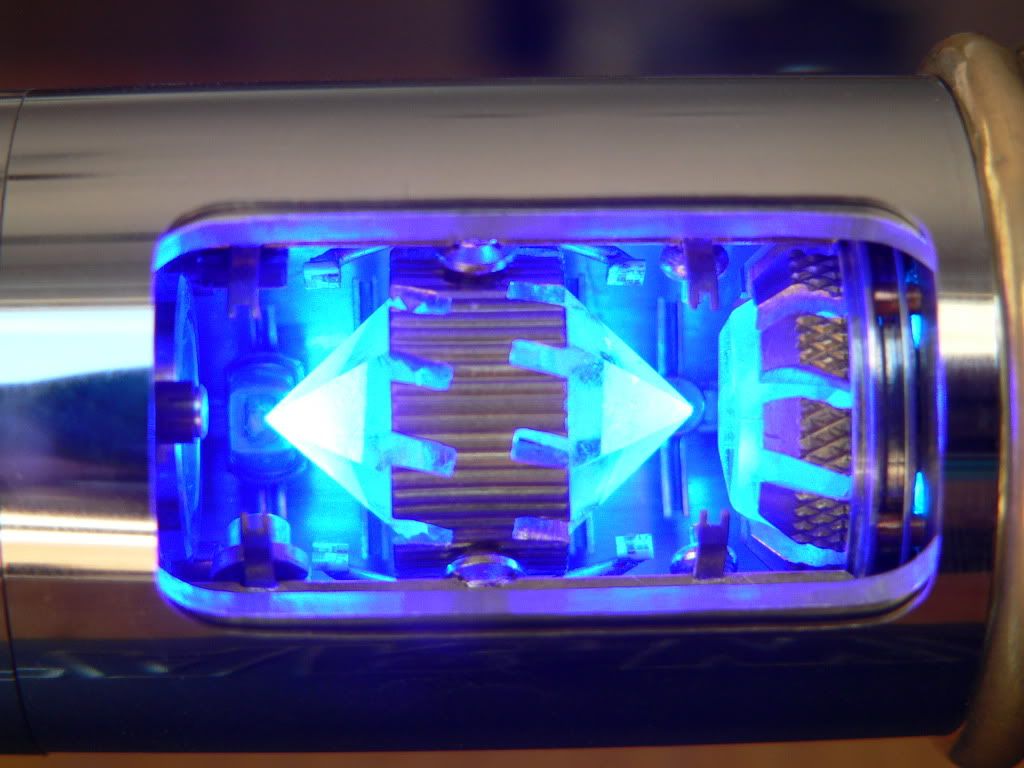
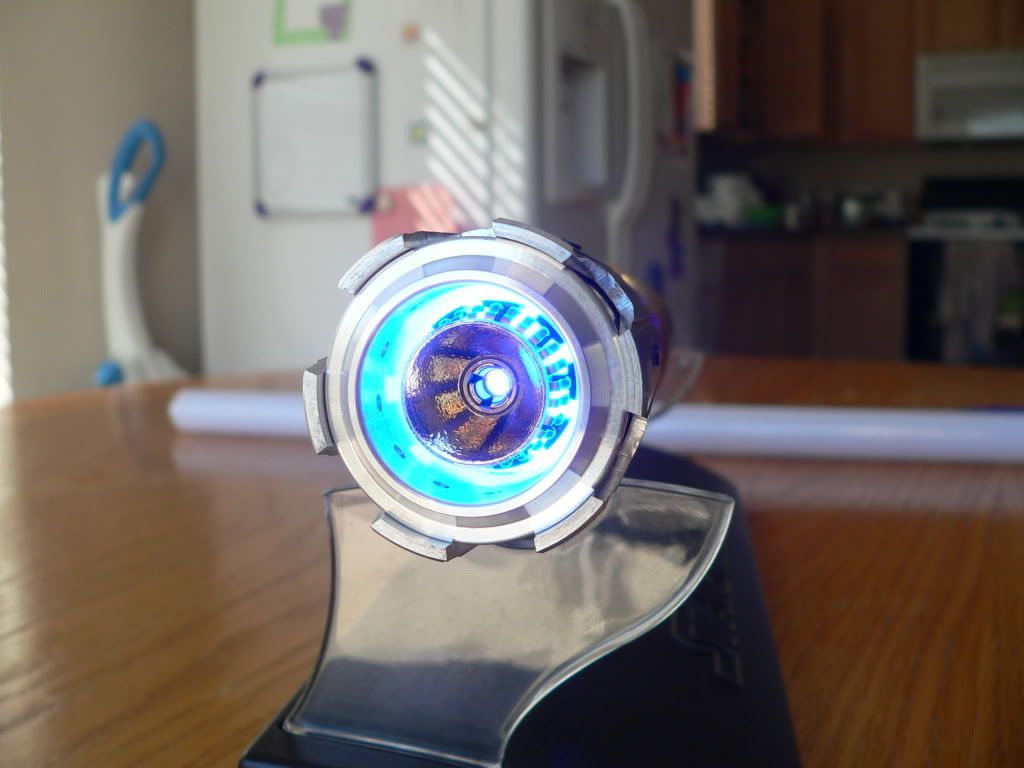
Chamber on
Just Kidding.That would blind somebody!
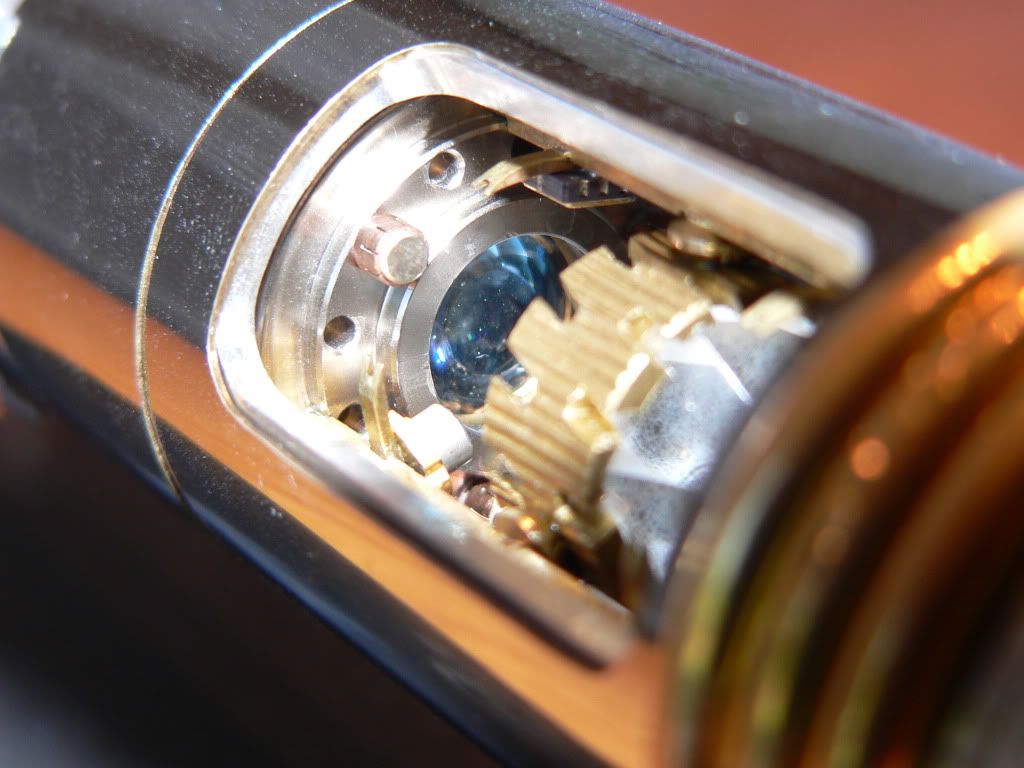
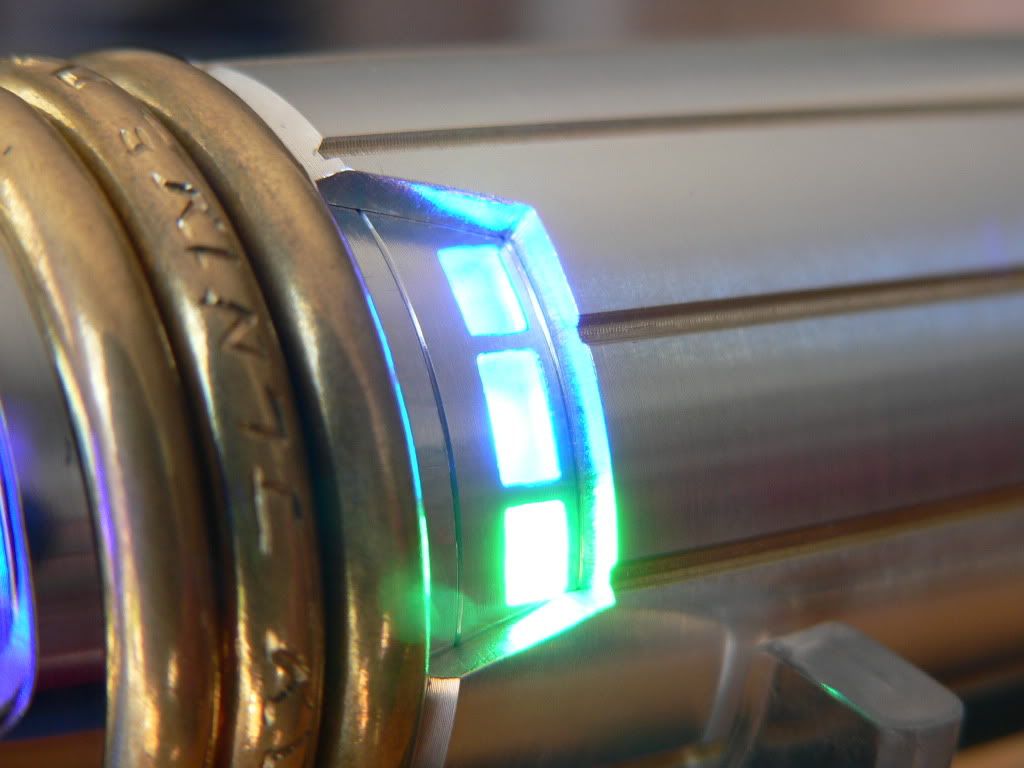
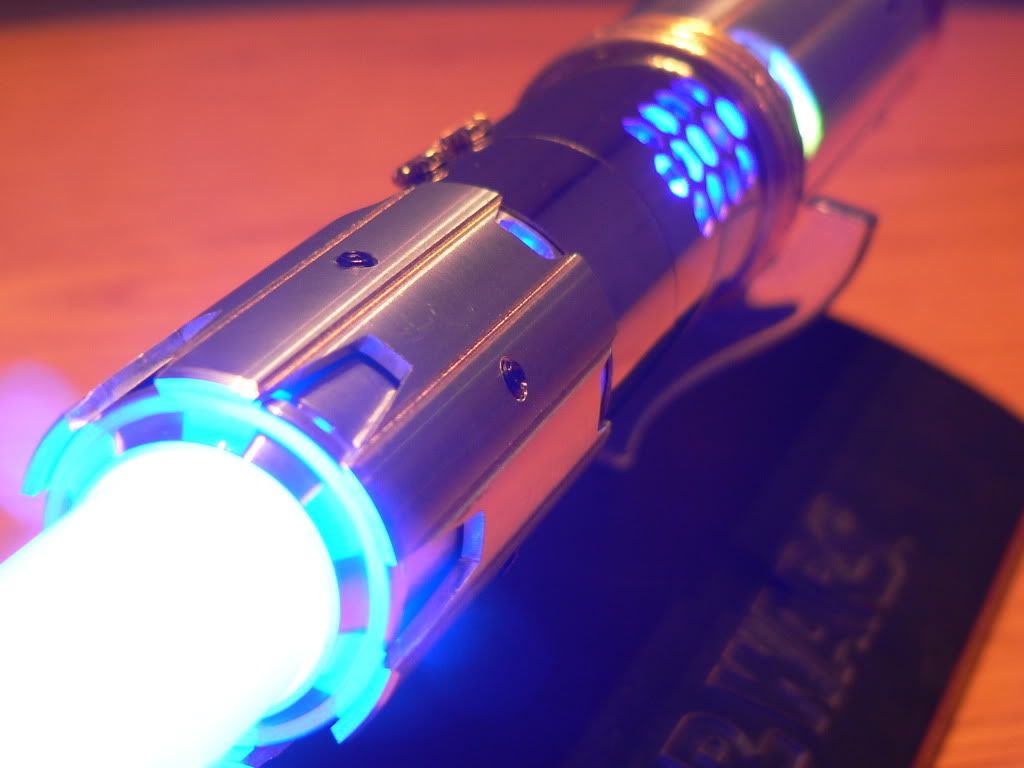
There is a 150ma 450nm blue LED that shines through the lens on the other side of the chamber. It is one of 3 that are driven by the PC main LED driver to make the chamber and air exhaust vents flicker with the blade.
I put a 10mm blue topaz in the chamber for a color crystal. I used cut, somewhat symmetrical crystals to support the idea of them focusing light/energy. I also wanted to give this chamber a more refined look. I tried to keep the chamber symmetrical and centered as if inline with the blade and directly connected to it.
I put a lot of detail in this chamber. I wanted to put some detail everywhere you could look but did not want overload it so it seemed crowded. Under the 12 sided crystal a vortex pattern is cut around the hole where the blue laser shines up from. Under the lens the blue topaz is held by a six fingered gold plated mount. Some carbon scoring and gun metal grey paint was put on some parts for definition. I tried to use noble appearing metals as they are typically used for harsh environments because of their corrosion resistance and other properties.
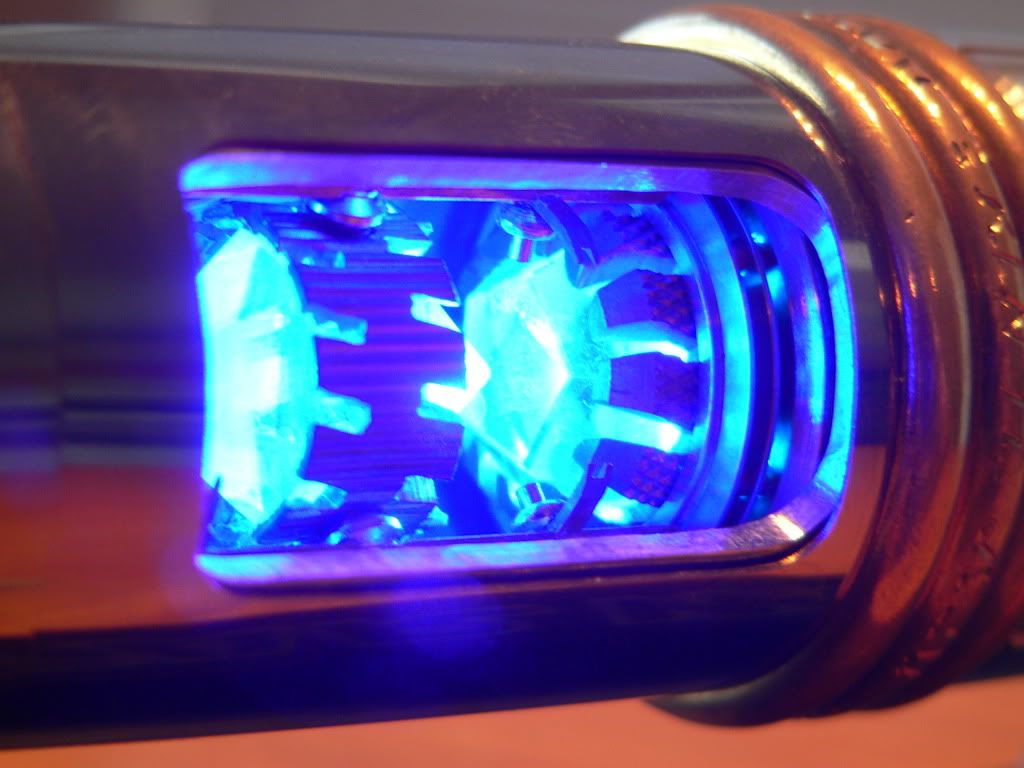
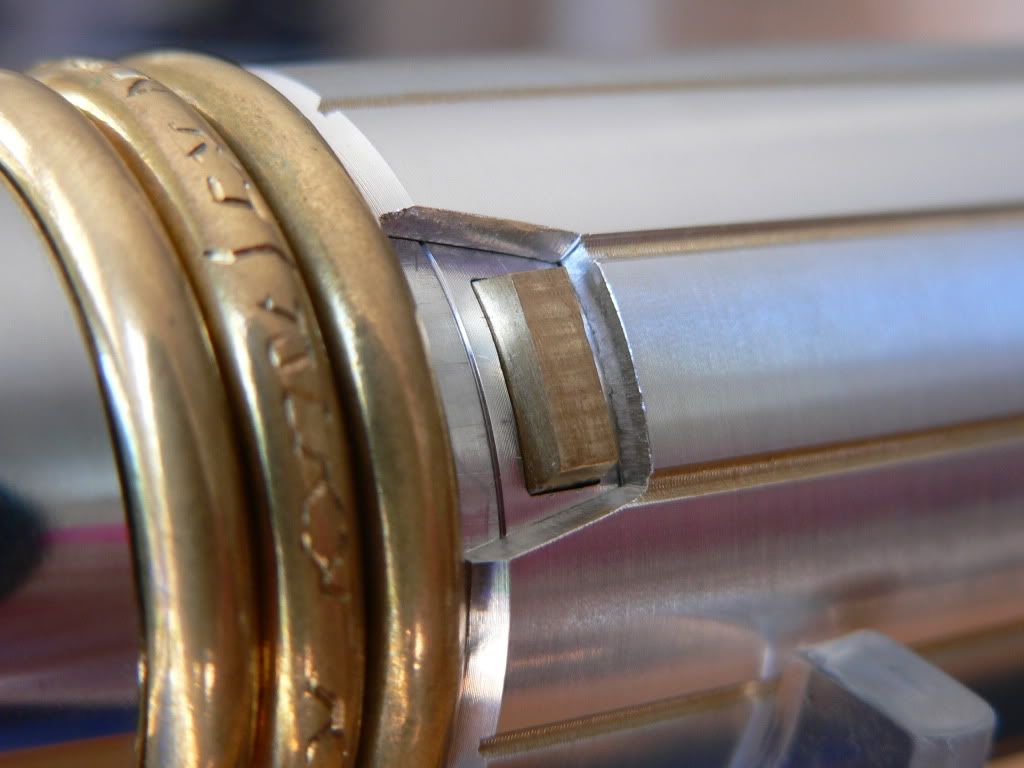
To display the chamber best I decided on a 2 way door so the chamber could be seen normally through the honeycomb holes or easily fully displayed by turning the shroud around to the open window. A 8/32 brass thumbscrew holds the shroud in place for normal use. The chamber chassis is secured in the hilt by several 8/32 set screws.
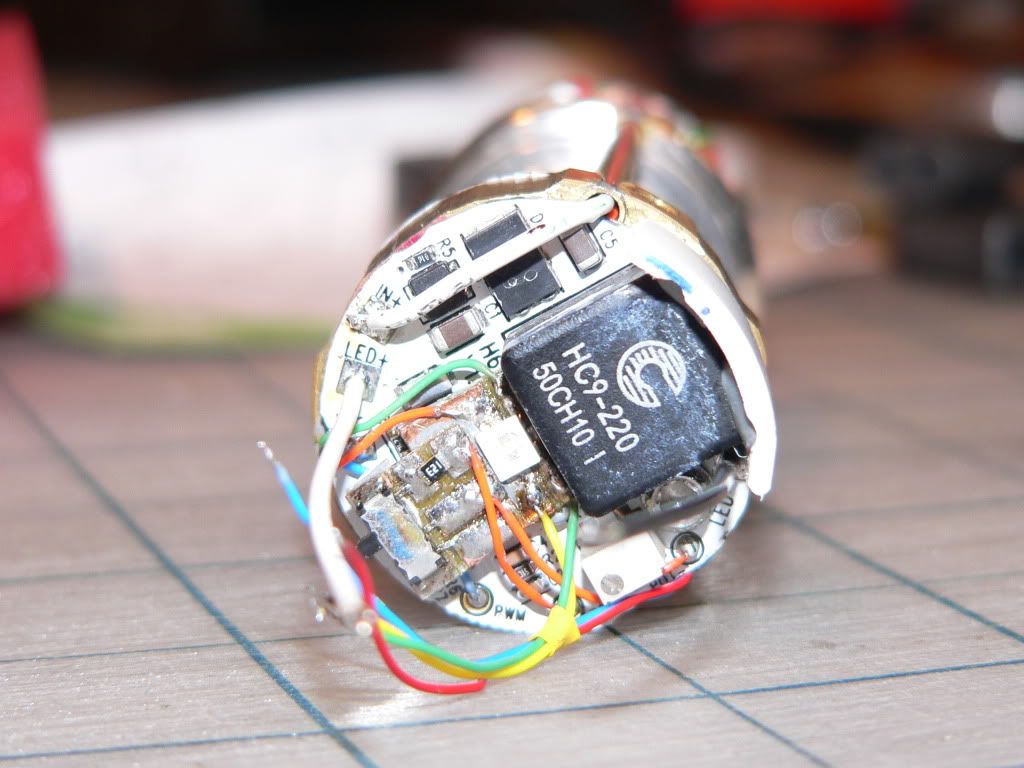
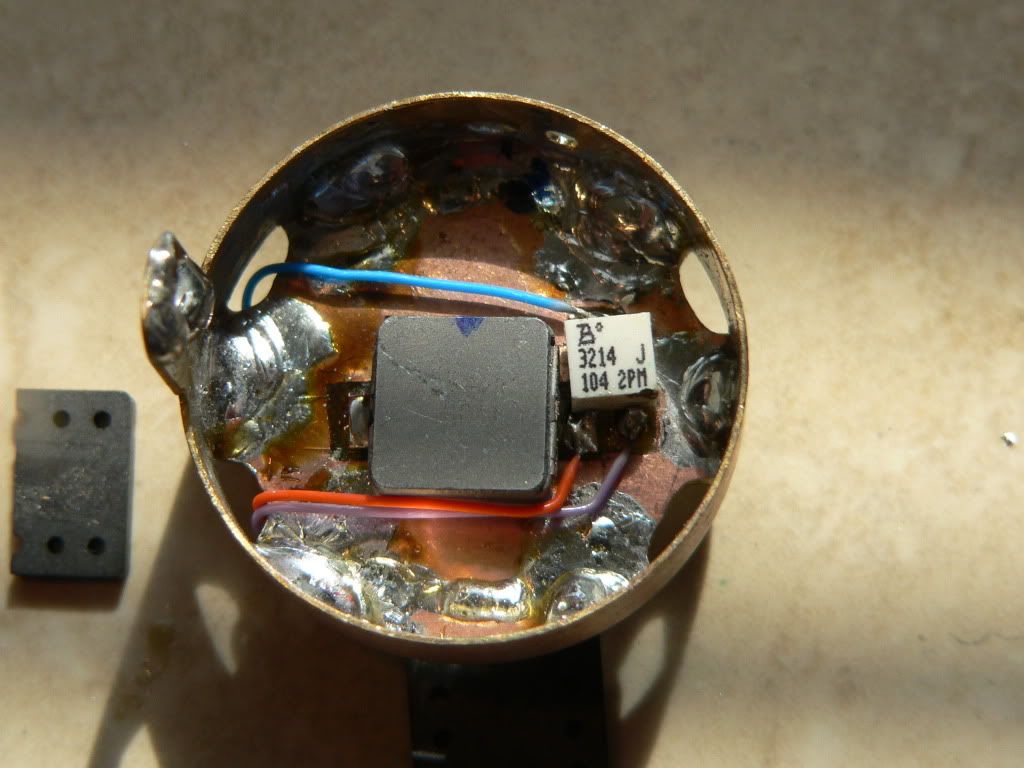
Above the chamber is the heat section with the 6.6 amp driver and the SSR90 on a finned copper heat sink. This section is cooled by a 25mm fan that sucks air from the crystal chamber and out the holes higher up.
The 6.6 amp driver can be run at 3.2 or 6.5 amps buy toggling a switch under a brass thumbscrew. The SSR90 blade effects are produced by the 6.6 amp driver being controlled by the Petite Crouton via a signal from the PC main LED drive section to the driver PWM input.
This is the 6 amp driver mounted to the top of the crystal chamber.
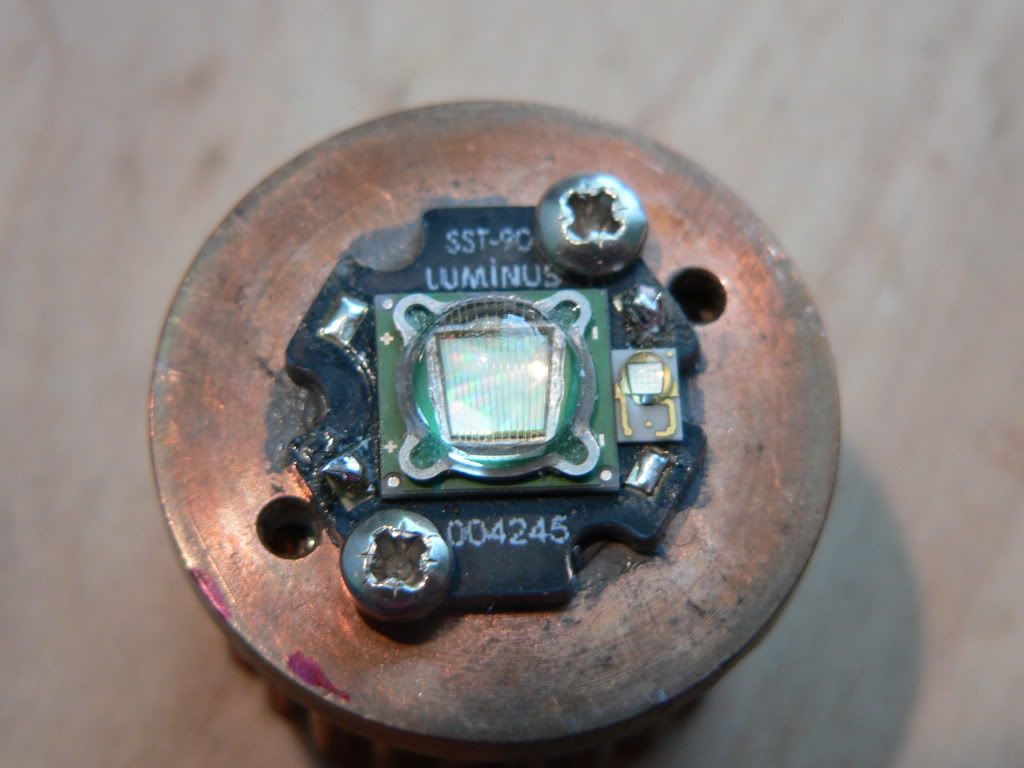
For people that have not heard me preach about the SSR90 here is a picture of one with a rebel led to the right of the big glass dome. The SSR90 has about 6 times the size and light output of a rebel.
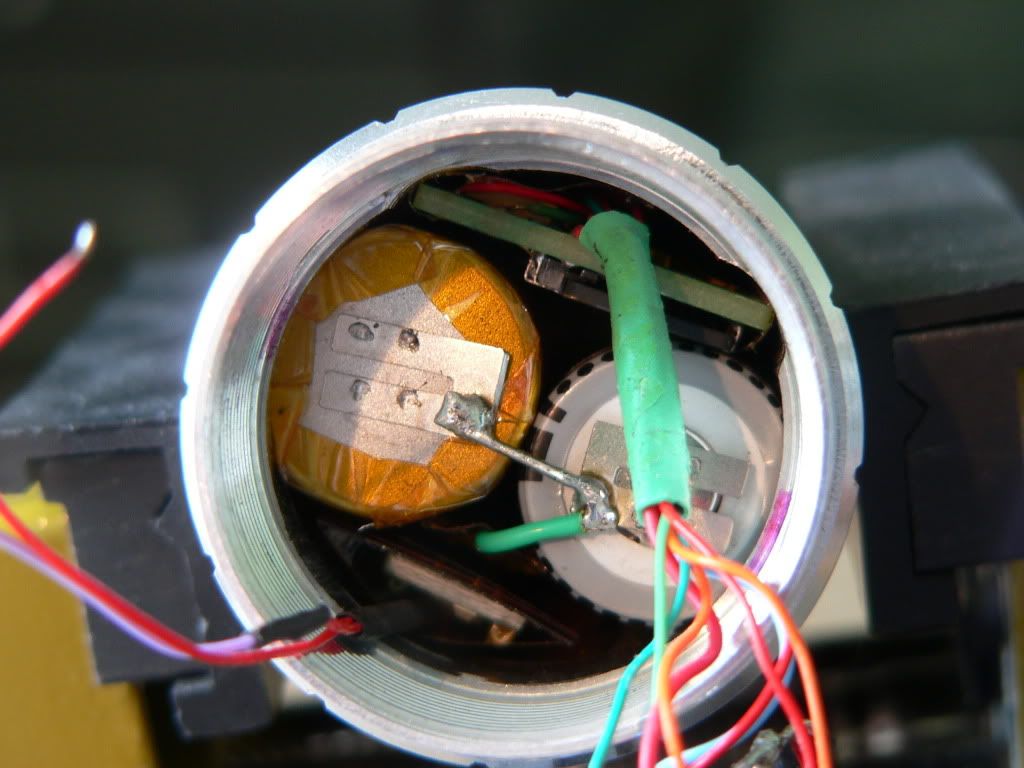
The power is supplied by 2 x 2900mah 18650s for 7.4v. The batteries are stuffed in a 4 inch double female part with a bunch of other boards. Run time is just above 40 minutes with the blade at 6 amps and an hour and 15 minutes at half power.
The speaker module is mounted in the pommel end. A 28mm speaker points toward the inside of the hilt for some low tone resonance. A 16mm speaker points out the pommel vent. A small ceramic cap is used as a passive crossover letting the small speaker produce only higher frequencies.
Here is the PC with the sensors mounted to the speaker module.
The speaker module can be removed after removing the pommel cap. This is how the PC SD card is accessed. The sensors for the PC are also mounted to the speaker module. All of the higher profile parts had to be remotely located for the PC to fit.
Here is the speaker module removed. You can see the 18650s are held tight in their channels and the PC has smaller channels so it can slide back just far enough to clear the speaker.
Power is controlled by 3 Pololu boards and 4 momentary switches. There is a 1.3mm recharge port near the 7 led display. Only 3 of these LEDs are lit by the PC but 7 (2rgb & 1 blue) can be used with a CF5. There is a 5 volt regulator that supplies power to the lasers constant current PCB and the fan.
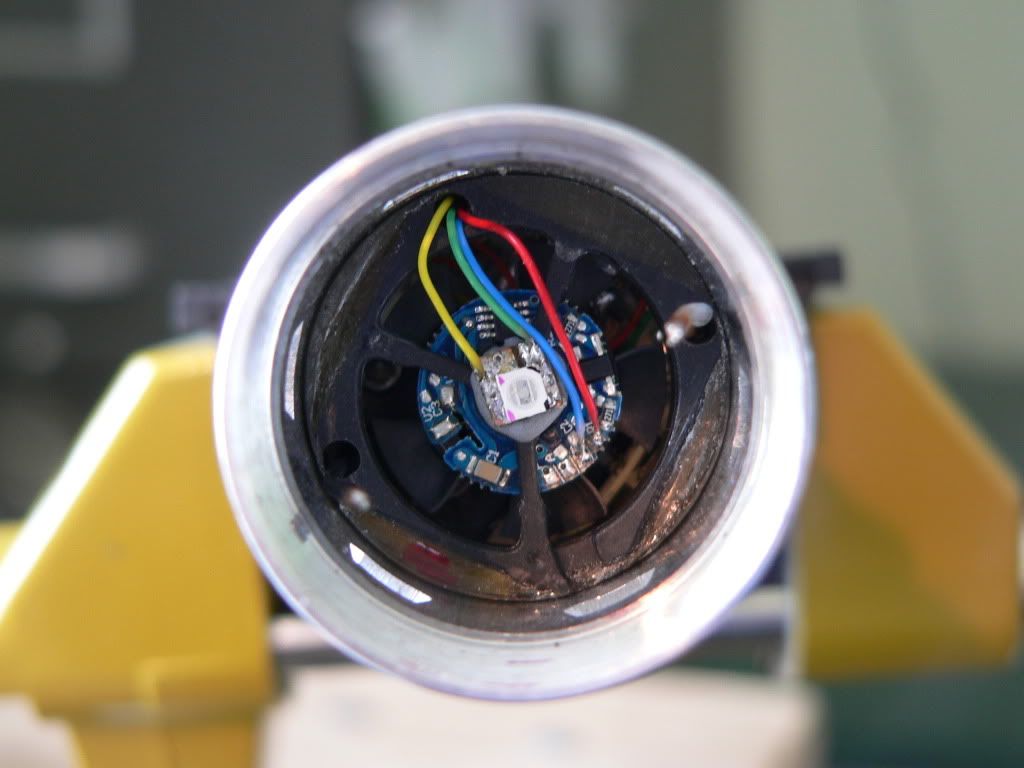
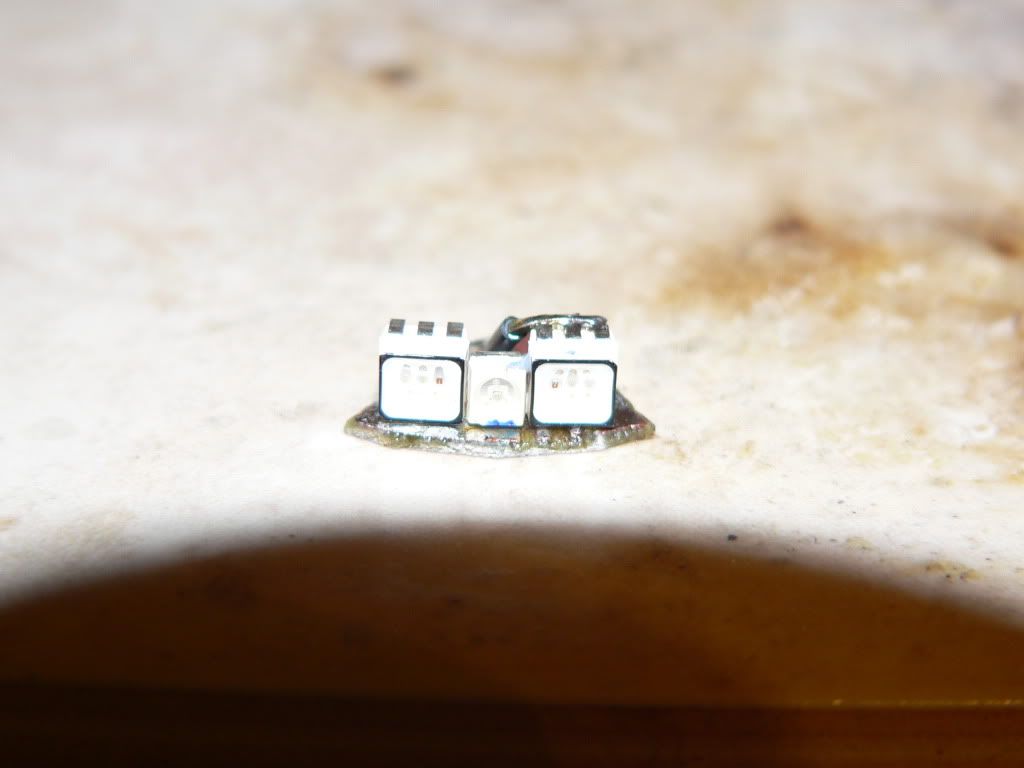
Blinky display
The LEDs mounted on their little pcb
The shroud on the emitter was done through Tim at TCSS and further modified by me for deeper cuts. The rest of the shrouds were cut with a dremel and files.
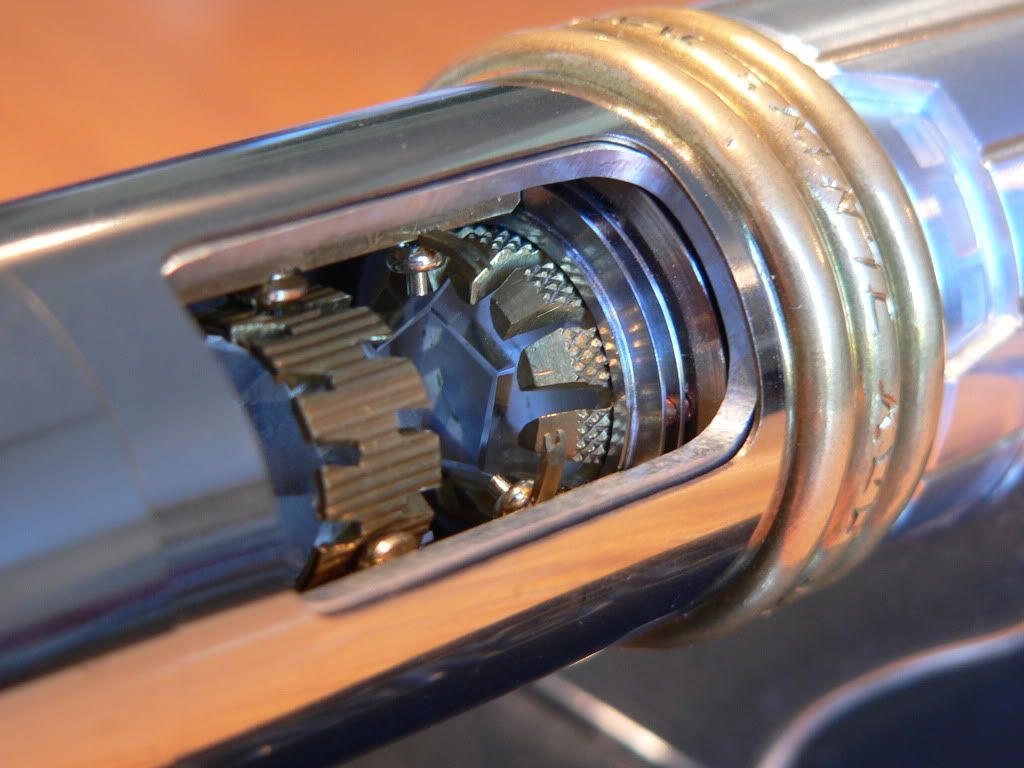
The solid brass rings were ground down on the inside to slide over the MHS parts except the one with the belt loop, which is held by the pommel cap. Two of the brass rings are engraved in sith prophecy. One says BE LIKE WATER AND FLOW WITH THE FORCE kind of a jedi statement with a little Bruce Lee thrown in. The other says THEY ARE ONE THE FORCE, THE BLADE, THE JEDI. The font may sound strange but the theme for the saber was not to be jedi but one that had seen the dark side and might need a reminder. I also engraved the brass screws with some knurl and abbreviated symbols for crystal chamber and power control. In the grooves of the grips I used some gold paint for some definition.
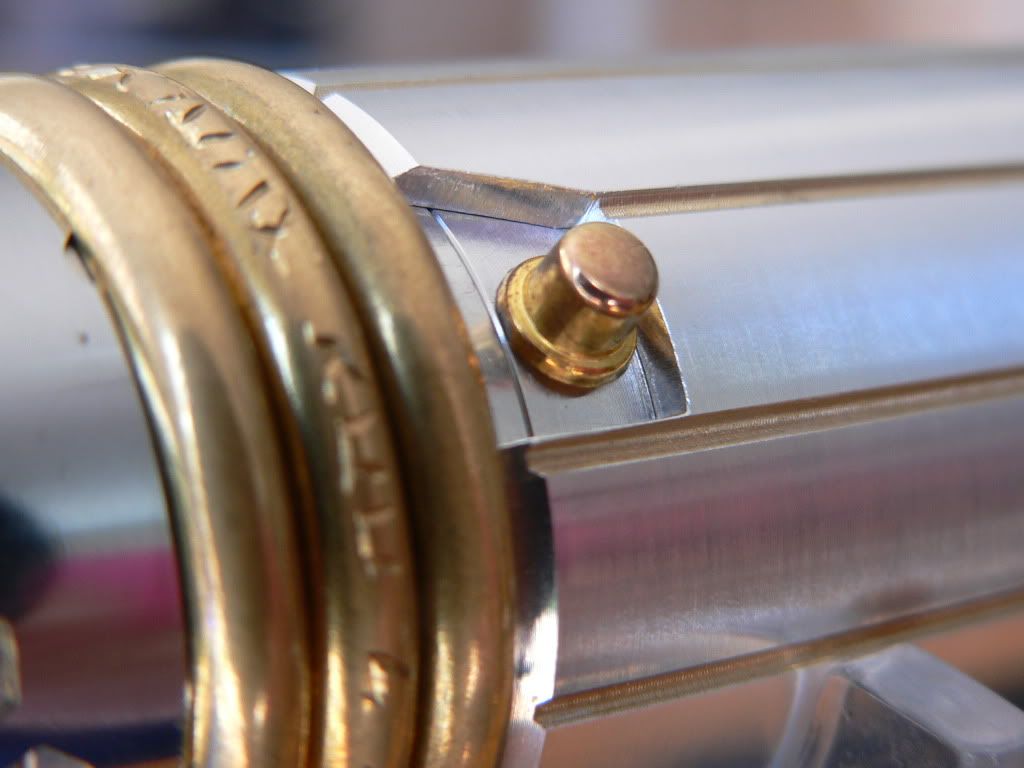
Thumbscrews and aux button
Ignition button
Recharge port
I didnt want to cut the sink tube shroud but I wanted the aux switch in the one handed grip section so it had to be done. The brass switch buttons are brass bar stock that I filed slightly slanted sides on so they could be held from the back by small momentary switches. The button in the pommel is a gold cell phone microphone with a brass bezel around it.
The hilt is 11.7 inches long. The many components are really packed in tight. I had to do a little cramming and it made for a tricky assembly. Internal sections are grouped into modules to make it easier but it is like doing surgery soldering all the tiny wires. Each section is well secured by 8/32 allen set screws, snap rings, and spacers.
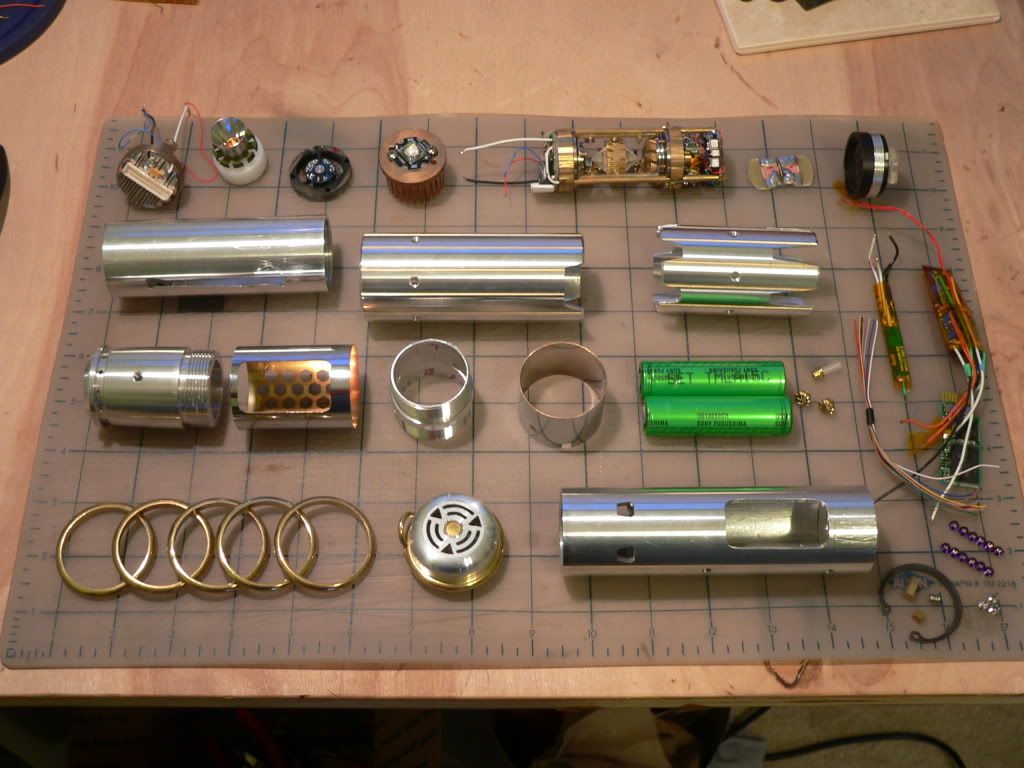
Here is how the internal components are laid out inside the hilt. As you can see there is little room left! :dft002:
Here are all he parts laid out.
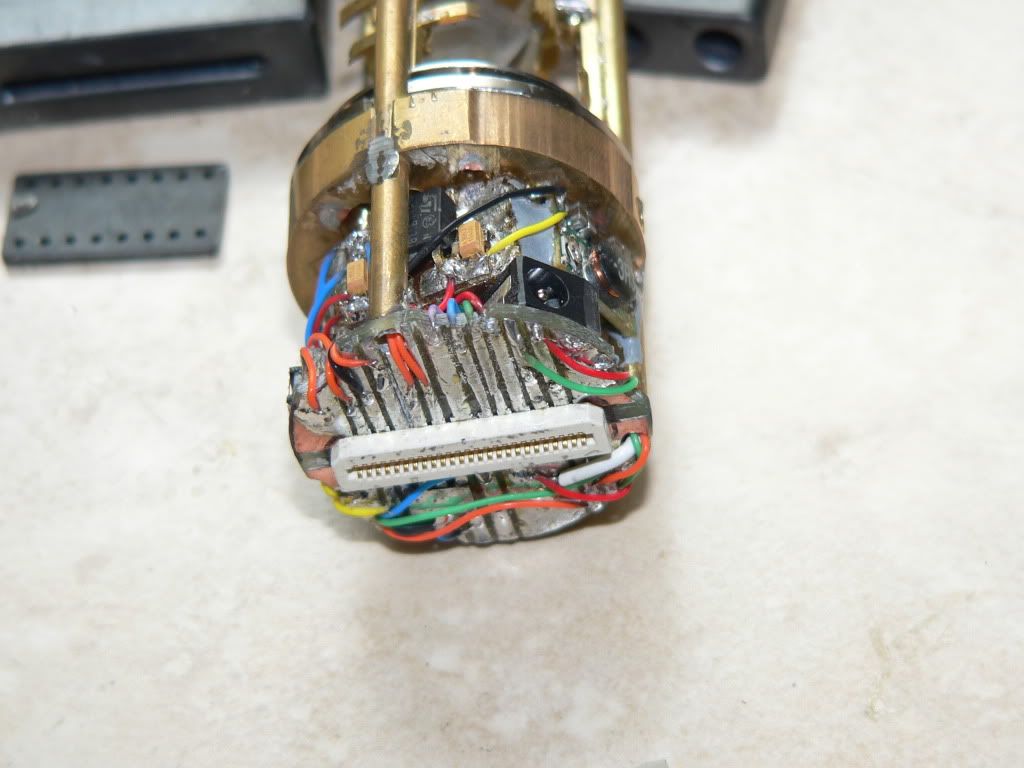
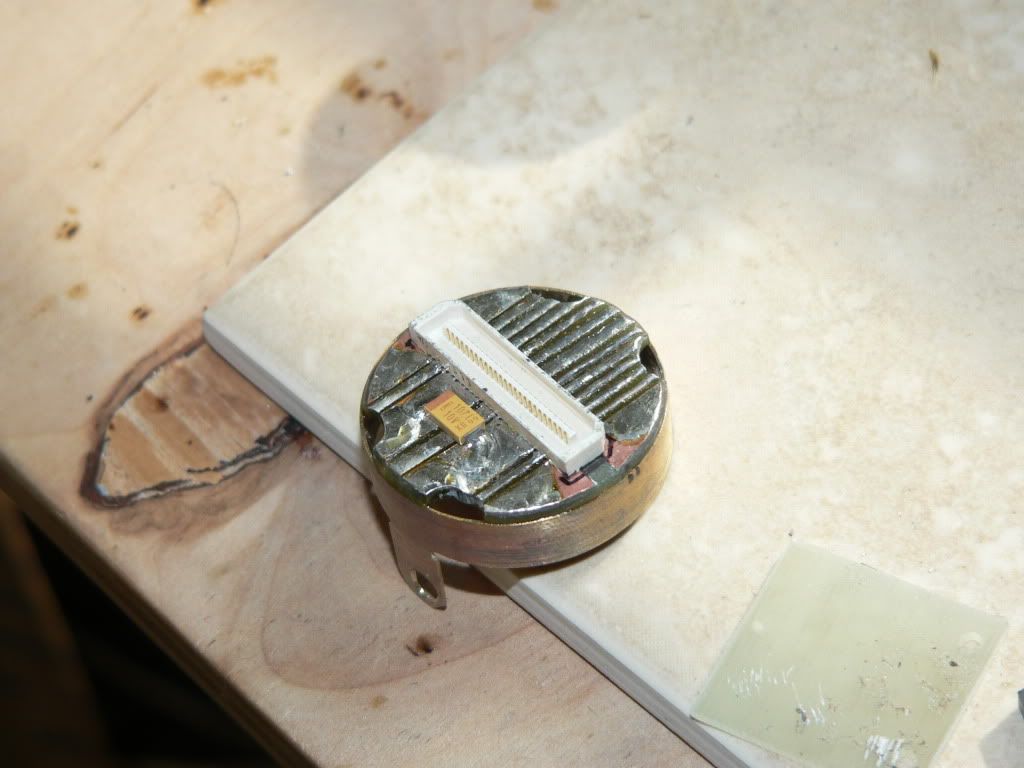
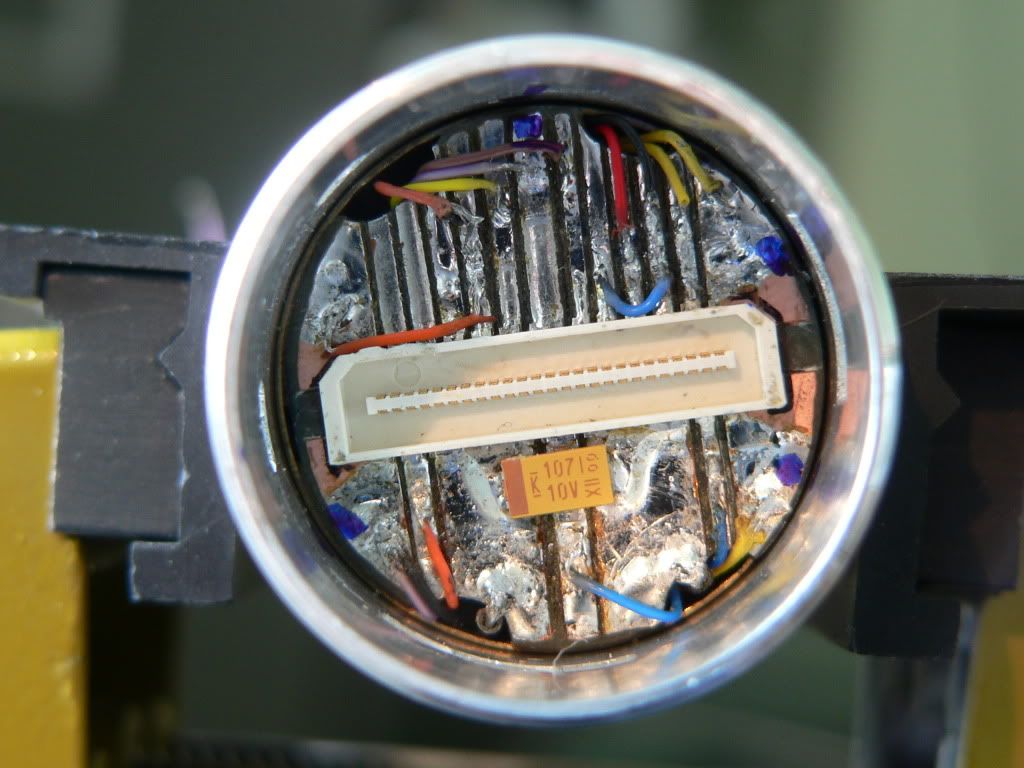
Here are both sides of the 50 pin connectors and their mounting solutions. This connector really solved several assembly problems and saved space.
This is where the Crystal chamber chassis plugs in
This is the PC large inductor remotely located to the bottom of the 50 pin connector board. The small white square part is a 10k pot I used to send a pwm signal to the 6 amp driver.
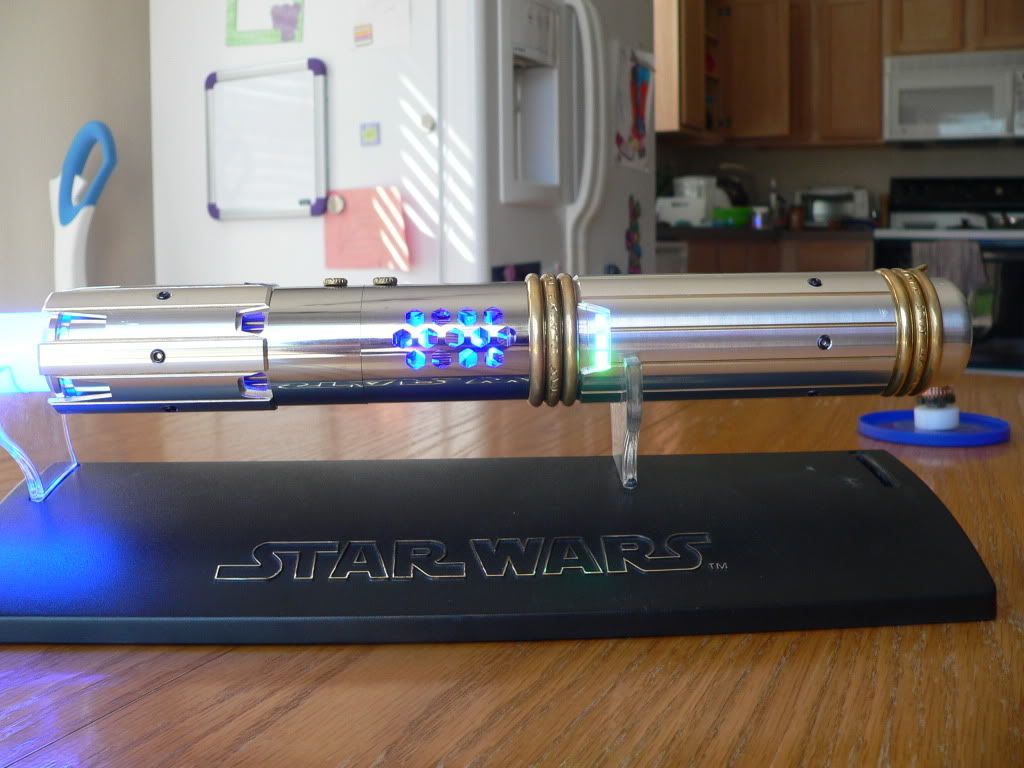
The completed pics
chamber open
I had to make a plug for it of course.
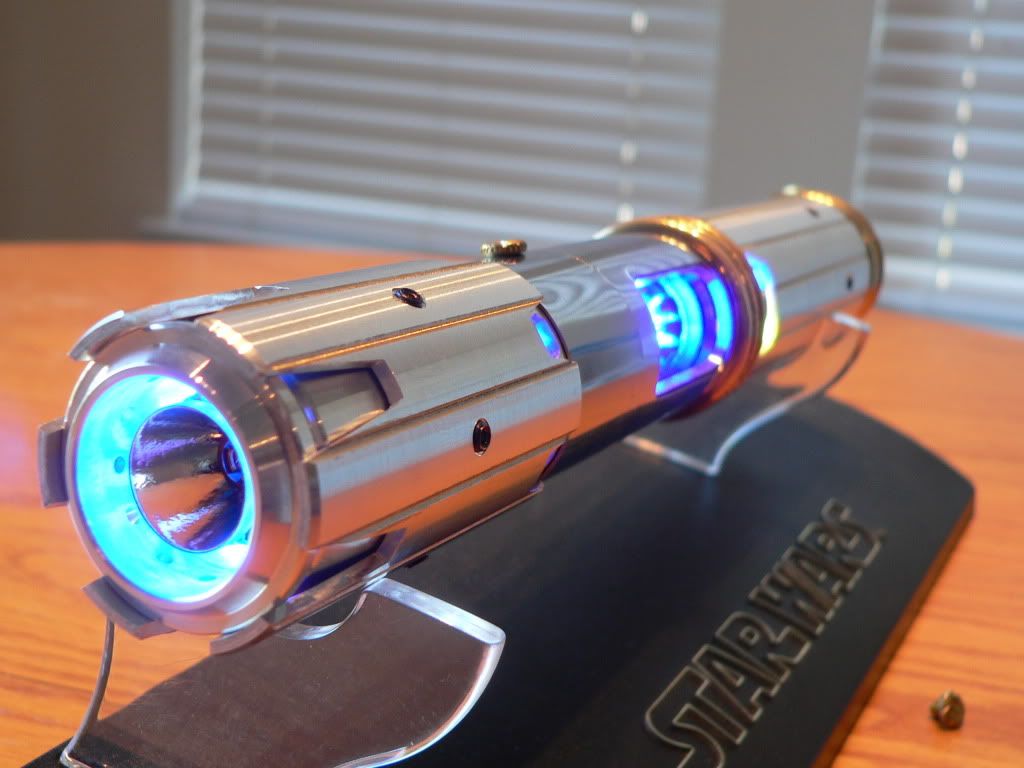
Side view
Addendum: Pololu boards are horrible for high power setups.They perform great on the bench, But it becomes evident that inside the hilt the environment is much too noisy. This seems to be due to the fact that the switch leads are a floating type circuit and small currents can be induced into those leads and trigger the board on. Also the electromagnetic noise created by the LED drivers (or anything noisy) over loads them and they dont want to turn off. I replaced two of those silly things and put a D2Flex in their place to control the ignition circuit. As it uses a grounded type switch it can share the same switch as the PC. It works much better now.
Saber function video
http://www.youtube.com/watch?v=b3RfWjVpBVc
Saber component layout video
http://www.youtube.com/watch?v=Xvg5ZPp26xo
Crystal chamber video
http://www.youtube.com/watch?v=yHIKg59Nskk
An outdoor video on a overcast afternoon.
http://www.youtube.com/watch?v=I7XoRiLKgjQ
Night outdoor video. Not sure why the video is sooo dark. The blue light seems to make my camera do weird stuff.
http://www.youtube.com/watch?v=7RNlI5_2gKE
I am happy to have gotten second place in the combined TCSS build contest. I was up against super stiff competition with the Blood Wyrm and others. I hope this build will give back a little inspiration to the community which has given me much of it.
SR


 Reply With Quote


 Shhh! Don't tell anyone! I knew Praxis was yours. It was the laser in the Crystal Chamber.


Bookmarks