Page 1 of 2 1 2 LastLast
Results 1 to 10 of 12

Thread: Inexpensive Thermal Detonator build

  1. #1

    Default Inexpensive Thermal Detonator build

    Ok can't take complete credit for this idea got the kick off from this thread but wanted to expand it.
    http://forums.thecustomsabershop.com...ead.php?t=9421

    As far as tools go you are going to need:
    drill press
    dremel or flex shaft
    reinforced metal cutting disc for dremel
    JB weld
    metal files
    soldering iron
    solder w/resin core

    Materials:
    2-stainless steel ice cream scoops
    1-1.25" electrical box adapter
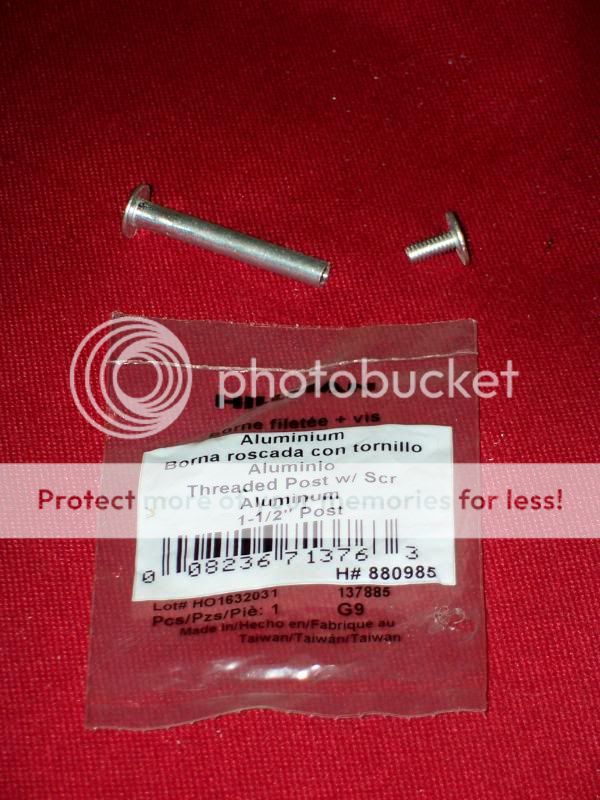
    1-1.5" aluminum screw and post connector
    1-1.5" 8-32 socket head screw
    3-5mm 3v yellow leds
    1-5mm 1.7v red led
    1-33ohm resistor
    1-5 pack of 5mm led folders
    1-12v red led assembly
    2-n cell battery holders
    2-n cell batteries
    4-0.5mm tall tactile momentary switches
    plastic material from making top switch
    wiring

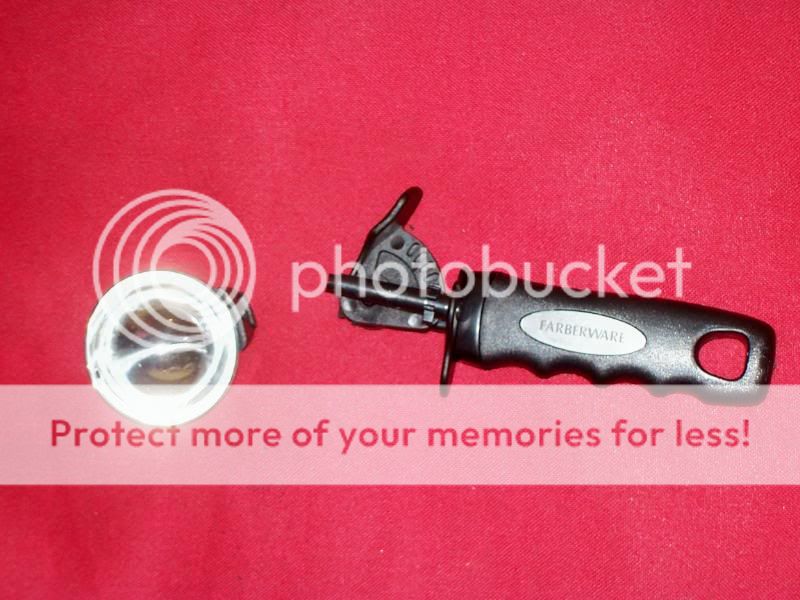
    First here is the scoop i used it is made by faberware cost like 4 bucks.

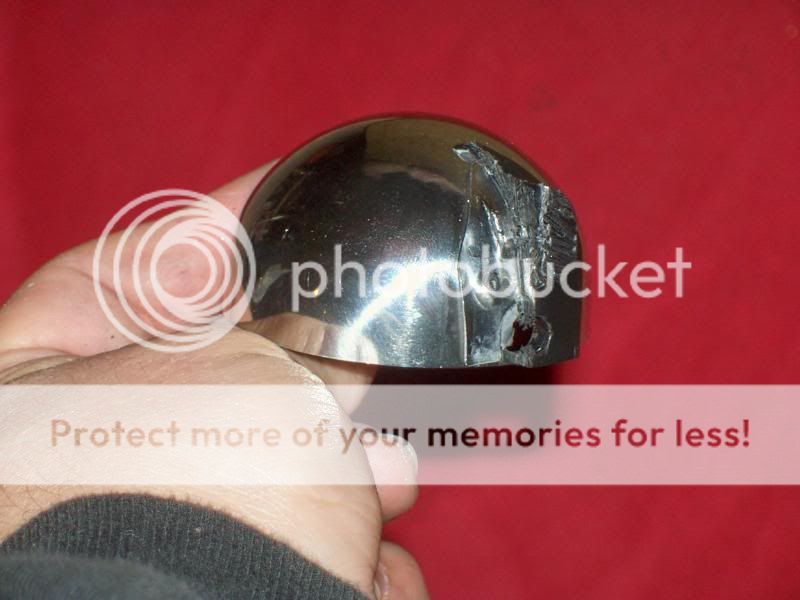
    Then cut the scoop off.

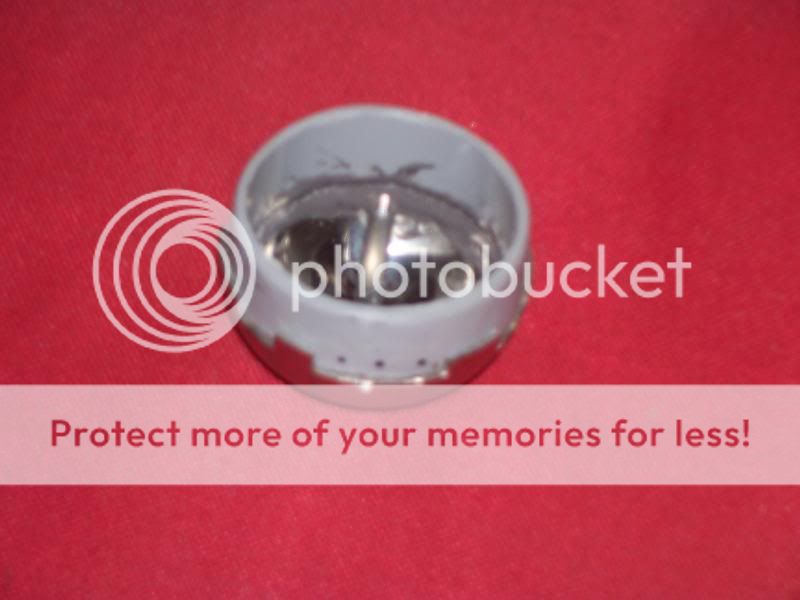
    After you get the scoop cut off you have t remove the plastic that is attached to the scoop and a metal plate that is spot welded to the scoop that holds the plastic on.


    After you get just the scoop you should file or sand down the spot welds the lay out the guide lines for the sectioning grooves you cut in with the dremel metal cutter as well as the notches along the bottom just be sure to cut high enough to remove the two holes in the scoop from the swing arm. In the second pic you see the holes i drilled as close to center on the top of each piece this will become important later.


    Be sure that when planning the notches to remember the need to mirror each other top to bottom. *And label which is which* You may also want to trim down the protruding portions a bit.

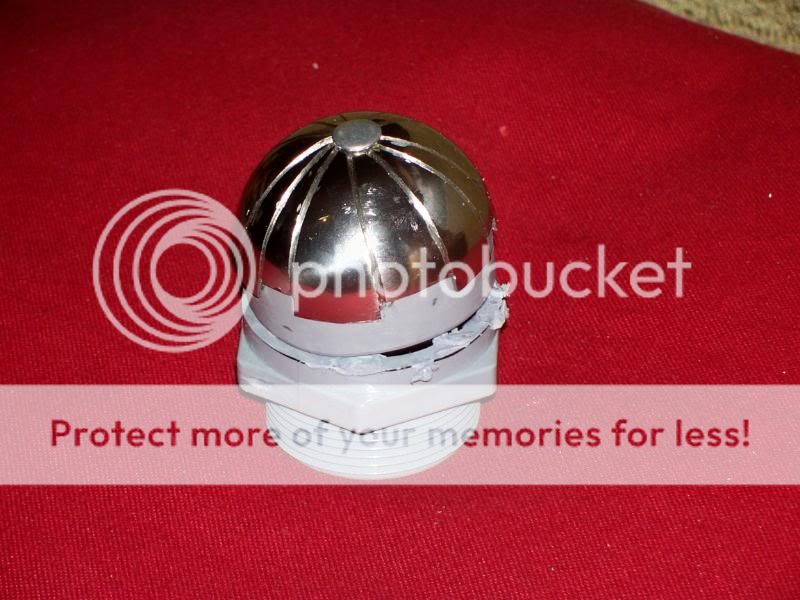
    Ok now for the electrical box adapter you need to cut it off just before the lip in front of the threads.

    After cutting it off you would need to file it a bit to get it to fit into the scoop. Then just JB weld it in place. I suggest that you affix it to the bottom portion.

    Now that one half is ready get the screw post and JB weld it through the hole in the center of the piece.(don't have pic of it from the inside, sorry)


    Then use the 8-32 screw through the top hole and it should hold together like so.

    Apology in advance no picks for wiring section or for switch makeing.
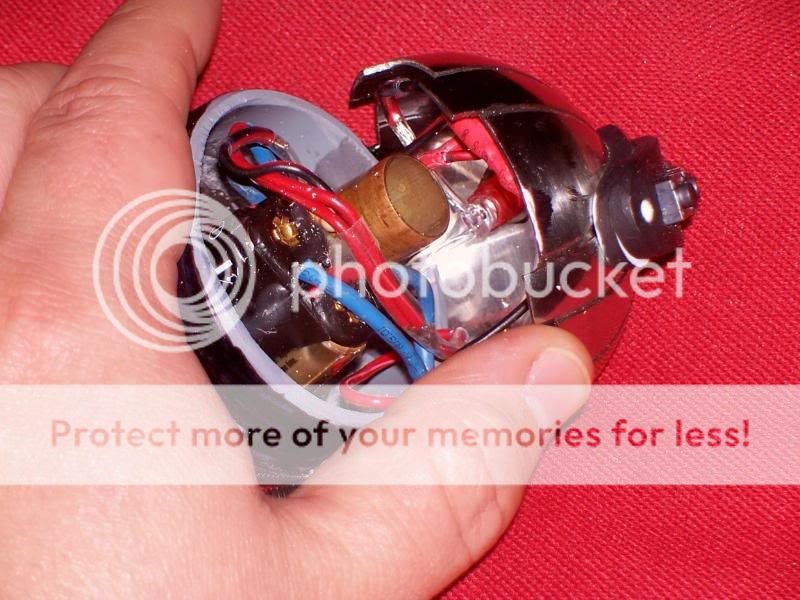
    Need to drill 6 more holes for the leds, 3 in the center section for the yellows and one in top section about 2/3 of the way up to the screw for the red assembly piece.You won't use the assembly its self just the holder piece by removing the led and resistor inside it the just slip the red 5mm led in after you have it all wired up. And the another 2 holes in the back of the top to allow for switch wires to come out and a screw for holding on the switch body.
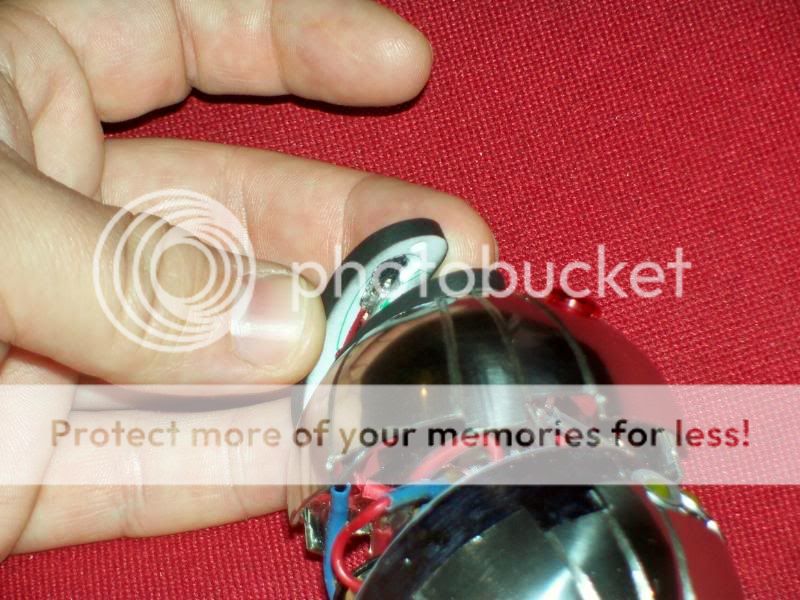
    After that you need to wire up and solder together your leds and power supply. then run the wires out through one of the holes in the back.then through the switch body. I used one tactile switch to activate the leds and the other three are just for show. I made the switch body a two piece so I could cover the the main body screw with it.
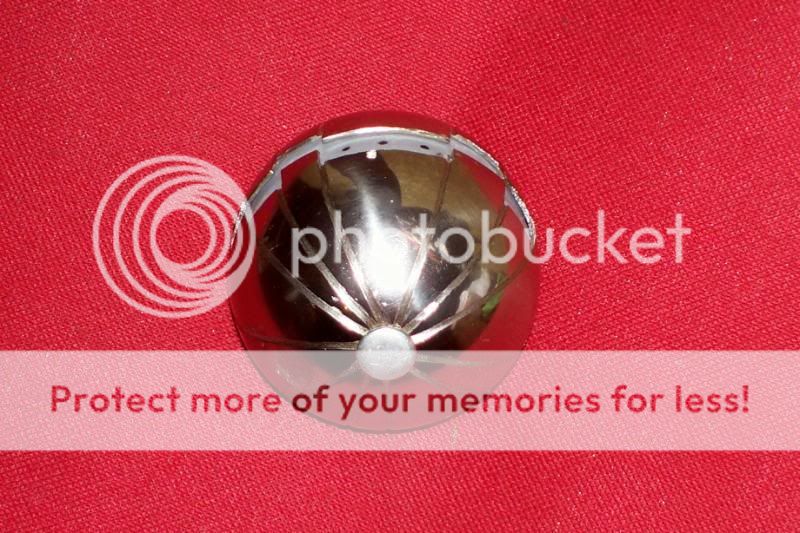
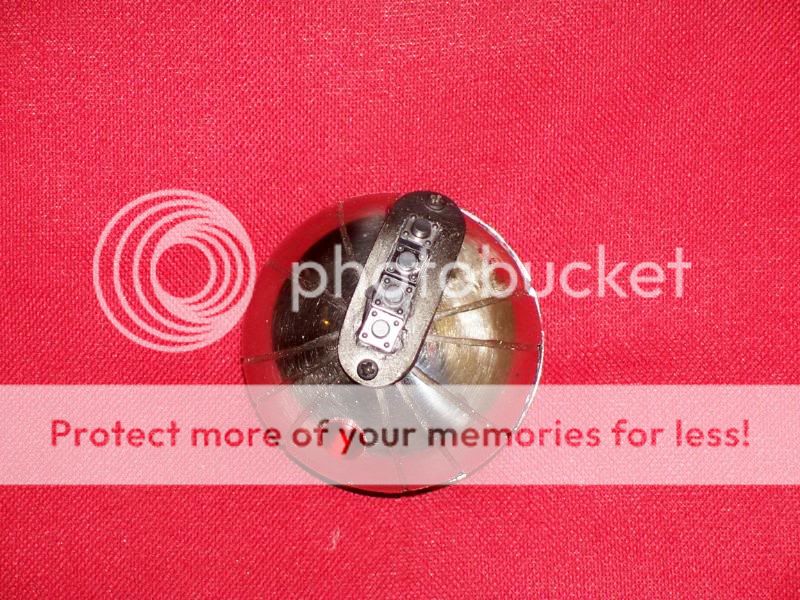
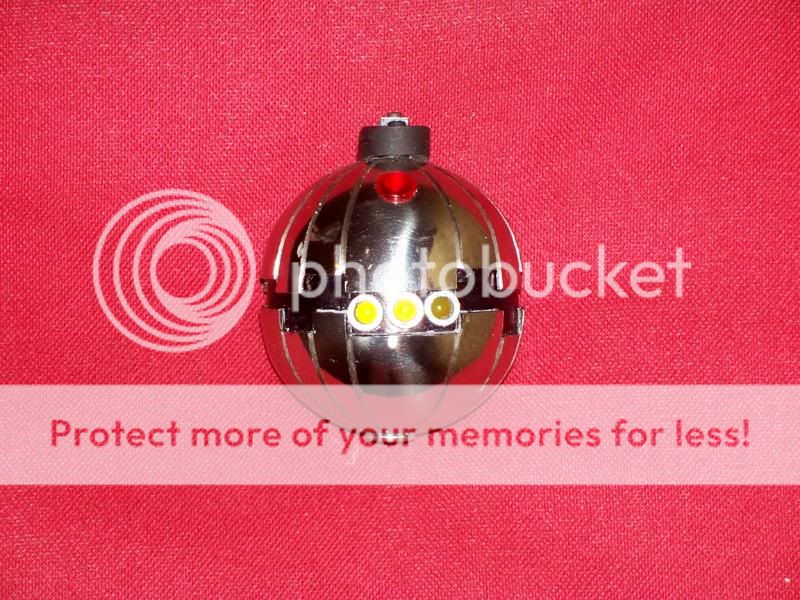
    Per recommendation i have added these 4 pics in the first is the switch body being separated to reveal the main screw. The second shows the battery pack made from 2 single n cell holders as well as the red led in the top section. The third shows the battery pack and the three yellow leds and the resistor for the red one. The last one is the bottom of the top of the switch showing the wires leading to the momentary which that turns it on. Should have taken these during construction sorry they aren't better.


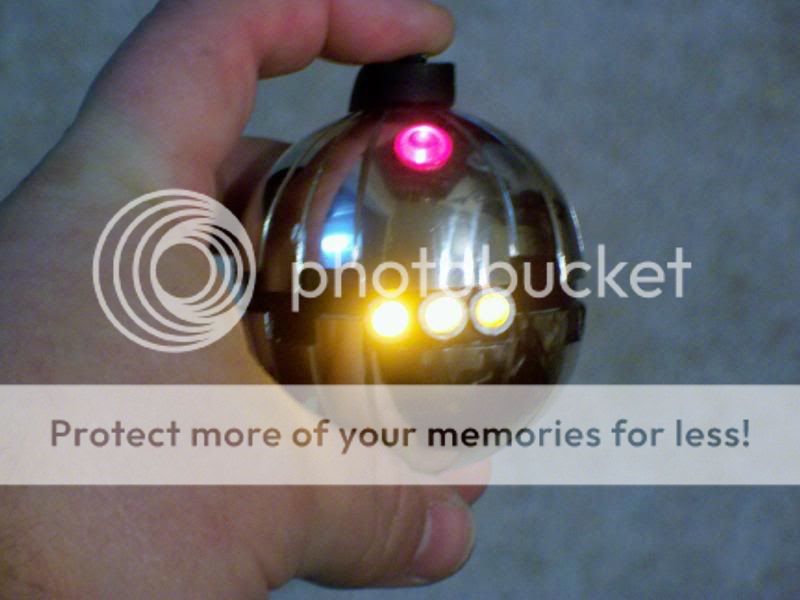
    i used a sharpie to turn the center section black and spray painted the led holders silver and the switch body black. And then this is what the result is.


    last photo is with no flash it washes out the led but they can be seen clearly in a bright room. And the whole thing cost less then 50 bucks by the end.
    Last edited by Goltar Bias; 11-16-2009 at 08:13 AM.
    "Art is never finished, merely abandoned." Da Vinci

  2. #2
    Force Aware Nineteen's Avatar
    Join Date
    Oct 2008
    Location
    Northwest Missouri
    Posts
    115

    Default

    Very nice, I like it. The next step, IMO, would be to "rust it up." Great job!
    "The man in black fled across the desert, and the gunslinger followed."

  3. #3
    Council Member
    Jedi Council Member
    Rhyen Skytracker's Avatar
    Join Date
    Feb 2009
    Location
    Covington, GA
    Posts
    2,550

    Default

    Awesome job. I like it.

    Live long and...I mean May the force be with you. http://saberconcepts.50.forumer.com/index.php

  4. #4
    Jedi Master Kal El Rah's Avatar
    Join Date
    Jul 2008
    Location
    High in the hiltops of the SIMI Valley
    Posts
    1,378

    Default

    Excellent, just excellent, and a very nice tute too.
    I'M JUST A SPY(LOL)

  5. #5
    Council Member
    Jedi Council Member
    Jedi-Loreen's Avatar
    Join Date
    Dec 2005
    Location
    Not of this Earth
    Posts
    6,077

    Default

    You should have taken pics of the electronics, though.
    In order to see the Light,
    you must sometimes risk the Dark.
    TCSS MODERATOR


    BLUE 8 Ready to ROCK and ROLL!

  6. #6
    Sith Minion mihunai's Avatar
    Join Date
    Mar 2009
    Location
    The Netherlands
    Posts
    449

    Default

    Lookin' good!
    The tutorial is nice, but a wiring pic. would indeed be helpfull.
    It would show where the switch is, and where you managed to fit a battery
    next to that 'core' holding it together.

    mTm


    Official Owner of Skottsaber at Bowling

  7. #7
    Council Member
    Jedi Council Member
    Jedi-Loreen's Avatar
    Join Date
    Dec 2005
    Location
    Not of this Earth
    Posts
    6,077

    Default

    That's why he used "N" cells, they're maybe 1/2- 2/3 the length of a AAA cell.
    In order to see the Light,
    you must sometimes risk the Dark.
    TCSS MODERATOR


    BLUE 8 Ready to ROCK and ROLL!

  8. #8
    Sith Minion mihunai's Avatar
    Join Date
    Mar 2009
    Location
    The Netherlands
    Posts
    449

    Wink

    N-Cells? Intersting idea...
    That reminds me, can rechargable NiMh's be reloaded recharged while in the holder, without
    blowing up or anything like the LithIons?

    mTm
    Last edited by mihunai; 11-15-2009 at 02:32 PM. Reason: J-Lo


    Official Owner of Skottsaber at Bowling

  9. #9
    Council Member
    Jedi Council Member
    Jedi-Loreen's Avatar
    Join Date
    Dec 2005
    Location
    Not of this Earth
    Posts
    6,077

    Default

    Do you mean recharged?

    Rechargeable cells might be too long, which is probably why he went with N cells because they are shorter.

    Otherwise, he probably would have gone with AAA or AA cells, since they are cheaper.

    Remember, there's a post going through the center, so you couldn't put something longer inside it diagonally.

    The only thing that would have made this better, to me, would have been if he'd been able to use a slide switch, instead of a tactile and had the whole thumb trigger able to slide back and forth.

    That might be kind of hard though, not having the access to a prop department.
    In order to see the Light,
    you must sometimes risk the Dark.
    TCSS MODERATOR


    BLUE 8 Ready to ROCK and ROLL!

  10. #10
    Sith Minion mihunai's Avatar
    Join Date
    Mar 2009
    Location
    The Netherlands
    Posts
    449

    Default

    That is my plan though...
    And since mine wont have a center core (it just sounds better ),
    I can fit a battery in there.
    I allready successfully testfitted a double AAA holder.
    So ill probably try 2 rechargeable AAA's in mine.
    If they can be recharged 'in-hilt' to use a more popular term
    .
    There is this guy T_Bone on the FX forums that made a great Boush Bomb,
    and a matching tutorial, which was the 'spark' that got me making mine,
    which in turn made Goltar Bias make this one, apparently.

    I am just waiting for a sheet of Stainless Steel to make the center section of,
    and a not-so-rainy day so i can start dremeling the top slot for the slide-switch.

    But lets stay to this Boush Bomb for now

    mTm


    Official Owner of Skottsaber at Bowling

Bookmarks

Posting Permissions

  • You may not post new threads
  • You may not post replies
  • You may not post attachments
  • You may not edit your posts
  •