Results 1 to 10 of 10

Thread: Creatively Hiding/Disguising a on/off Push Button

  1. #1

    Default Creatively Hiding/Disguising a on/off Push Button

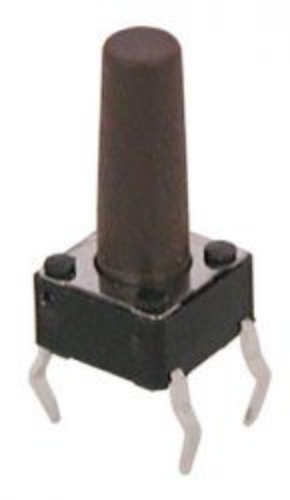
    I have one of the black on/off push buttons sold in the TCSS store.

    I was wondering if anyone had any ideas or examples as to how to make the button more discrete or hidden if it were?

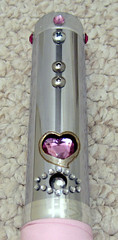
    I was thinking of having a gold washer of sorts and a jewel on top of the button to 'hide' it as it were. Sure more people will be drawn to that area, but they won't know it's a push button.

    Thanks!

    Randy

  2. #2

    Default

    Good idea.

    Maybe use the gold or copper ani buttons epoxied on top?

  3. #3
    Jedi Knight cannibal869's Avatar
    Join Date
    Sep 2008
    Location
    Home of NUCLEAR JEDI SABERS
    Posts
    1,027

    Default

    If your saber uses a momentary button for activation, you can basically glue anything on top of the button and as long as it's recessed properly, it'll look like the button is "hidden". This is especially true for the tactile momentary switches that Tim sells in the store.

    Case in point: I used this switch
    http://www.thecustomsabershop.com/SP...itch-P285.aspx

    underneath the round "diamond" here:


    You could probably do this with the latching buttons too, but it might be a tad bit harder.
    LOCKHEED

  4. #4

    Default

    Quote Originally Posted by cannibal869 View Post
    Case in point: I used this switch underneath the round "diamond" here:


    You could probably do this with the latching buttons too, but it might be a tad bit harder.
    Off topic: That is one cute saber. Do you have a photo album of it online somewhere? It reminds me a bit of one of the two sabers I made for Japanese singer Yui Horie's show at the Budokan in September (and which, incidentally, uses that same tactile switch).

    On topic: That switch cannibal869 recommends, when used on a matte black surface with a very small hole, is all but invisible. The switch on my MHS-based Qui-Gon-style hilt is about an inch to the left of the charge port:
    There's always a bigger fish.

  5. #5
    Jedi Knight cannibal869's Avatar
    Join Date
    Sep 2008
    Location
    Home of NUCLEAR JEDI SABERS
    Posts
    1,027

    Default

    Quote Originally Posted by Matt Thorn View Post
    Off topic: That is one cute saber. Do you have a photo album of it online somewhere?
    ask and ye shall receive...
    http://forums.thecustomsabershop.com...ight=valentine
    LOCKHEED

  6. #6

    Default

    Quote Originally Posted by Matt Thorn View Post
    Off topic: That is one cute saber. Do you have a photo album of it online somewhere? It reminds me a bit of one of the two sabers I made for Japanese singer Yui Horie's show at the Budokan in September (and which, incidentally, uses that same tactile switch).

    On topic: That switch cannibal869 recommends, when used on a matte black surface with a very small hole, is all but invisible. The switch on my MHS-based Qui-Gon-style hilt is about an inch to the left of the charge port:
    I just wanted to ask you guys how you actually mount this on a saber. Do you just glue it with super glue?

  7. #7

    Default

    Quote Originally Posted by dj2rbo View Post
    I just wanted to ask you guys how you actually mount this on a saber. Do you just glue it with super glue?
    No. There are any number ways to do it, but in my case I mounted the tactile switch to a PCB which I cut down to minimum size, and held the PCB in place with a small section cut from the blade of a Hasbro lightsaber toy. The plastic is flexible enough to insert in the hilt, but firm enough to push down on the PCB/switch. The plastic tube is held in place by the cosmetic red knob on the other side of the hilt. There is a hole in the plastic which the thumbscrew penetrates to keep the plastic tube from sliding or turning. The plastic also insulates the contacts on the switch. I'll be making another one soon, so I'll try to remember to take photos.

    These days I try to build my hilts so that they can easily be taken apart and put back together, because I almost invariably find that after I've got everything together and think it's finished, I discover some problem or another, and need to dismantle the hilt. (One thing I've done so many times it's made me wonder if I have dyslexia is wire my charge port wrong. You would think I would have this image memorized by now, but apparently I don't. )

    So, I always think twice before using superglue or J-B Weld for anything.
    There's always a bigger fish.

  8. #8

    Default

    If its the standard on/off button I'm thinking about, you may wanna check this out its sold on TCSS site>

    http://www.thecustomsabershop.com/Sw...-Nut-P270.aspx

    I got one for my 3 piece MHS build and....I LOVE IT. It hides the button and also helps prevent you pushing it by accident. Just remember to screw the black nut on BEFORE you insert it inside the hilt, then screw the bezel on the outside.

    Hope this helps you.

  9. #9

    Default

    I used the section of hasbro blade to hold a mom switch in place, but. I have found that a film can works better. If you use a small section with the end still there, it act to stiffen the plastic. The blade plastic seems softer.

  10. #10

    Default

    I once machined a pommel to house a standard latching TCSS switch that was completely hidden. l had to machine a few other pieces that go inside the pommel as well to make it all work. Basically you just pressed on a "gem" at the bottom of the pommel to turn the saber on or off. Of course, this method requires access to a lathe. Anywho, here's some pics and a vid of said saber...


    http://s6.photobucket.com/albums/y23...0Saber%20Hilts

    From Wikipedia: "Internet Explorer slows down GIFs if the framerate is 20 frames per second or higher and Microsoft reports that Google Chrome and Safari also slow down some GIF animations."

Bookmarks

Posting Permissions

  • You may not post new threads
  • You may not post replies
  • You may not post attachments
  • You may not edit your posts
  •