Page 3 of 4 FirstFirst 1 2 3 4 LastLast
Results 21 to 30 of 33

Thread: From Zero to Saber

  1. #21

    Default

    Thanks for your kind replys

    I have added a Video now in the first Post

    The insulation was done by taping some film into the 7" extension. Most of my electronics is in there so I have no risk of short something. Also I additional taped done all wires to the Li/Ion cells. The other parts were insulated using different kinds of heatshrink.

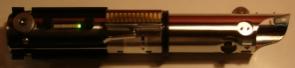
    Once I had done the first overlay it looked quiet nice. But for me to much chrom and to much similar fields on the saber. I have thought about skipping my design plans, but I did go on with the planned second overlay.
    There is one big advantage were I like the second overlay second than just the look. It adds grip to the saber. there wer I place my first hand is no overlay expect the thin lines from middle to behind. But the second hand is place directly at the pommel were I love the groves of the overlay.

    Because it was asked. I used special flexible metal glue to fix the second overlay from pattex. This stuff is so sticky that it doesn´t come off even when pulling at full force (tried it).

  2. #22

    Default like

    great video. me like. Did you build those additional internal circuits yourself?

  3. #23
    Youngling DDanDevious's Avatar
    Join Date
    Mar 2008
    Location
    In the cantina drinkin' Colt 45's with Lando
    Posts
    286

    Default

    that is freaking awesome. Good work man.

    DDD

  4. #24

    Default

    Nice looking saber my friend, and I like the look of the brushed steel better than the chrome, so eating it on the hard stone was probably a good thing imo.
    Not as clumsy or random as a blaster, the lightsaber is an elegant weapon, from a more civilized time.


  5. #25

    Default

    Chrom was indeed a bit too shiny in my opinion

    There is a CF4.1, a Plecter Bargarpgh, a Powerxtender and a Slimline LED driver in there. These are all buyable items. The only thing that I did here is lots of studing plans, wireing and resistor calculation. Nothing that is very hard.

    Just to mention it that does also mean that the saber is crowded. I do not have space left because of connectors and cables.

  6. #26

    Default

    An early contender... VERY inspiring work

  7. #27

    Default

    wow , that is amazing.

    There was another saber built a while back that is similarly cool to this one, but I can't find the thread. It also had a video and played the star wars theme along with leds flashing in sync. Does anybody have the link to that thread?

    edit--------------
    nevermind, of course after 20 minutes of searching I can't find it and once I post here.... well what do you know.

    http://forums.thecustomsabershop.com...ead.php?t=6071

    I want them both
    Last edited by duncan29793; 02-22-2009 at 01:15 PM.

  8. #28

    Default

    OMG, for a new guy, you've got it going on! I didn't know Erv was making CFs with Maiden now Seriously, though dude, that is some exceptional work! I am jealous!

  9. #29

    Default

    Absolutely beautiful. I'm awe-struck and near speechless.

  10. #30
    Jedi Council Member cardcollector's Avatar
    Join Date
    Jan 2009
    Location
    I am A proud American.
    Posts
    2,567
    Blog Entries
    3

    Default


    <speechless>
    Got a Question? There's a thread for that...
    ~Do what you can, with what you have, where you are.~Teddy Roosevelt

    SollusVir everywhere else... FXsabers, Youtube, etc...

Bookmarks

Posting Permissions

  • You may not post new threads
  • You may not post replies
  • You may not post attachments
  • You may not edit your posts
  •