I say with out. I just like it a lot more without because the way you will paint it looks more like the movies.

with the thin neck "choke point" section.
without the thin neck "choke point" section.


I say with out. I just like it a lot more without because the way you will paint it looks more like the movies.

I say without the choke point. While it does make the saber more accurate, at the same time it makes it look way too long.

I agree with what you say about the blank section, its just a shame the threads are in the way. As for the details on the blade holder and the choke point, its just a shame I didn't think about that before ordering the parts. I could have asked Tim to do something similar, to late now. I don't have or have access to a lathe so they'll just have to stay that way for the time being.Originally Posted by Luke-SkyMarcher

Chen and MaverickJsmith, to answer your question about the rear grip. Its a Browning ANM2 machine gun booster replica that I got from Roman Gomez, he used to run the Roman's Empire website.
Heres some pics of it next to the Armitage shanks handwheel:
To attach it to the MHS I just used a double ended male threaded connector. I cut of one of the threaded parts and it just slips over the boosters male end. It just needs to be glued on to make it secure. I had Tim machine a part so I can connect the handwheel and booster together, this also houses the speaker. I'll post some pics of these later on.
I've still not really decided if am going to be using the chock point yet, but I'll let everyone know what I decide later on.

That looks very awsome, Maybe a thin neck style 2 and a redesign of the style 5 and 8 bladeholders could be in order of something.
Any intelligent fool can make things bigger and more complex. - Albert Einstein
Reaganomics not Obamanomics
Heres the pics I said I would post earlier.
First how the booster attatches to the MHS parts.
I had to file down the booster a bit so the threaded part would fit better. I plan on freezing the booster over night and then putting the threads on as far as they will go. Once the booster goes back to room temperature the threads should be stuck! If not a little extra glue should help.
Now heres the part I got Tim to make for me. This is the drawing I sent to to him.
And then how it fits in to the booster.
I had to file this down as well so the handwheel would fit tightly, but this was planned. I wanted the connecter to be slightly larger than needed so I could custom fit it myself.
I hope that explains things.
OK, I've just this second decided what am going with.
I've decided to go with the thin neck "choke point". I know it looks a bit long but I can live with that. Anyway if I want to remove it, its easy enough to do thanks to the MHS setup! Plus I'll be using a Quick connector so it will be even easier to remove it. Unscrew blade holder, unplug connecter, unscrew choke point, reattach connecter and rescrew blade holder. simple.
Thanks everyone for your input it was much appreciated and it really help me make my mind up.
Now I just need to find out how much it will cost to get them anodised/painted/powder coated! I'll keep everyone up dated but it might be a while before it gets done, lack of cash!!
Again thank you all.


Hello, first post, but I have something you should look at.
Notice the begining of the choke is black, unlike your original render. This looks much more faithful as a replica. I think you should keep the choke, but at the beggining, do it this way for the more faithful replica.
The only thing that bothers me is that its in the range of being 12-13" long., does anyone know the length of the actual prop?
Any intelligent fool can make things bigger and more complex. - Albert Einstein
Reaganomics not Obamanomics


Actual props are about 12" to my understanding.


closer to 11"
RED LEADER Standing by!
 Posting Permissions

 Reply With Quote
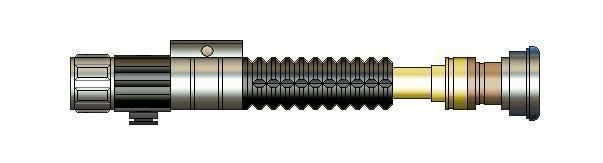


Bookmarks