-


 Making saber pics with MS Paint
Greetings all.
In response to numerous request I've gotten over the past year, as well as a recent discussion about how it's done, I've decided to FINALLY take the time to put together a tutorial on how someone with Microsoft Paint can render a reasonable looking custom hilt. MS Paint is a rather simple program that can't do all the "cool" things Photoshop can do, but with a basic understanding on how it works, what it can (and can't) do and some simple techniques I'll show you here, most anyone can design a nice looking 2D rendering of custom Lightsaber.
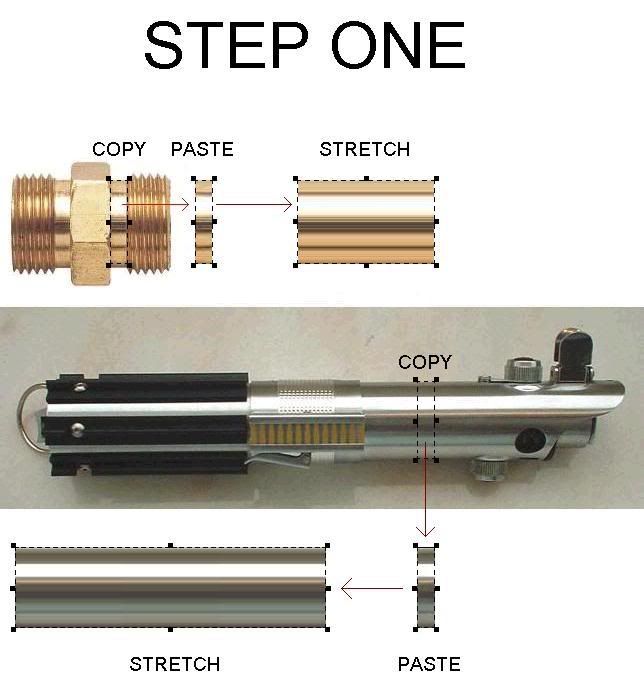
Step one.....instead of trying to duplicate the way chrome looks by drawing each reflection and highlight, find a decent picture of something that has the appropriate texture of what you're looking for. In this first picture, I'm using the chrome section of an ESB Luke saber and the brass from a garden hose fitting.
Open those pictures in MS paint, then select a small sliver of the texture you're wanting. Next paste this selection on a blank area of the screen and grab the little dotted box that surrounds the selection by it's side. There's another little dot there in the center along the side. Click on this and drag the mouse sideways to stretch the selection into a long rectangle.
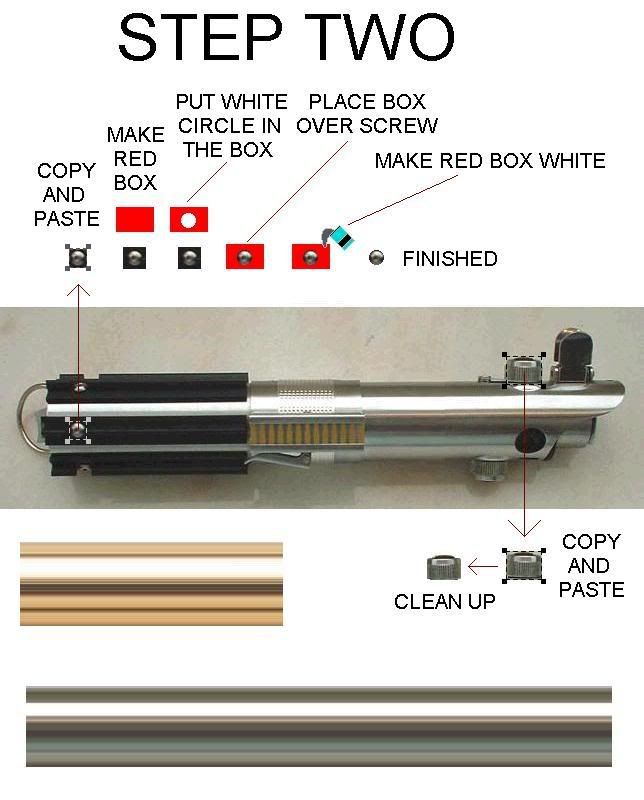
Step two.....After you have the chrome and brass sections, use your select option and start selecting, copying and pasting various items that you might want to include on your saber from whatever pictures you can find.Since I'm using the ESB saber, I chose to copy and paste the red button assembly and one of the socket head srews in the grip. Using the eraser, you can "clean up" the unwanted areas, like the main body around the pasted red button bezel.
If you're wanting to select a very specified area from a picture, you can utilize a trick I came up with that I like to call "red box white". Make sure that you set the selection option to allow for the white to be transparent. This is done at the bottom of the tool box. There's two boxes there: one for making your selections able to cover up an existing area by having the white selected area in the selection be opaque; the other allows for the white selected area to be transparent.
For the button head screw paste for instance, you COULD just take the eraser and remove all the black from around it if you wanted. However, an easier way is to make a red square (or any color that's not on the main picture), then draw a white image in the center of it that's the shape and size of what you're wanting to select (in this case, a circle). Select the box/circle combo and drag it over the pasted screw head. Position it so that the red blocks out all the black area and you only see the round head through the white circle. You can either copy and paste the screw surrounded by the red box or just move on to the next step.
Go to your tool box along the left side of the window and click on the fill option. It looks like a paintcan pouring out paint. Make sure you set the color to white in your palatte along the bottom of the window. Then position the fill icon over the red box and turn it white. You're left with a perfectly round screw head.
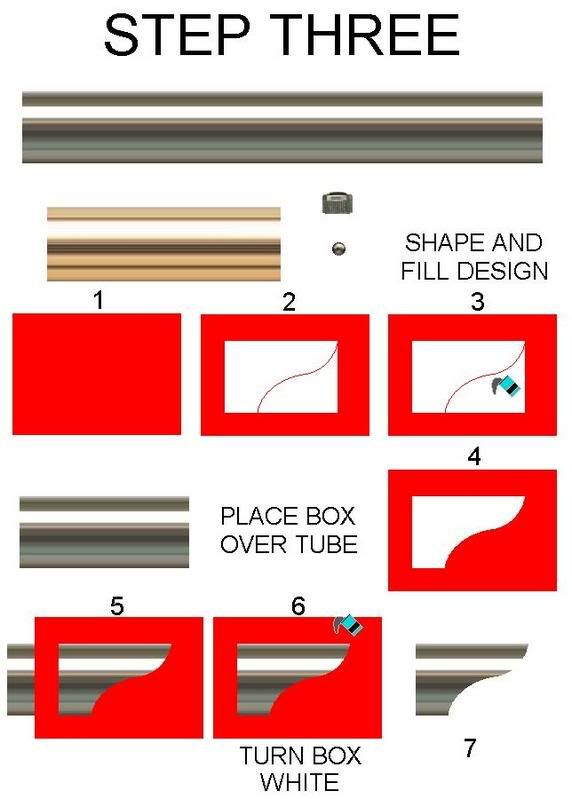
Step three.....utilize this same "red box white" trick on the stretched out chrome tube you made in step one. This time, make the red box, put a white rectangle inside it, then draw some red lines in an angled or curved design onto the white area. You're wanting to make the shape of whatever emitter you're trying to come up with (in this example). Once you're satisfied with the shape, turn the rest of the white area red again, leaving only the shape you're wanting your emitter shroud to be.
Just like before, put the red box over a section of your desired texture (the stretched chrome section) and allign it so that you can only see the chrome throught the whire area of the red box. When you get it how you want it, turn the red part white and you've got a shaped emitter.
Use the "red box white" trick to shape angles, ridges, curves, cutouts or whatever shapes you want from whatever sources you want until you have a library of dozens of elements like thumbscrews, buttons, LEDs, covertech knobs, D-rings or whatever. I'd save them to a dedicated paintshop picture called "parts" or something like that. That way, you can open a couple MS paint programs at the same time and copy from your "parts" page, and load onto whatever project you're currently working on. You might have to resize some things.
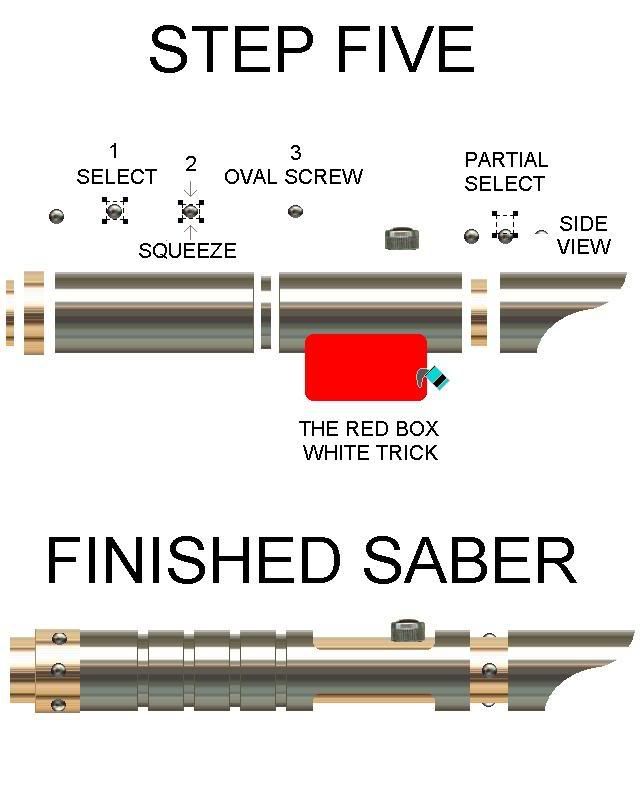
Step Four.....If you're wanting any grooves in your hilt, or just different sized spacing for the reflection so that you can "red box white" smaller items and have the chrome on it be a smaller version of the main body, select a sliver from your stretched chrome tube. Then instead of stretching it sideways like you did in step one, squeeze it together, making it a bit shorter. Once you have done this, you can either stretch out the new, smaller chrome selection, making a smaller looking chrome tube....or you can copy and paste several of the slivers to make grooves for the grip area.
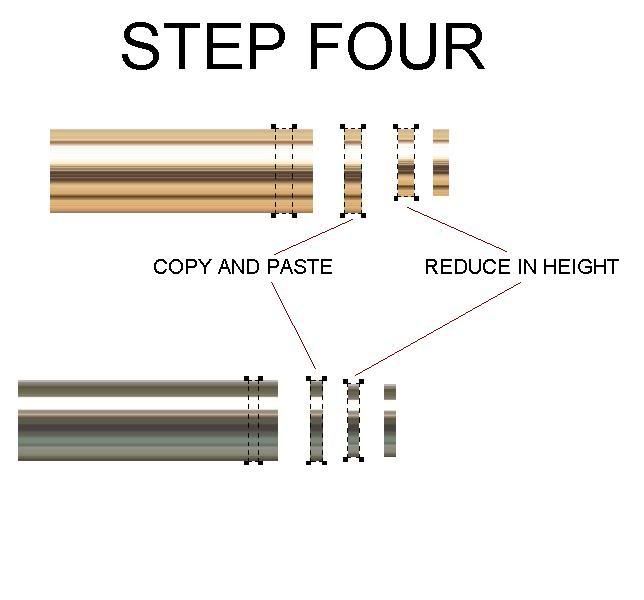
Remember how I told you to make sure the selection area has white set to transparent before? Well, now you're going to want to have the white be opaque. Select the squeezed version of the chrome tube that you just made (making sure not to grab too much, if any,of the white along its sides). Copy and paste this sliver of this smaller "diameter" chrome section over the main body of the tube (the larger chrome section). The opaque white will now create little notches on the top and bottom of the larger tube, creating the effect of "grooves". Space as many of these grooves as you like onto the saber's main body. If you have some white showing on the sides of the grooves (like in my picture below), just select the larger tube area and stretch it over the white untril it touches the other smaller chromed area. I find that drawing a small line where the larger and smaller ares comes together helps define the groove better. Use a neutral gray color that you can select from the saber body itself. If you're really ambitious, you can even make the line darker where the reflections are darker and lighter where the reflections are lighter.
Do the same shrinking technique to the brass selection you made earlier, if you're wanting different sized brass. The same "squeeze" technique can be used on the round button head screws to make it look like they're more oval. This would be used if you wanted to make it look like the screw was attached at an angle to the direction you're viewing it. Once you made some oval screw heads, you can copy and paste one, then flip it vertically, so that the shadow on it is reversed and you could place that one on the underside of the hilt and have it look a little different.
Another technique you can employ is only selecting a small section ofthe screw to make it look like a side view. In the picture below, over towards the right, you can see where I selected just the top rounded section of the screw and pasted that. It looks like the side view profile of the screw head. I could have just as easily sected the bottom of it for a different look.
Then it's just a matter of putting all the pieces together.
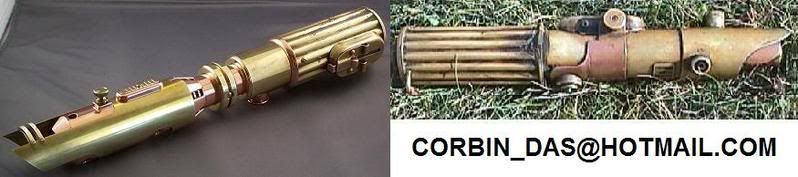
This particular design was done to illustrate the techniques outlined in the tutorial and not to show any particular saber design that I'm planning to build. So if you must comment that you think the saber needs this, that and the other thing....feel free.... . I'll politely listen, then roll my eyes.
Corbin Das
 Posting Permissions
- You may not post new threads
- You may not post replies
- You may not post attachments
- You may not edit your posts
-
Forum Rules


 Reply With Quote
Bookmarks