Page 1 of 15 1 2 3 11 ... LastLast
Results 1 to 10 of 150

Thread: Corbin's saber from Jonitus

  1. #1

    Default Corbin's saber from Jonitus

    I will have to come back soon and edit this post, because my pic hosting is a bit wonky at the moment.

    This saber has been many months in the making, and has seen many, many, many revisions from what was first pictured in my head. I had originally intended the saber to be of a Sith nature and red-bladed by nature. I had originally intended a full sound suite.

    Neither of those came to be. This is a mute stunt saber. No sound. With the 2005 MR Vader sound board going haywire I had slotted for install in this saber and the subsequent demise of my Red Lux III, it was the calming voice of my better half that said "Jon, just relax...it is beautiful and does not need sound to be complete. Finish it. Get it off the workbench and this whole escapade is done."

    She is right, of course. I'm miffed about the MR board dying. I wired it exactly like the tutorial here, but it got really hot, the sound died, then the magic smoke arrived. DEAD. Then I saw a bright flash and a pop...the LED was toast too. That's alright, because the 3W Cyan looks niiiiccceee. With the battery pack in this thing, it ought to have some looooonnngggg runtimes as a stunt saber.

    Until I can get my pic hosting sorted out tonight, here are some images to hold you over:


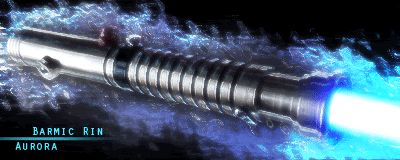
    The saber is nearly 15" from tip to pommel. Comprised of MHS parts that have been slightly altered to serve my own purposes. The sleeve and rings were cut from raw brass tubing and as you see them here, were slowly and steadily polished. The emitter tips are as menacing as they seem and are quite sharp. I have a scar on my finger from where one of them laid it open due to my negligence.


    Another pic to give you a more accurate sense of scale of this saber. The rings are secured to the main body via socket-had cap screws. They provide a surprisingly comfortable grip. When spinning the saber, the hand is best served on the ribbed section, but for fighting, the screws help to lock the hand in place without being harmful.


    All brass on the saber is polished to this luster. By hand.

    Feel free to comment thus far. I'll get the other pics sorted out ASAP and posted.

  2. #2

  3. #3
    Council Member
    Sith Lord
    Lord Maul's Avatar
    Join Date
    Jun 2006
    Location
    Seattle area, Washington
    Posts
    5,169

    Default

    very nice saber jonitus
    i look forward to the completed pics
    Aluke123 on every other forum - Old grumpy moderator here

    Thread Index, The Saber Building Dictionary, and The Basic Saber-Build Tutorial - Read Them!

  4. #4

    Default

    very nice, how would someone who cant do something like that go about getting something like that.....i kind of want one...

  5. #5

    Default

    Very nice, even un-finished in those pics!

    Got a question? Start Here. Have you tried the Thread Index yet? Most questions can be answered there.

  6. #6
    Jedi Council Member Barmic Rin's Avatar
    Join Date
    Feb 2006
    Location
    London, United Kingdom
    Posts
    2,438

    Default

    Nice Jon, but get her sprayed & fired up!
    XBOX 360 Gamertag AdeganBlue


    Being so great, the owner of these wonderful forums and attached shop has filmed how to build an MHS hilt, here's the link:
    http://www.youtube.com/watch?v=sm_-BQb_-eY
    Is he just great to you all?

  7. #7

    Default

    What was the worst part of this project was the spraying. Clearances are so tight, I had to fit the brass on the saber, mask it off, then spray the MHS parts. Then I had to mask off the MHS parts to polish the brass up to luster. It was a giant pain in the neck.

    Pics soon, I promise. Busy couple of days lately. I think you'll be pleasantly surprised how it turned out. I still haven't decided if to sell it or not. I'm not too proud of it because it's just a stunt saber. We'll see how I feel in a week or so.

  8. #8

    Default

    Okay. Here's the remainder of the pics and description:


    Just a nice quartering shot of the completed saber. Nothing particularly noteworthy to say here.


    Rotated to show more of the custom sleeve I crafted for this saber.


    Detail of the grip area, as well as the socket-head cap screws that secure the polished brass rings to the body of the saber. There's three sets on this saber, each set 120 degrees from each other.


    More details, this time of the emitter area.


    Showing how menacingly sharp the emitter tips are. Not for the faint of heart.


    Showing the relative scale of the saber compared to a human hand.


    Rear quartering shot. There's holes ready for sound, should the new owner want to go through the trouble of adding it.


    Yep, the brass overlay is highly polished.


    Ditto for the bands comprising the grips.


    Lit blade picture. I went with Cyan Lux III. Would look better as red, but time constraints and a blown LED made that impossible. Easily changed for the new owner.


    Money shot. Say cheese!

  9. #9

    Default

    that is a fine piece of work you have got there.
    Darth Sequentius...Sith Lord

    Bringing light to darkness.

  10. #10

    Default

    That turned out great!

    Got a question? Start Here. Have you tried the Thread Index yet? Most questions can be answered there.

Bookmarks

Posting Permissions

  • You may not post new threads
  • You may not post replies
  • You may not post attachments
  • You may not edit your posts
  •