Page 1 of 2 1 2 LastLast
Results 1 to 10 of 11

Thread: Journey of a first time saber smith

  1. #1

    Default Journey of a first time saber smith

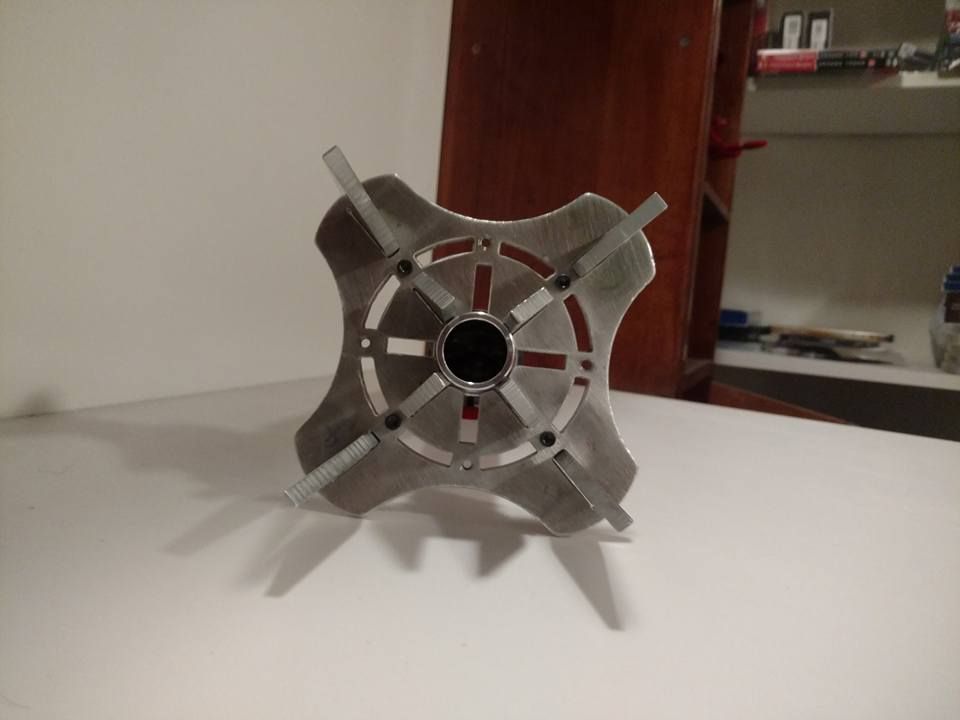
    Well I have taken my first steps into a larger world. You see in the photos the beginning stages of a sink tube saber with something special on it. A guard and quite a large one if I do say so myself not to mention the claws. Almost all lightsabers don't have guards which is understandable. I'll just say mine is made of Mandalorian Iron even though it is aluminum.

    I work in a factory so that's how I managed to get the unique shapes. They did mess up cutting the thing as you can probably see. I don't mind so much as I was going for an ancient beat up saber look. Rather neat what happened to the cord when I tightened it on the one end. Not sure how that happened.

    From here I need to figure out how to secure the cord as it still moves around, super glue perhaps? Then I need to get a shopping list together so I can illuminate this thing with MWS, figure out how I want to engrave the guard and claws and practice, practice, practice the engraving before hand so I don't mess it up. From there I will see where this hobby takes me.


    If I do not try, there may be nothing to return to.

  2. #2

    Default

    Dude! That looks lethal but in a good way. I look forward to seeing it lit up. Oh and where this hobby takes you is usually down the rabbit hole.


    Greenie

  3. #3

    Default

    What are using for cord? There are a number of videos out there of doing paracord hilt wraps but pretty much all of them are relying upon the handle to be asymmetrical in some way so the cord has something to tighten against/freeze in place. A perfect cylinder will have difficulty with that when using something like yarn or paracord. Leather provides more friction. If you want to keep the cord you are using you could glue a small thin piece of wood or metal length wise to the tube where the wrap will completely cover it. If you using something small and thin enough you won't really be able to feel it, but it would provide enough grip for paracord to grab onto. If you like you could glue 2 on opposite ends and that way if your cord is thin enough that you do feel the protrusion it will be on both sides. Just a thought, I am a total noob as well when it comes to this and am struggling with my own hilt wrapping issues but I have thought about these issues a lot in the past few days heh.

  4. #4

    Default

    Cool guard.

    http://s6.photobucket.com/albums/y23...0Saber%20Hilts

    From Wikipedia: "Internet Explorer slows down GIFs if the framerate is 20 frames per second or higher and Microsoft reports that Google Chrome and Safari also slow down some GIF animations."

  5. #5

    Default

    Really cool saber! It looks very top heavy due to the guard.Does it feel like that in person.Cant wait to see an blade and led in it.

  6. #6

    Default

    Quote Originally Posted by Greenie View Post
    Dude! That looks lethal but in a good way. I look forward to seeing it lit up. Oh and where this hobby takes you is usually down the rabbit hole.


    Greenie
    The rabbit hole? Oh goodie! I hear there is candy down there!

    For the wrap I just saw some cheap paracord at Walmart that I thought would look cool. Cheap was right as one of the ends came undone and the inner strands came loose. I could have fixed it but instead I removed the inner strands and melted the ends which might be the cause of what happened to the lower portion of the wrap. I then drilled two holes in the sink tube to tie off the cord at both ends. So really I was winging that part as well. I did consider a few different paracord braids before going for the "fishscale" braid thanks to a video on youtube due to how easy it was and the because it only uses a single strand. https://www.youtube.com/watch?v=mKlSPgJolo4&t=187s

    Thanks for the advice all the same, minorhero. I think putting some wood or metal in there would help with the friction as you say and also would be a good idea as it will help reinforce the sink tube which is a bit thin material as it is only 22 gauge and just having the wrap on there seems to have deformed the lower end. The sink tube was just going to be a cheap solution until I could afford something better. One thing I considered doing was interweaving some string or more paracord running vertically between the horizontal "fishcales" to keep things from moving and adding some color though I am not sure which color would be best.

    Thanks for the compliment ARKM. I wanted something not only cool looking but also functional hence the way the claws are shaped could be used to catch and lock a blade. If those are missed the guard could still deflect the blade. I did have 4 additional smaller claws made so if I wanted I could have something without the outer points of the claws. I need to see how the eletronics will balance out the hilt first as even though I used aluminum there is still quite a bit of weight there. My brother in law pointed out to me it could just be used as a mace on its own.


    Edit: Here is a slightly older picture. I do have a blade and I dropped an LED Maglite down the tube just to see how it looks in the dark.
    Last edited by Tryagain Infinity; 01-08-2017 at 09:01 PM.
    If I do not try, there may be nothing to return to.

  7. #7

    Default

    Wicked looking saber.

  8. #8

    Default

    Hey everyone I am still around. I have been busy trying to get electronics wired so I can get my saber properly lit up. I have hit a snag though.

    I got everything wired up and connected as per the picture I have attached. The speaker, Nano Biscotte, and switch all light up and make sounds, but the main led doesn't light up. I think the issue is I have the 'Y' splices I made are backwards, perhaps?


    Thanks in advance for any help you can give.
    If I do not try, there may be nothing to return to.

  9. #9

    Default

    You would be correct. The base of the "Y" should connect to the sound board. The two upper "arms" should go to your main LED and switch LED.

    I would also verify that you have the polarity of your LED wires correct.
    We all have to start somewhere. The journey is all the more impressive by our humble beginnings.

    http://led.linear1.org/1led.wiz for the lazy man's resistor calculator!
    http://forums.thecustomsabershop.com...e-to-Ohm-s-Law for getting resistor values the right way!

  10. #10

    Default

    Umm please donīt hit me with that... No it looks awesome!
    Join me, join the dark side!

Bookmarks

Posting Permissions

  • You may not post new threads
  • You may not post replies
  • You may not post attachments
  • You may not edit your posts
  •