-

 Build Log: 1st Saber (sink tube) updated: 1/8
Hope its alright to start a build log here, half for myself, and half so that I can get constructive criticism, and maybe help some fellow newbies out as well.
I have never made a saber before aside from some PVC with PVC overlays as stunt sabers for fan films back in high school. I would say i'm semi skilled in fabrication and electronics so Im kinda diving right in after a few weeks of reading and scouting the forums. I just ordered my blade components and a few extras from TCSS, and am ready to dive in. A lot of the stuff I had hoped to buy to make it easier was out of stock, so im keeping an eye out and will go the less custom higher quality route for my next build, mainly anything to hold the blade in place.
I have 2 ideas for that, A. those little cheapy harbor freight flashlights are right about 1" in diameter, but I want to wait till my blade gets here to test fit. B. PVC conduit as seen here: http://forums.thecustomsabershop.com...l-on-last-page
That thread was a great read, so maybe a 2-2 1/2" piece of that hidden below my sink tube to hold the blade in place.
Kinda the main idea of the build is I am using a finned heatsink for my LED, and plan on having it show through the handle of the saber, basically the heatsink will be a very tight fit inside the tube and will have viewing cuts made to see it and help vent, on paper and in my head it should look awesome, hoping it works out!
Anyway hopefully progress will be fast, been loving looking through other peoples builds and getting inspired!
Last edited by djblingbling1; 01-08-2016 at 10:50 PM.
-
Went out and bought my sink pipe tonight and got started on what I can while I wait for parts to arrive. I did the pommel, in a way ive seen done similarly, but I think I found a nice way to do it without too much fab skills. I took a lot of pictures in case anyone else wants to try it:

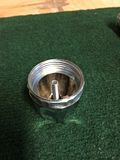
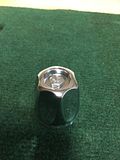
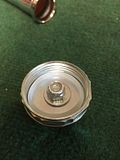
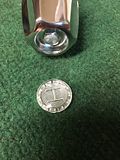
Here is what I started with, the usual 1 1/4 slip joint extension tube with the flared threaded end, complete with the screw on cap, and rubber washer. I also picked up a set of bathroom handles, hopfully the packaging shows about the size, i test fit in store and they perfectly fit into the cap that came with the pipe, problem ws there was not a deep enough fit to rivet or screw it in place. I saw a build where it was glued in place, but I wanted durability. The bathroom handles have a screw under that clear hot or cold cap. I removed the cap and took out the screw as seen here:

I also picked up a 3/8 fender washer, 1/4 x 2" hex bolt, 1/4 lock nut, and 1/4 washer. These worked out perfectly, I think you can get as creative as you want with the bolt if you leave it visable, or you can put the hot/cold plastic cap in and do something with it, or find a chrome cap to fit which is my plan.
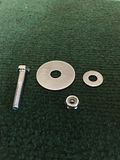
Here is how it is all layed out in order of how I assembled it:
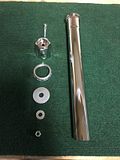
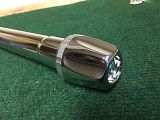
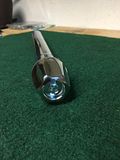
And all back together on the pipe:
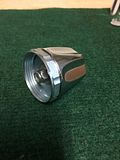
You an see that the hex screw isnt the best looking option...you could flip it and use a stylized nut, or find a brass button head screw, ect, but 1/4 x 2" was a perfect fit with this setup.
Again I am looking for one of those claw feet chrom covers, which may or may not work, if not ill look for a bettwe screw or possibly pain the plastic cap that came with it.
Hopfully this will help anyone else looking for cool mods at the hardware store. I bought this all at Lowes, and since it came with a hot and cold knob I only have to spend another dollar in hardware and have a second pommel for a future build.
-
Little update:
Finally took a dremal to the sink pipe and shortened it as well as added a slant to the emitter end.
I got my TCSS order and here is everything laid out minus the blade sitting kinda in the back.
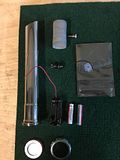
I changed the pommel because I want to put a D ring on it, and am getting the T track stick on grips too with my next TCSS order which will probably be any day now...again, haha.
Ordered resistors for my led, made my PVC blade holder, got a 8/32 tap and have been refreshing my tap skills, and now am again playing the waiting game.
I think after this I will build a MHS sith saber. Hopfully more updates soon, having a blast building this!
-
-
-
 Posting Permissions
- You may not post new threads
- You may not post replies
- You may not post attachments
- You may not edit your posts
-
Forum Rules


 Reply With Quote


Bookmarks