Put this schemtaic this morning while i should of been working...
I don't think I did the recharge port correctly, I am going to re-watch TCSS youtube tutorial on how to do this. Please, please, please give me some feed back!
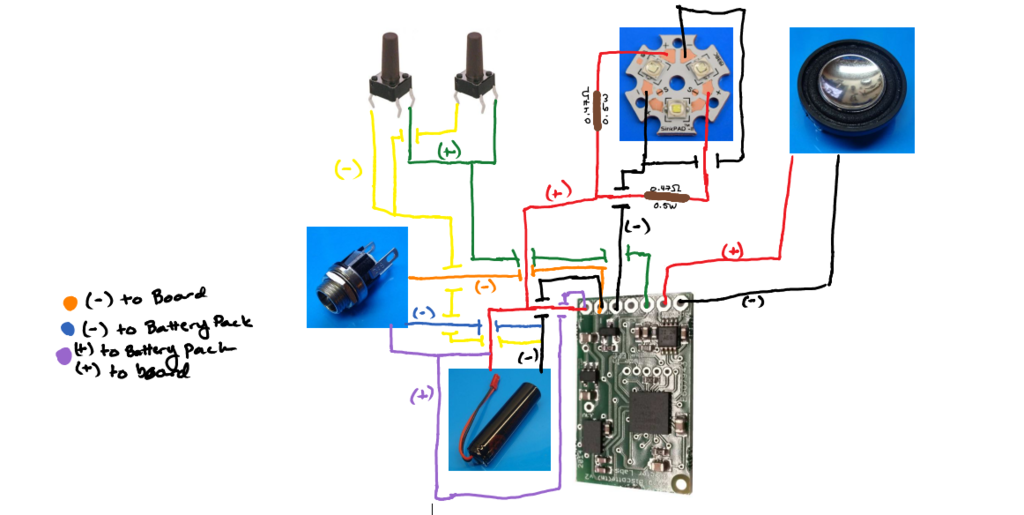


Put this schemtaic this morning while i should of been working...
I don't think I did the recharge port correctly, I am going to re-watch TCSS youtube tutorial on how to do this. Please, please, please give me some feed back!

You are correct. The recharge port is wired incorrectly.
The black wire from the battery (-) should NOT connect directly to the NB. The rest of the wiring is acceptable, though I'd personally move the switch (-) wires to the orange (-) wire.
One question: Why do you have two switches? The NB only requires one. If you just want to be able to turn the saber on and off from multiple places, that's fine. It's just not needed.
We all have to start somewhere. The journey is all the more impressive by our humble beginnings.
http://led.linear1.org/1led.wiz for the lazy man's resistor calculator!
http://forums.thecustomsabershop.com...e-to-Ohm-s-Law for getting resistor values the right way!
I am going more, for an ESB look, so I am using the printed circuit board. It also fits very loosely, and would fall out without adaptation. For the time being, a small piece of cardboard under the board stabilizes it nicely. I will cone up with a more permanent solution after I decide where to put the aux. switch. As I see it, the two choices are: (1) Under the clamp (bubble strip or circuit board), or (2) Under the second (glass eye) button. Does anyone have any suggestions about the aux. switch placement?
Since I am not an experienced builder, I elected to use a 3D printed chassis.
What switch is that? Name?
thanks

It's a tactile switch. Switch 17 in the store.Originally Posted by Sith4Life

is that what goes under the red graflex? seems big? couldnt you use the?
SPST Momentary tactile switch?
Unlike Ronin, I am installing a Prizm sound card, hence the need for an auxiliary switch.
The kit comes with two (idenitcal)momentary mini switches and with red buttons that can be glued to the shaft of the switches. These fits well in the red button collar, which I plan to use for the main switch.
The questions is where to put the second mini switch, or use a different switch all together as the auxilliary switch.
I see, I will be doing the same set up Ronin so all I need is the the single for the main and only button in the graflex it's strictly an on and off switch, the nano also has a deep sleep mode so no need for an auxiliary port/hole the auxiliary port goes inside you open the hilt charge then close.
I'm new to this my first build also I got my graflex of the RPF the same 2.0 as found on TCSS so this switch is the only one to use for the red button in the graflex? The glue thing scares me will it hold up? Has this been done?
This is my first build, too.
I have been studying the instructions I found for the Korbanth build. Same kit, apparently.
Some suggest gluing in a small piece of brass tubing in the red anodized button so that it sis higher. They it's glued in place. I think with careful use of epoxy, we can get a strong bond.
 Posting Permissions


 Reply With Quote
Bookmarks