Page 1 of 3 1 2 3 LastLast
Results 1 to 10 of 26

Thread: First Build: Neophyte's Pride

  1. #1

    Default First Build: Neophyte's Pride

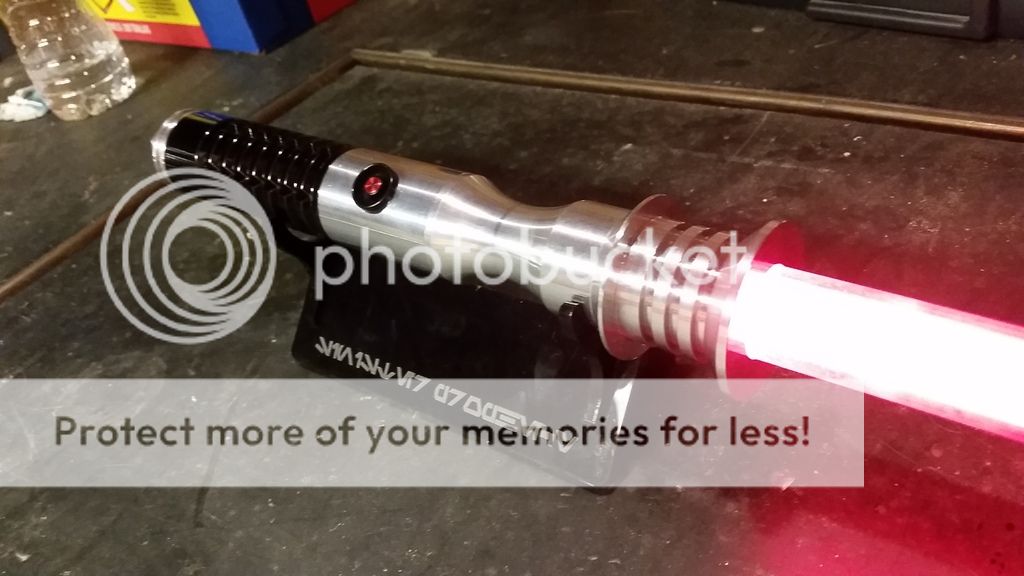
    After an agonizing month of waiting for my parts to come, I finally got to build my first saber. Following Madcow's tutorial vid (a huge thank you to him) made it pretty painless and I'm completely hooked of course.

    Luxeon Rebel Star (Deep Red)
    Latching Guarded switch with red button
    4AAA battery holder (which I had to carve up like a turkey to get it to fit in the grooved extension)


  2. #2

    Default

    Nice saber you've got there. Simple, clean lines, no nonsense and Sithy...

  3. #3
    Youngling Zahc Zi Phan's Avatar
    Join Date
    Aug 2012
    Location
    The forest moon of Endor
    Posts
    201

    Default

    Ooh I like! Gimme!

  4. #4

    Default

    nice simple and to the point. I dig

  5. #5

    Default

    Nicely done. Simple lines yet different.

  6. #6

    Default

    It looks very practical and clean. The placement of the choke section must make this very comfy to use. Very nice, well done.

  7. #7

    Default

    Thanks, everyone! It is incredibly comfortable to hold and use. Next step us upgrading to sounds and an illuminated switch. I may do some etching around said switch if I'm feeling brave.

  8. #8

    Default

    I like the choke tube with that emitter!

    You should weather it a bit too!

  9. #9

    Default

    Very nice. Full blade shot sometime? =]
    "Your move!" -Obi-wan kenobi-

  10. #10

    Default

    Started working on the upgrades to this saber. Thought I'd update everyone as I attempt to make it a little less vanilla.

    Tonight I electro-etched the choke section. It was my first try with etching. I used ARKM's Tutorial (ARKM's Saltwater Etching Tutorial) as a basis. I'm pretty happy with the results. I used nail polish as my resist and it worked flawlessly.


    It also came off in like 5 mins, so that's a plus. Only mistake I made was using stickers to mask the spots I wanted etched. When I peeled them away, they left a residue that I wasn't able to completely get rid of without taking the nail polish with it. It makes the etching a little rough. Lesson learned.


    Next up is widening my switch hole to take a 16mm AV switch. Wish me luck.
    Last edited by Ackocin; 05-29-2015 at 08:01 PM.

Bookmarks

Posting Permissions

  • You may not post new threads
  • You may not post replies
  • You may not post attachments
  • You may not edit your posts
  •