Results 1 to 10 of 10

Thread: Second Saber, first build thread... Sarlacc.

  1. #1

    Default Second Saber, first build thread... Sarlacc.

    Hey all!

    I just completed my first saber a little over a week ago and I've already got the bug to build two more! hahaha

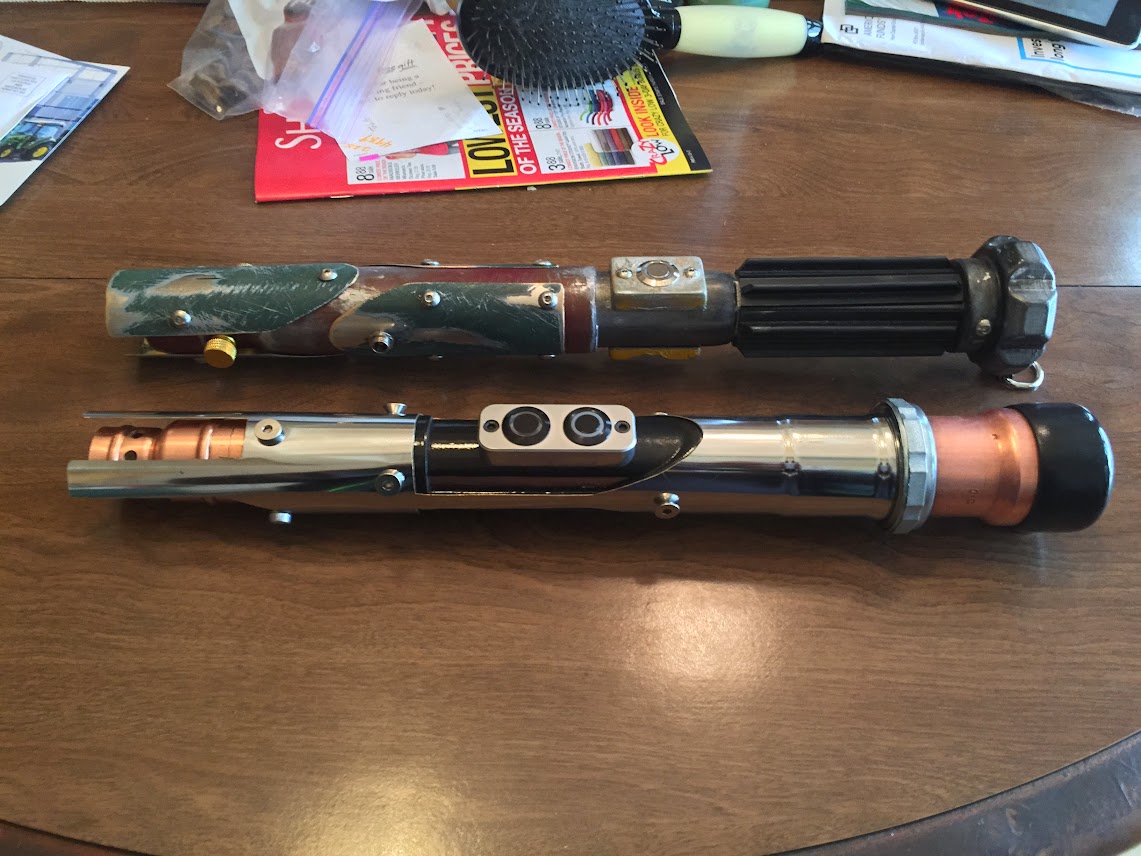
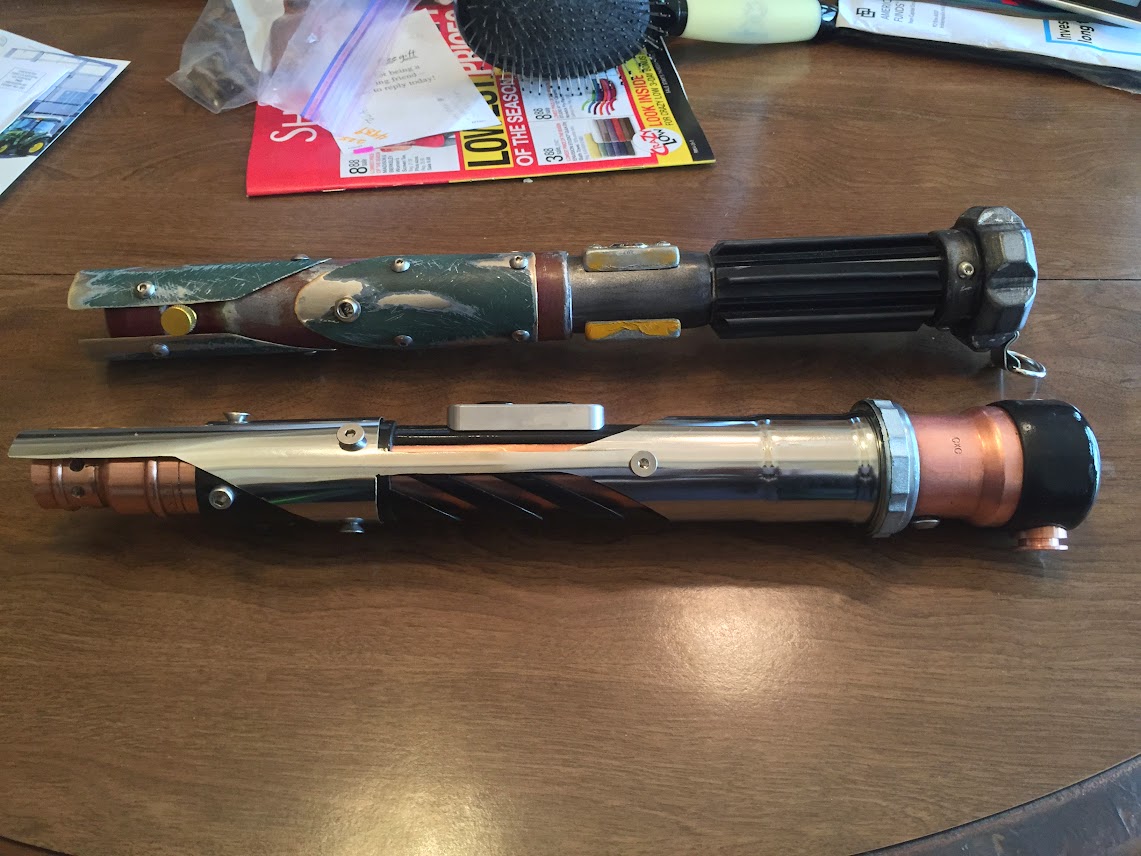
    My first saber was almost entirely scratch built using Copper plumbing, a few MHS parts, and a bunch of electronic goodness from the MHS store. To effectively tie everything together I designed and 3d printed a number of joiners, adapters, and chassis out of ABS Plastic. After some finish work and paint, I gotta say it came out pretty nice! But more on that in a different thread... ( I might enter it in the Saber building contest and don't want to give away too much now should I decide to do that.)

    Anyway... I've been lurking and reading the forums off and on for the better part of a year and finally decided to dive into the world of Saber crafting. One big motivation is the Upcoming Star Wars Celebration. I'm all lined up to go and it just wouldn't be right if I showed up without a Saber!! So, mission accomplished there, but I've also got two good friends who are going as well (My friend and his wife). I haven't seen them in a long time and I really want to surprise them with something cool out there, so I decided to build a couple of sabers to surprise them with. My plan was to scratch build the hilts and fill them with basic electronics (Cheapy Hasbro soundcards I had laying around) and give them the option of paying for a fancier soundcard, should they want to. After much searching, I eventually found the info on how to get them to run a Cree at full power, but after I started playing/testing the card a little I decided to scrap that idea. The sound was quiet and horrible at best and even running 3.7V at 500ma was enough to short out one of the boards after only a few minutes. I could go buy another cheap toy saber to use, but I think the money would be better spent on prep work for eventually installing a quality board. So, it'll be a lights only buckpuck affair for now!

    So, first the relevant details and then some concept pics.

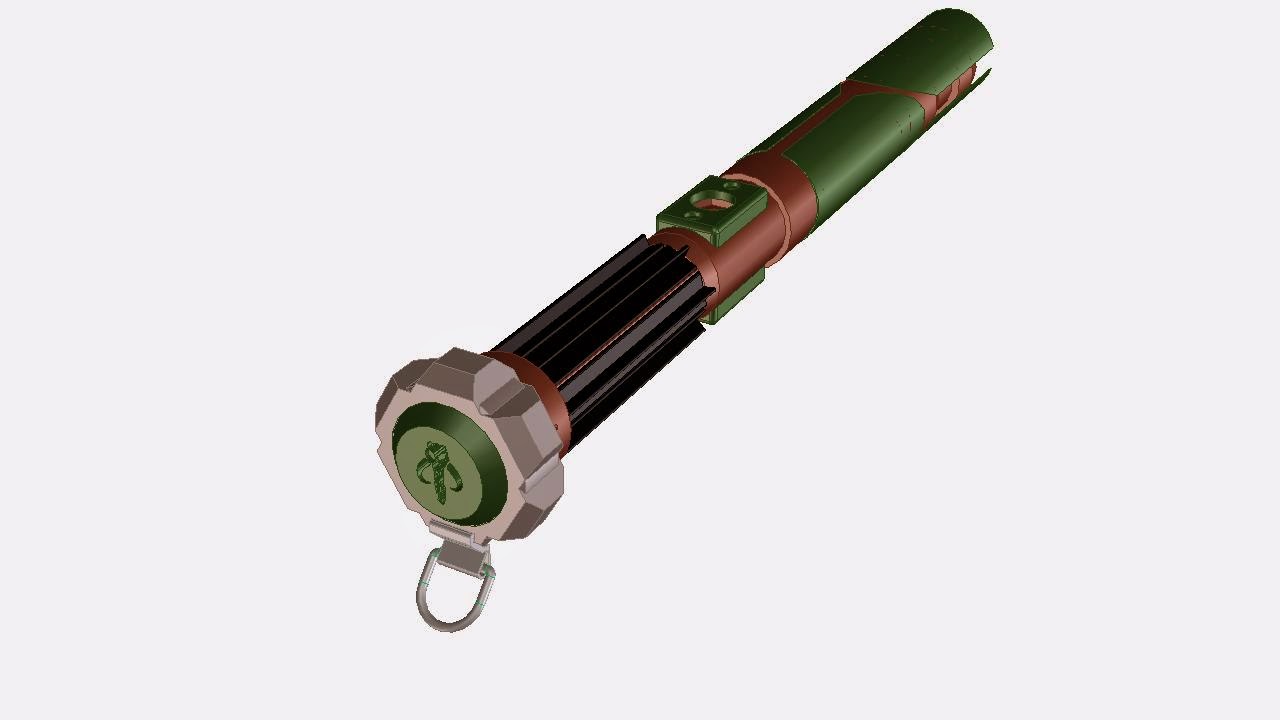
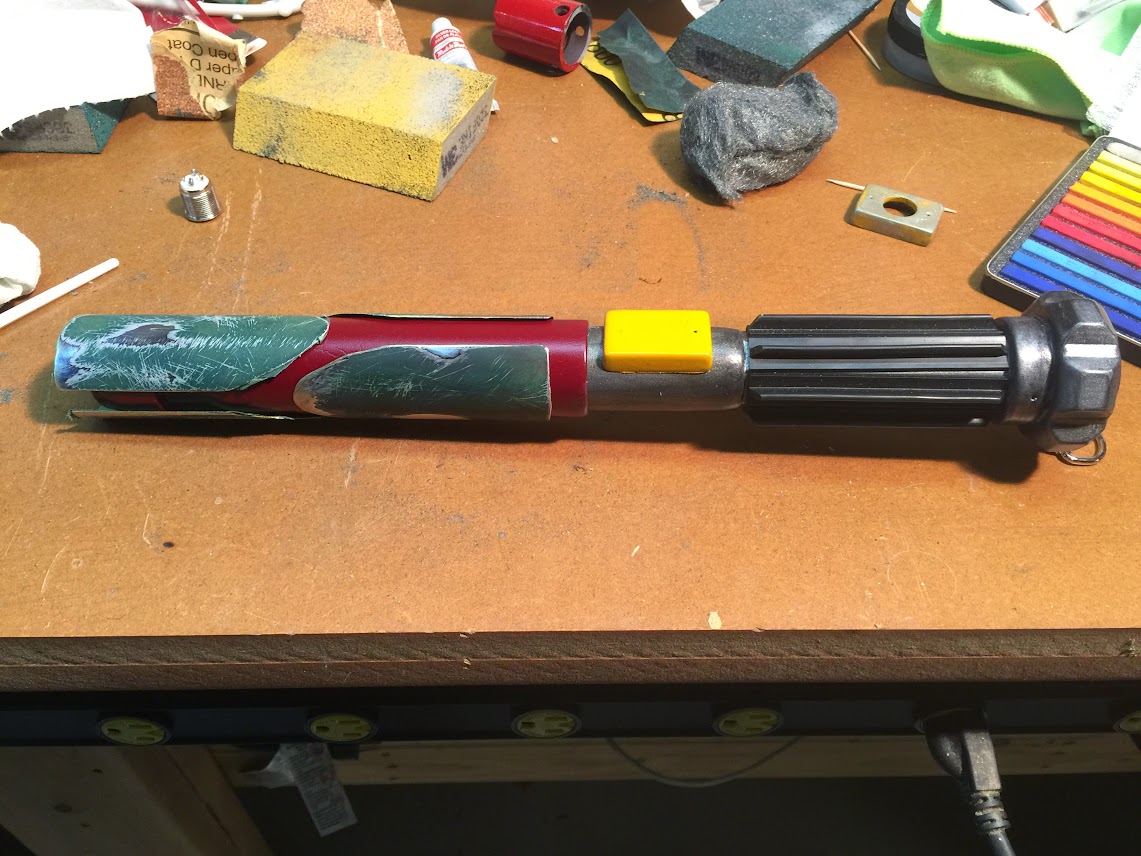
    I've decided to theme the Sabers Mando style as a sort of matched set. My friend is a huge Boba Fan, and it only seemed fitting. I've decided to call the first one Sarlacc and, after you see the concept pics below, you can probably guess why. hahaha

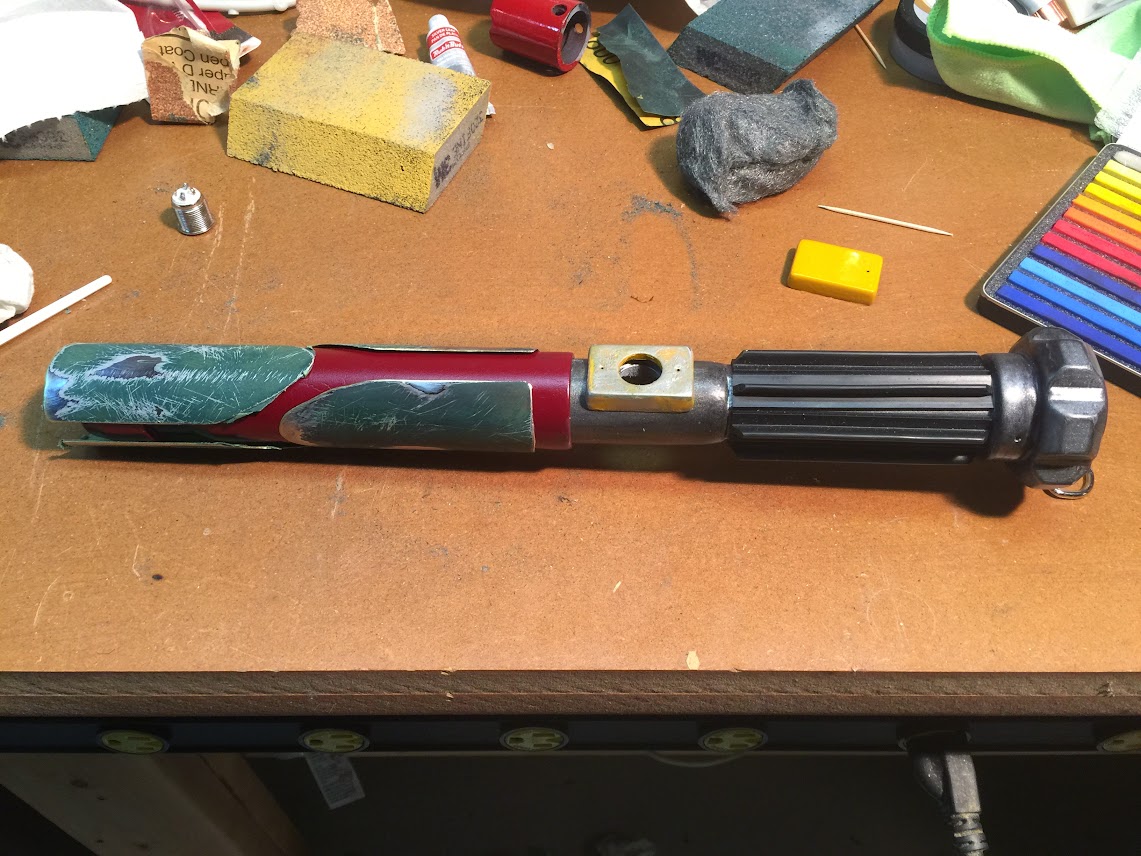
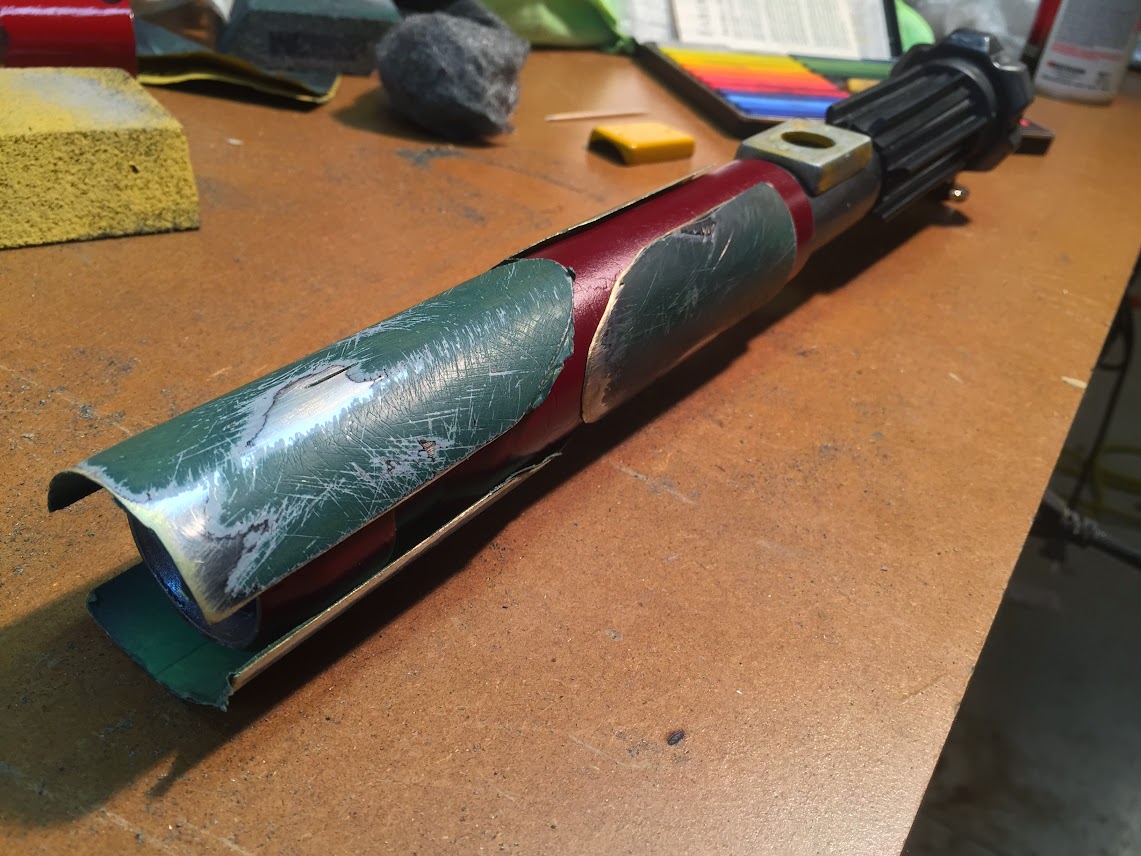
    I'm planning on using either a Green or a Red Cree (I have one of each and will give him the option of which one he wants). The hilt itself will made up almost entirely from 3D printed ABS plastic. The shrouding/panels will made up of the leftover sink tube pieces i had after building my saber. The plan is to give the saber a worn, old, and heavily used look. The way one might expect it to look after cutting their way out of the belly of a Sarlacc. hahaha

    Anyway, on with the pics:


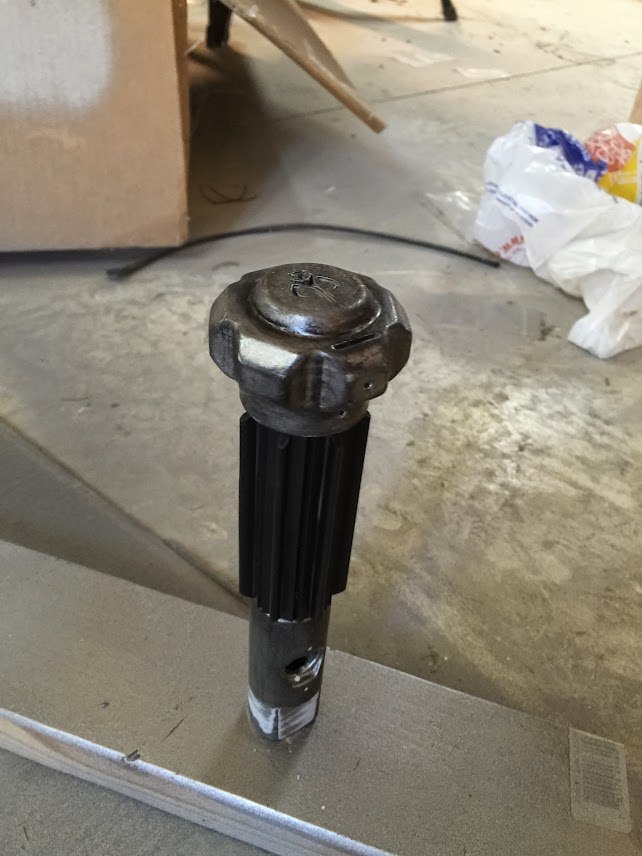
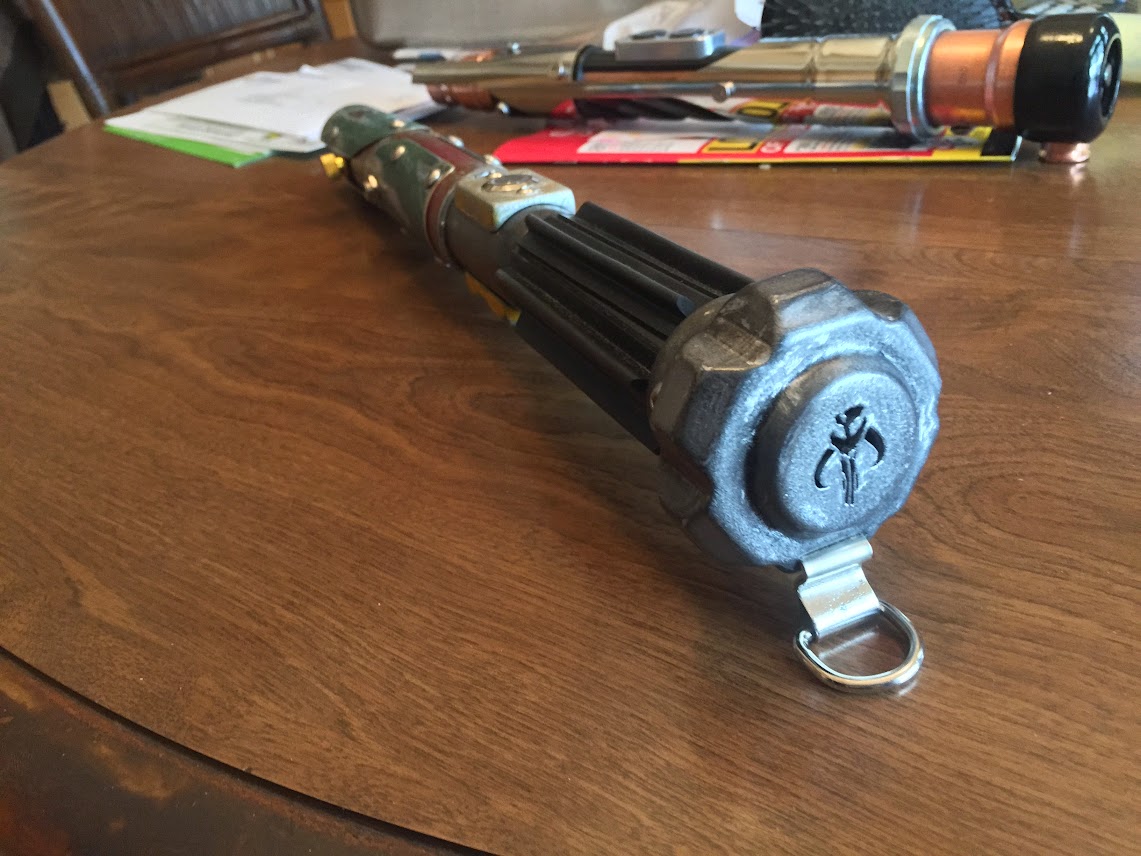
    And for those of you wondering, I did manage to print this speaker cover with the Mando symbol cut through it (for the sound to come out of) and it looks great!


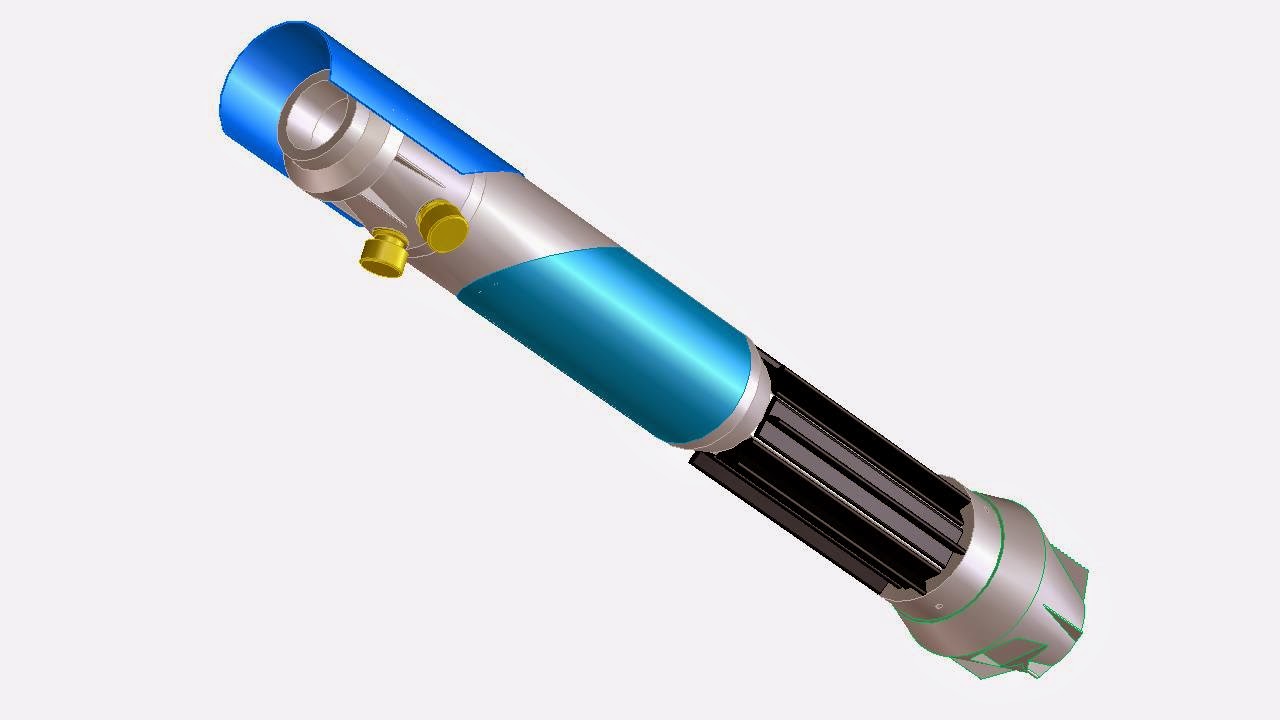
    I didn't model every single detail. (screws, buttons, wires connectors, etc) It might look a little plain jane, but I'm thinking between the paint and weathering I plan to do, along with whatever else I might add for accenting, it should look pretty good.

    So there it is for better or worse. Any comments, constructive or otherwise, let em fly. I know I'll probably be cutting it a little close on the time frame, but really, with the 3d printer doing what it does best, the only really time consuming part will be finish detailing, and the nice part about that is if I end up rushing a piece here or there and ending up with a mark or a nick, etc... It'll just help add to the overall effect of being a beat up old saber! (at least I hope... worst case scenario i'm out 25 cents worth of plastic and have to reprint a piece.)

    The 3rd saber will carry on in a similar fashion, but will have slightly different features and lines to it, along with a slightly older (newer?) paint scheme, if you catch my drift.

    More to come as I get all the pieces printed to my satisfaction. (4 down 6 to go!)

    Later!

  2. #2

    Default

    Speaking as...well, me (a huge Mando Fan), I love this saber.
    "Bacon and cheese>squeezed lemon." - FenderBender
    "But, ya know...rules are made to be broken." - Yoshi-Taka
    LDM's Recipe For Noobs. Totally Worth The Read.

  3. #3

    Default

    Thanks MandoJoe! I'm glad you approve. I know my friend is going to love it!

    Not much done in the last week. I was out of country and couldn't get anything done. I was able to get several more pieces printed today, however. By tomorrow I should have all my parts ready to go. Then it'll be time for priming, sanding, painting, weathering, etc... and Hopefully final assembly by this weekend. So far I'm really happy with the parts and the few I've printed and started priming/sanding are looking really good! The pommel it self is looking great! I decided to make it look like it was single piece of metal, bolted to the hilt instead of looking like it was 3 separate pieces. (in actuality it's made of 4 separate parts! lol) Between the glue and sanding, the pommel is taking on a very nice worn look and should look very cool if i can give a convincing paint job.

    I got to looking at more boba fett photos one the net and decided to alter my color scheme slightly.


    As you can see, less red, more gray, and a little bit of dark yellow on the switch boxes. I plan to prime gray, a couple coats of aluminum/steel/silver (whatever looks better) and then a top coat (or two) of the final color, which will then be rubbed with steel wool and other various grits of sand paper to give it a worn through/scratched to the bare metal in obvious spots look. I may even brush a layer on or two on to give it a bit more texture in spots. Then a combination of black washing and earth-toned chalk for character and then top off with a nice clear coat (non-gloss/non flat, completely clear) or three to seal it up nice.

    Now the biggest question... What color should I make the Blade? I've got several different Cree's I can swap in and out easily enough, (and ultimately I'm going to let my friend decide what he prefers). But for the initial go, what should I go with? I was originally thinking Green, but I picked up a Red Cree and think that would look pretty nice as well. I've also got a royal blue (though I'm thinking that is must for the 3rd saber), and an amber. Too many choices!

    Anyway, I should have some real world shots to post up in the next day or two. So far, so good!

  4. #4

    Default

    What color should I make the Blade?
    My first thought was green as well, but I don't think you can get that Boba Fett minty-olive green from an LED or a shade of green that looks good with the hilts paint job.

    I'd picture it with a "non-standard" color like yellow or amber for aesthetics. Or if you want to go deep you could use a deep blue because it reminds him of the oceans of Kamino, or one of the silvery-white blades because its more utilitarian and effective rather than decorative. Or purple, because he tracked down the corpse of Mace and stole his saber for the basic components. (The last one is more of a joke)

  5. #5

    Red face

    Oof.. Been a bit busy the last week or so, but I'm happy to say progress is being made. Sarlacc is nearly complete! Just need to install the electronics and give it a final clear coat to seal in all the nice weathering, and then it'll be ready for killing Jedi! }

    Speaking of killing Jedi, I've decided to stick with a green blade for now. I liked the suggestions, Solaren (especially the purple! Joke or not, it does make sense! hahaha), but then I came across this little gem on the interwebs:


    This came from an old Star Wars comic and while it's a little out there, it is sorat canon-esque (though, not really imo). Either way, it does give a little validity to the design... so green it is. (And if my buddy prefers something else we'll change it then.)

    So, more pics! This time of the painting process up through the weathering phase:


    As you can see in the pics, the weathering isn't fully done on the red or the yellow switch box. (it is... I just haven't gotten any pics yet).
    All the green shrouds and various parts have been drilled, tapped, and screwed together as well. Just waiting on a momentary to latching converter for the switch (stupid me forgot the saber would only stay on as long as I held the button with a momentary wired to just a buck puck! Doh!!) and then I should have it all done up!

    In the meantime I've been Working on getting saber number 3 printed up. As I've hinted at above, it's going to have a newer/older style to it and, keeping with the theme, will also have Mando influence:


    As you can see I've decided to style this one after Jango Fett. Specifically on his battle as Mand'alor on Galidraan: "It was then that Fett would carry out the act that would make him both famous and infamous for the rest of his life and career: using no weapon beyond his own hands, feet, and armored body, Fett vengefully killed six Jedi, including the one responsible for Myles' death.[13] His efforts, although impressive, couldn't change the outcome of the battle. Fett's True Mandalorians had fallen victim to the Death Watch's machinations and were wiped out; Fett, the sole Mandalorian survivor of the battle, was subdued by the Jedi and delivered into the custody of the Governor of Galidraan. Stripped of his armor, he was sold into slavery.[8] The Death Watch had won at last.

    Fett is unrelenting in his vengeance upon Vizsla.

    Fett spent years as a slave aboard a spice transport, until his chance at freedom came when pirates attacked the ship. Though his slave masters promised him freedom if he helped them fend off the attack, Fett had already broken free of his restraints and with a stolen blaster pistol, killed the slaver before fighting his way off the ship. Once free of the spice freighter, he set his sights on Galidraan, going after his lost armor and his revenge upon the governor.[8] Slipping by all of the governor's security, Fett infiltrated his castle, recovered his armor?restored and repainted by the governor as a trophy?and offered the governor a choice: his life or the location of the Death Watch."

    The background of the saber is that it belonged to one of the Jedi Jango killed and had also been taken and repainted as a trophy by the governor. Jango took it, as well as his armor, and secretly practiced with it on Kamino in preparation for Darth Sidious' eventual Order 66.

    This one will be titled Zanzai of the Blue Death. (Zanzai literally means execution by decapitation in japanese... so, a bit of dark irony there.) hahaha

    I plan on keeping this one pretty clean and new looking (much like mostly everything was in the prequels). Rub and buff silver leaf for the main body and a nice blue for the covers. Also toying with the idea of sticking a couple of mando decals on there if I have the time.

    Anyway... That's about it for now. I'll hopefully have a couple of finished shots before the end of the week to share!

  6. #6

    Default

    And a few more pictures!

    Here are a few of Zanzai (printed main body, ready for sanding and priming):


    and I've finished Sarlacc (other than the final electric wiring to actually give it light)!


    And here are a couple of shots side by side with my first saber build!


    I wasn't going to show my first build right away, but decided what the hell. I don't really have a name for it, but I think it turned out pretty cool! It's got a Red/Orange Cree powered off from a PC3.5 board. It's built around a copper pipe, plumbing fittings, and various 3d printed spacers and grips, all wrapped up in a sinktube mount. You might notice the various screws sticking out of the hilt. The initial intent was to have a clean sinktube (held only in place around the main body by the sinktube nut). After initially fitting it all together I noticed it left the emitter/Led module/blade holder weak and very wobbly. I drilled and tapped some screws so now the sinktube connects directly to the central copper core and emitter. this increased the support tremendously and it made it a very stable balanced saber. My plan was to flush mount the screws by countersinking them into the tube, but when I did an initial test fit to see how well they gripped I loved the look of them sticking out from the surface. Gave it a neat character! Anyway... I really like the way it turned out. There are a few dings and scratches here and there, and a couple of my cuts on the sinktube may be a a tad crooked, but overall, I think it carries the spirit of a custom built lightsaber!

    While I am excited to have Sarlacc nearly finished, I am a tad disappointed as well since it appears as though it will be relegated to being a display saber only (probably the same for Zanzai, as well). The 3D printed ABS just doesn't seem to be up to the task of any kind of duel. The saber itself is very light in comparison to my first build and with the added weight of the 1" blade, it feels almost too light and fragile. A couple of tentative test swings and I could hear some cracking/squeaking that left me a little worried. Too bad as this would have been a fun one to put a full motion sensitive soundboard in and go to town with... Oh well, lesson learned. The next one I build will be like the first and built around a solid core (though there are a couple of new 3d printing filaments coming out that are a blend of ABS plastic and metal that I'm keeping an eye on. The one I'm particularly interested in is one that the developers claim can be sintered to near 99%+ metal after printing. If that's the case, it could lead to some truly awesome creations, so fingers crossed!).

    So there we have it. If all goes well I should have Zanzai rubbed and buffed by tomorrow and ready for final assembly as well. One week till Celebration. I'm cutting it close, but I think its going to turn out good!

  7. #7

    Default

    Good looking sabers

  8. #8

    Default

    You have a good eye for design. Those are some attractive looking sabers.
    We all have to start somewhere. The journey is all the more impressive by our humble beginnings.

    http://led.linear1.org/1led.wiz for the lazy man's resistor calculator!
    http://forums.thecustomsabershop.com...e-to-Ohm-s-Law for getting resistor values the right way!

  9. #9

    Default

    Thanks! Glad you like em!

    Unfortunately disaster struck tonight! I had Sarlacc completely finished (Wired, lighted, and buttoned up) and had just cut the blade to its final length (shaved 10 inches off a 1" thick walled polyc tube in hopes of reducing the weight and stress on the saber) and when I stuck it in the end, Crack, Crack, Crack!!!! :-O The main body broke clean in three spots! It was all I could do to calmly set the saber and pieces down versus throwing it across the shop in a fit of sith fueled rage.

    I carefully glued the pieces back together with some ABS black cement. I think it actually patched it pretty solid, but I'm no longer satisfied with that, nor do I trust it not to break again, so I went inside and immediately went to the computer to draw up a fix. I'm currently printing out an insert for the main housing that I'll permanently glue in place and hopefully make the whole saber several times stronger. It doesn't leave much space for the battery and wires but it should work much better. On the downside... Due to the reduced internal area from the insert, the LED will not be able to be swapped out, so I guess it's just going to be a green saber for the rest of its life. :-/

    On a happier note, Zanzai is all buffed and sealed up and should be ready for wiring and assembly tomorrow! The overall build on this one feels more solid and it only has to support a thin walled 3/4" blade.

    I've also designed and printed out a blade plug that turned out pretty nice. Pictures of that incoming.

    Well, hopefully tomorrow is a better day.

  10. #10

    Default

    Sometimes, a particular design just ends up too fragile for dueling. They still look lovely on the shelf or hanging from your belt.
    We all have to start somewhere. The journey is all the more impressive by our humble beginnings.

    http://led.linear1.org/1led.wiz for the lazy man's resistor calculator!
    http://forums.thecustomsabershop.com...e-to-Ohm-s-Law for getting resistor values the right way!

Bookmarks

Posting Permissions

  • You may not post new threads
  • You may not post replies
  • You may not post attachments
  • You may not edit your posts
  •