


So one day I was bored... er... uninspired at work and was trolling through deviantART and I ran across this lightsaber design:
So, there, full disclosure, the initial concept isn't mine, and hopefully I haven't stomped on anyone's copyright. Anyhow, I really liked the simple design; I really wanted to work on my dremel-fu; and I wanted to spend some quality time with a Nano Biscotte. Throw in some personal touches, and the end result is what I present below (a tribute saber if need be). Why Saber 19? That was the file number it happened to be. Someday I hope to build Saber 6. Saber 2 needs to be deleted. There's no logic, just go with it.
SPECS:
Nano Biscotte
18650 3.7v 3400mAh
(3) Cyan accent led's, tried to match the main color
CC(W) Tri-rebel
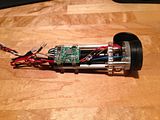
MHS and sink tube and the acrylic chassis disks
Copper mesh with a drafting mylar inner wrap
GLAMS:
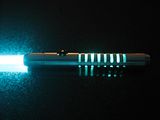

I need to shoot a video, but so far they've not been good because I have no video-fu. It?s running Madcow's Korriban font, thanks to a project that didn't end up using it and Saberfont.com. It's one of my favorites. This saber is so loud I need to crack it open and adjust the volume down, as the power down actually hurts my ears and our cat runs away and hides.
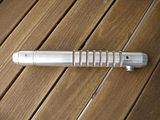
A note on the chassis - I asked Tim to add an extra set on holes on one recharge port disk, so I could transition to the smaller extension disks and keep them actually centered and aligned. Thanks Tim! This gave me the scootch of room I wanted to let the chassis slip in under the copper/mylar. For reference, the front face of the recharge port chassis is just a smidge short of the back edge of the rear cutout, and it was white knuckle time when I drilled that hole (last) since the chassis was all wired up at that point. More on that below... Luckily, it hit correctly. Uh, I mean, my mad skillz let me drill that hole exactly where it had to go. Yeah, that sounds better? Oh, and the sink tube at the switch has a hidden set screw.
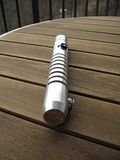
So, what I learned: 1.) I don't want to cut any grooves in MHS for a while - I've got about two dozen half-used disks on my bench waiting for some rip cuts. Cut a pair of grooves, burn cutting hand through a pair of gloves on the hot hilt, allow to cool then hand file till bored. Ease those edges, or you'll end up with a bunch of parallel cuts in your hand! 2.) I really like the layering the sink tube gives, and the shadow the battery casts on the mylar. 3.) I need to work on modifying a plug adapter, I don't think it seats correctly the way I've got the port, darn it. If need be, the chassis' got enough slack in it to slide out for charging if I can't figure something out. 4.) I need to make a kill key, same problem. Minor, and thank you Deep Sleep mode.
I hope you enjoy the saber. Critique away!


 Reply With Quote


Bookmarks