Page 1 of 2 1 2 LastLast
Results 1 to 10 of 17

Thread: Rich330's first build parts list and request for feedback

  1. #1

    Default Rich330's first build parts list and request for feedback

    Hi all,

    I have been spending quite some time reading and planning this first build of mine and am ready to order. Weeks of general reading have already saved me from purchasing from a certain company offering ready-built sabers.
    Since spending time on these boards my "best friends" so far have been the Nano Biscotte operating manual and the search button. Hope I'm on the right track and able to ask some slightly more educated questions.

    I would be really grateful for any feedback and help with my questions. I have some specific questions regarding certain items in my list as well as the general questions ...

    - What have I forgotten?
    - What have I got wrong?
    - What could I do better and how?


    First of all, here is a link to my Wish List for an overview of what I have planned for order:
    http://www.thecustomsabershop.com/Vi...shlistId=34601

    Here's a breakdown with my specific questions.

    General concept
    Simple and sleek MHS lightsaber body
    Green LED
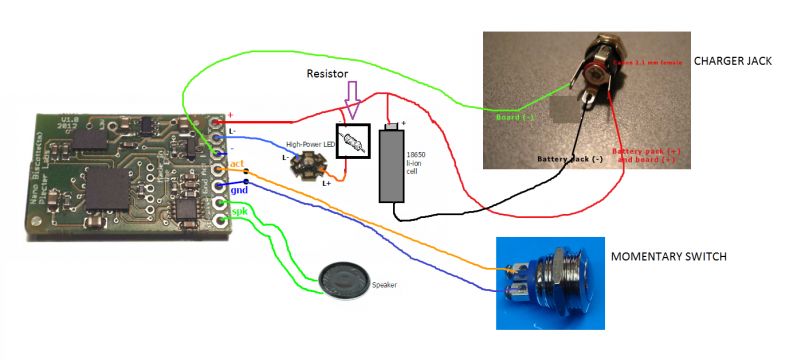
    Nano Biscotte for sound and LED driving
    A single AV switch with no LED and a recharge port housed in activation box style 9

    Body/structural parts/MHS


    Hilt - Fluted style 5 (http://www.thecustomsabershop.com/Hi...ctor-P406.aspx)
    Blade holder - Style 17 (http://www.thecustomsabershop.com/Sc...e-17-P417.aspx)
    Pommel - Style 7 (http://www.thecustomsabershop.com/MP...le-7-P386.aspx)
    Pommel insert - Style 12 with D-ring (http://www.thecustomsabershop.com/MP...e-12-P535.aspx)
    Pommel insert clip - (http://www.thecustomsabershop.com/MPS-Clip-P72.aspx)
    Choke - Style 1 short (http://www.thecustomsabershop.com/MH...hort-P317.aspx)
    Lubricant - (http://www.thecustomsabershop.com/Su...ease-P426.aspx)

    Activation box - Style 9 for AV switch and recharge port (http://www.thecustomsabershop.com/Ac...le-9-P626.aspx)
    Screw for activation plate - 4-40 button head as recommended in online store (http://www.thecustomsabershop.com/4-...Head-P625.aspx)
    QUESTION: I'm going to need the corresonding 4-40 nut aren't I? Brass is in stock. No reason why I shouldn't use brass is there?
    Drilling/tapping services - For activation plate style 9 (http://www.thecustomsabershop.com/Bo...vice-P627.aspx)
    QUESTION: I plan to request the positioning as follows for symmetry. I realise this means that the AV switch bore will not align with the typical position for the same switch if installed without an activation box. Would the requested positioning cause any foreseeable problems?
    "On top of main body. Centered in the non-fluted section. Diagram:
    "

    Covertec clip button - (http://www.thecustomsabershop.com/Ma...clip-P161.aspx)
    Screw for Covertec button - 8-32 x 1/4" socket head as recommended in online store (http://www.thecustomsabershop.com/8-...head-P107.aspx)
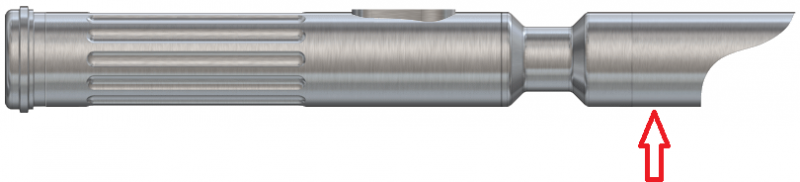
    Drilling/tapping services - For 8/32 socket head screw for Covertec clip. On the side of the main body, centered within the fluted section. (Viewed from the pommel end) rotated 90? counter clockwise from the top center/activation box/switches.
    QUESTION: Will this work OK in the fluted section?
    Diagram:


    Blade - TCSS show style (http://www.thecustomsabershop.com/LE...-OD--P450.aspx)
    QUESTION: I do not plan any duelling. I just want the brightest most evenly distributed light possible. Any opinions on my choice of blade?
    Blade retention screw - Stainless steel thumb screw (http://www.thecustomsabershop.com/8-...crew-P538.aspx)
    Drilling/tapping services - For 8/32 thread of thumb screw for blade retention (http://www.thecustomsabershop.com/Dr...Hole-P193.aspx). On underside of blade holder, i.e. opposite side (rotated 180?) to activation box/switches. In best position for otimum stability of blade please. Diagram with rough indication of position:

    Hilt safety plug - 1" clear plug (http://www.thecustomsabershop.com/1-...plug-P571.aspx)

    Second pommel assembly for when I want to carry this with the Covertec clip. My belt assembly has a hook for the D-ring but I plan to use both systems. This gives me a different look with a little more length, deliberately exploiting the higher connection and relative comfort of the Covertec clip. Design:


    Pommel - Style 8 (http://www.thecustomsabershop.com/MP...le-8-P424.aspx)
    Pommel insert - Style 1 (http://www.thecustomsabershop.com/MP...le-1-P262.aspx)
    Pommel insert clip - (http://www.thecustomsabershop.com/MPS-Clip-P72.aspx)


    Electronics
    Nano Biscotte (pre-wired) - (http://www.thecustomsabershop.com/MW...dule-P835.aspx)
    Momentary switch - 16 mm nickel plated AV no LED (thus no resistor needed) (http://www.thecustomsabershop.com/16...itch-P471.aspx)
    Kill plug - Style 2 (http://www.thecustomsabershop.com/Ki...le-2-P570.aspx)
    LED module - Rebel Star Green, fully assembled module including heatsink and lens (http://www.thecustomsabershop.com/Re...dule-P653.aspx)
    Resistors QUESTION: I understand that using the Nano Biscotte to drive a green Rebel Star with a switch with no LED means I need no resistors at all. It would be great if someone knowledgeable could please confirm. Thank you.
    Power/Li-ion battery - Locally sourced single 18650 cell with wires for integration into circuit.
    QUESTION: I think the specs are OK. Have I missed anything and ordered the wrong thing? See specs below ..

    Panasonic Enerpower NCR18650B 1S1P cell
    3.7 V
    Minimum capacity: 3250 mAh
    Maximum capacity 3400 mAh
    Overload protection (4.20V + 0.05V)
    Deep discharge protection
    Safety circuit (PCB): 2A

    I intend to solder the wires to some locally sourced JST connectors so that I can replace the battery more easily as necessary in the future.


    Charger - Suitable charger from TCSS for 3.7 V batteries (http://www.thecustomsabershop.com/37...plug-P890.aspx)
    QUESTION: I will have to purchase an adapter for the European pin and mains configuration but I think this is going to be the more convenient route, rather than trying to source a charger locally. If anybody on this side of the Atlantic knows of a good European source for a suitable charger, then I would be grateful for input.

    Power jack - Switchcraft power jack (http://www.thecustomsabershop.com/Sw...Jack-P822.aspx)

    Speaker - Premium Speaker (http://www.thecustomsabershop.com/Pr...eaker-P77.aspx)
    QUESTION: Admittedly I just saw "premium" and thought it must be 'the good one'. I haven't researched much. I'd like good volume and quality of sound (duh!). Is it the best option for my configuration?
    Speaker mount - Version 5 (http://www.thecustomsabershop.com/MH...t-V5-P887.aspx)
    QUESTION: Any problem with this in conjunction with my pommel set-ups? Any better option?

    Chassis For NB and 18650 cell (http://www.thecustomsabershop.com/Ac...k-S3-P813.aspx)
    I realise I will need to cut/file the slot for the NB on one side to accomodate the board with connectors but that won't be a problem and will probably still be the tidiest option for a chassis.
    Chassis rod - 2 x 12" threaded rod (http://www.thecustomsabershop.com/St...read-P770.aspx)
    Chassis screws - 16 x 4-40 brass hex nuts (http://www.thecustomsabershop.com/Br...-nut-P602.aspx)
    Chassis spacers - 4 x 0.5" aluminium spacers (http://www.thecustomsabershop.com/12...acer-P604.aspx)
    QUESTION: Have I selected sufficient/appropriate chassis materials? Am I going to need something else? Trying to configure this remotely without access to the parts is tricky.

    General supplies
    Heat shrink - 12 inch length (http://www.thecustomsabershop.com/18...ubing-P32.aspx)
    Wire - 3 feet of red, 3 feet of black, 26 gauge (probably much more than I need immediately) (http://www.thecustomsabershop.com/26...foot-P284.aspx)

    Many thanks in advance for all your help.

    Rich

  2. #2

    Default

    Quote Originally Posted by Rich330 View Post
    Electronics
    [S]Nano Biscotte (pre-wired) - (http://www.thecustomsabershop.com/MW...dule-P835.aspx)[/S]
    I have been trying to put a wiring diagram together and, in the interest of saving space, I have decided to order the NB without wiring harness and will be limiting the JST to one each on the LED side, battery side and speaker side. The board itself will stay permanently wired with plain wire.
    I've added a few feet more of wire to my order and a few extra colours to avoid confusion.

    PS Where would be the appropriate place to post my attempts at a wiring diagram and related questions? In this thread or somewhere else?

  3. #3

    Default

    You can put your wiring diagrams in this thread if you like. There are some very good diagrams in the Nano manual that should suit your purposes. You're not trying to do anything out of the ordinary with this board.

    On to your questions:

    QUESTION: I'm going to need the corresonding 4-40 nut aren't I? Brass is in stock. No reason why I shouldn't use brass is there?
    If you get the mounting service, the 4-40 hole will be threaded. No retaining nut will be necessary.

    QUESTION: I plan to request the positioning as follows for symmetry. I realise this means that the AV switch bore will not align with the typical position for the same switch if installed without an activation box. Would the requested positioning cause any foreseeable problems?
    Shouldn't be an issue. Point Tim to your diagram(s) when explaining where you want things located. That goes for any other placement items, like blade retention screws, covertec screws, etc.

    QUESTION: Will this work OK in the fluted section?
    Yes. There will be some gaps underneath due to the fluting, but it will still work.

    QUESTION: I do not plan any duelling. I just want the brightest most evenly distributed light possible. Any opinions on my choice of blade?
    Any blades sold here are great for dueling. For brighter and evenly distributed color, you'll want one of the thin walled blades (clear or transwhite) with a diffuser of some sort. Clear gift wrap is the typical choice. See this post for help: http://forums.thecustomsabershop.com...how-I-do-it%29

    QUESTION: I understand that using the Nano Biscotte to drive a green Rebel Star with a switch with no LED means I need no resistors at all. It would be great if someone knowledgeable could please confirm. Thank you.
    Yes, you can do that. If you want to use a resistor, a 1 ohm, 2 watt will work just fine, but it's not needed.

    QUESTION: I think the specs are OK. Have I missed anything and ordered the wrong thing? See specs below
    That battery is fine.

    QUESTION: I will have to purchase an adapter for the European pin and mains configuration but I think this is going to be the more convenient route, rather than trying to source a charger locally. If anybody on this side of the Atlantic knows of a good European source for a suitable charger, then I would be grateful for input.
    You should be good with an outlet adapter.

    QUESTION: Admittedly I just saw "premium" and thought it must be 'the good one'. I haven't researched much. I'd like good volume and quality of sound (duh!). Is it the best option for my configuration?
    They're all good speakers. The bass speaker has better bass response, but they all work very well. Certain sound fonts may sound a little better on different speakers, but the premium works well for all of them.

    QUESTION: Any problem with this in conjunction with my pommel set-ups? Any better option?
    Should work fine.

    QUESTION: Have I selected sufficient/appropriate chassis materials? Am I going to need something else? Trying to configure this remotely without access to the parts is tricky.
    I think you'll have plenty, with some spare parts as starter material for your next saber.

    You've done your research. I don't see anything that's missing. Good luck with your build!
    We all have to start somewhere. The journey is all the more impressive by our humble beginnings.

    http://led.linear1.org/1led.wiz for the lazy man's resistor calculator!
    http://forums.thecustomsabershop.com...e-to-Ohm-s-Law for getting resistor values the right way!

  4. #4

    Default

    Many, many thanks for the very full response.

    One quick further question. You say I can install a resistor if I wish to. Does this have any particular benefit? The only thing I can think of is that it might enable me to set up the LED module as a quick-disconnect and allow me to change to a red LED.
    Is this right?

  5. #5

    Default

    I placed my order.

    And, if I'm not mistaken, this is what my wiring shoudl look like. It's basically just a quick mock-up which combines the two diagrams from the manual so I'm guessing it's OK.

    EDIT: Wiring amended as suggested below:


    Now, where did I put that third hand and those crocodile clip heat sinks .... ?
    Last edited by Rich330; 12-29-2013 at 12:48 PM. Reason: Amended wiring diagram

  6. #6

    Default

    Remove the blue wire running from the battery (-) to the board. The battery negative should only be running to the recharge port.

    The resistor is optional. The general rule around here is "Always use a resistor." It adds a small margin of safety and protection against the LED overheating. The LED and battery pack are close enough in value that you can get by without one. Many of the big name sabersmiths will skip the resistor on a setup such as yours.

    If you wanted to switch to a red LED, you would need to use a resistor with that one. The forward voltage of the red LEDs is low enough that the battery would burn out your LED without a resistor. You can set up the main LED with a quick disconnect if you like, but be sure that the resistor (if any) is on the LED side of the quick disconnect. That way you can remove the LED and resistor all at once, and swap with another LED/resistor combo.
    We all have to start somewhere. The journey is all the more impressive by our humble beginnings.

    http://led.linear1.org/1led.wiz for the lazy man's resistor calculator!
    http://forums.thecustomsabershop.com...e-to-Ohm-s-Law for getting resistor values the right way!

  7. #7

    Default

    Thank you very much again. That all makes a lot of sense.
    I will set the wiring up with the resistor on the LED-side of the quick-disconnect exactly as you suggest so that I have that option of swapping LEDs later.

  8. #8

    Default

    I tried to calculate the resistor I would need for a red Rebel Star.
    This is the data from the online store: Red 106lm @ 700mA 2.4v - Run at 700mA
    The calculator recommends: "2W or greater 2.2 ohm resistor"
    So, I would use this 2.2ohm 5W resistor from the store: http://www.thecustomsabershop.com/22...istor-P11.aspx
    Have I got that right?

  9. #9

    Default

    That is correct.
    We all have to start somewhere. The journey is all the more impressive by our humble beginnings.

    http://led.linear1.org/1led.wiz for the lazy man's resistor calculator!
    http://forums.thecustomsabershop.com...e-to-Ohm-s-Law for getting resistor values the right way!

  10. #10

Bookmarks

Posting Permissions

  • You may not post new threads
  • You may not post replies
  • You may not post attachments
  • You may not edit your posts
  •