-
Council Member
Jedi Council Member


Nice tutorial. I do a few things differently than you do. But I'm not saying your way is wrong, there are different ways to do things.
I understand that you wrote your tutorial to help other people learn to make their own pouches, not to advertise selling them to people.
I've never used any type of scissors or shears to cut my leather, I use those cheapy utilty knives with the snap off blades, they work well for me, along with a nice, thick steel ruler for the straight cuts. The trick with getting a good, clean cut through thick leather is have a very sharp blade and not to try and cut all the way through on the first pass, make several passes, going a little deeper with each pass until you are all the way through to your cutting board.
I also like to bevel the edges of my leather, it's not always important, but I think it can be when you are doing a belt, it helps to keep the edges from rolling and breaking down.
I, personally, don't trust just gluing seams, I use both glue and stitching, it's stronger, and I like the way the stitching looks. After the glue dries at the seams, I then mark my holes, but need to use a drive punch, because going through 2 layers of leather that are glued together can be too hard to do with a rotary punch.
Before I punch my holes, I use an adjustable grooving tool to mark an even line along the edge of the seam, this also recesses the thread a bit, so it is less likely to wear. Not necessary for the beginner.
I stitch using 2 needles at the same time, one on each end of the thread. For this you need something called a stitching pony, to hold your work:

The horizontal part goes under your thighs and your work clamps into the vertical part.
There is a special way to thread your needles to that the thread doesn't pull out. When I stitch this way, I cut a piece of thread 3 times longer than the seam.
I like to put the front side of the piece I'm working on to my left. I insert one needle into the first hole and pull the thread through till it's centered. Then I pass the left, frontside needle through the next hole, then the right, backside needle goes through the same hole and you pull both ends of the thread tight.
Continue this way down the entire seam, then when you get to the end, back stitch through 2 or 3 holes and cut the thread off flush with the leather. No knotting required. 
This method of double stitching makes a very strong seam and it looks nice at the back too, if anyone sees that side. :P
Working with leather takes a little practice, but the results can be worth it, when you can make pouches in what ever size and shape you want.  I actually bought a couple of kits from Tandy that had 2 different contruction methods and studied them. I also have a couple of books on basic leather working that have been a lot of help to me. You can probaby find books about this in your local library.
I work out my patterns on brown craft paper, then when I'm satisfied, I transfer it onto posterboard. This makes my "template" that is easier to use to trace your pattern onto the leather.
I decided to start learning leather working a few years ago because I wanted to be able to make things for myself, and customize them. 
In order to see the Light,
you must sometimes risk the Dark.
TCSS MODERATOR

BLUE 8 Ready to ROCK and ROLL!
-
Yeah thanks Tim. That is what I began thinking about after I had said it. I am going to edit my posts to remove the offending material. Thank you for this site and your patience with idiots like me.
JLo thanks for the extra info. I knew you could always chime in and help clear up the confusion. It really is fun to work with leather like you said. Once you learn to do it you can really have more fun with your own stuff.
edit
Hey Jedi Loreen do you have a picture of the groove left by the adjustable grooving tool? I have been meaning to pick one of those up, but I usually just use my swivel knife. However, the knife tends to not make a perfectly straight line no matter how hard you try. I think the groover would work perfectly. I may just have to get one to try it out.
-
Council Member
Jedi Council Member
The groover just makes a narrow, shallow groove, and you can adjust how far from the edge of the seem it will make that groove. I have even used it in the areas where I make my folds for my pouches.
So far, I've only made 2 pouches:
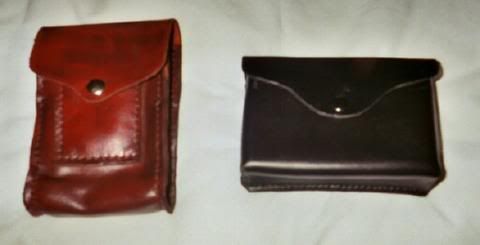
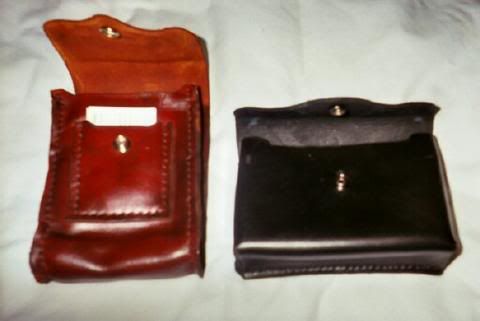
The brown one is made of a thinner leather. Since I wear it at my back, I didn't want something that was too hard. I also put a business card pocket in it. It's made using the 2nd construction method you made the diagram for, using the two gussets. It has the belt loops riveted on, to slide onto my Jedi belt.
The hard black one uses 2 pieces of leather and is only stitched along the back, the 2 corners are cut out at right angles and glued. The belt loops for this one are riveted on at the top, but have snaps at the bottom so I can get it onto my Sith belt, that has spike studs on it, instead of the button studs that Jedi belts use.
You can check out some of my other leather work here, though I need to get some pics of the greaves I made a couple months ago, into my album.
Jedi Loreen's Leather Work
In order to see the Light,
you must sometimes risk the Dark.
TCSS MODERATOR
BLUE 8 Ready to ROCK and ROLL!
-
Thanks Jedi Loreen. All your work looks really nice. I might just have to pick up one of those groovers to finish up my Anakin belt with. Looks like it would do the trick perfectly. Like I said originally I am not the master of all things leather, and I am learning some things as I go. Thanks again for the pics.
 Posting Permissions
- You may not post new threads
- You may not post replies
- You may not post attachments
- You may not edit your posts
-
Forum Rules


 Reply With Quote
Bookmarks