


Do to the termination of my account on my old picture hosting site, and some confusion from the way I originally wrote this tutorial, I am re-posting this edited version. I would really like to make another one of these, LED instead of EL this time, and document the making of it better for you all. This is mainly for those who are limited to a drill and a dremmel in the way of tools. I will start with a parts list. Nearly all prices of items which you can not get right in the saber shop store are approximate, though most of the stuff you can get here.
1.5 sink tube - $3.87
1.25 sink tube - $3.87
1 3/8 chrome end cap - $0.91
Covertech belt clip - $11.99
#8-32x 3/8 button head screw - $0.20
Spray-on truck bed liner - $7.50 (you can get this at Wal-Mart in the auto section.)
1 ½ x ¾ (or 1) washer - $0.35
PVC - $5.00 (1 1/4" PVC, 160 psi rated) This is the same type the Big Yellow Box guy reccomends for styles 6 and 8
Red switch - $2.50 (I used a momentary from Radio Shack, but the ones here look quite good too.)
Epoxy - $5.00 (if you dont have some already)
1.25x1.5 Flexible PVC tubing - $12.60 (http://www.usplastic.com/catalog/pro...duct%5Fid=8742)
Polywashers - $5.00 (at least 4 1.25 ones, and two of the strange 1.25 x 1.5 ones)
1.25" LED Blade holder, LED, etc
First of all, if you want a machined finish on the tube like the one I made has, wrap a large drill bit with duct tape until you can just jam the 1.5 tube snugly over it. Put the drill bit into a drill. Using 100 150 grain sandpaper, move it up and down the tube as it is spinning and this will create the desired effect.
Next, youre going to want to cut the 1.5 tube in the pattern for the outer tube. The easiest way to do this is using a cut off wheel on the dremmel. You should at least drill out the hole for the screw for the Covertech belt clip with a 1/8 drill bit. Remember also to cut out a ½long section from the tube. If you have a really large pipe cutter you can use that. Next, cut out a ½ long section of the PVC (thats all youll need). The 1/2 band of sink tube goes into the ½ band of PVC. To prepare the 1.25 tube, cut about ¾ off the non-flare end. Sanding it in the same way as the 1.5 tube will also make it easier to put the grips on.
Here are the links to the templates for both the grips and the sink tube.
http://i169.photobucket.com/albums/u...i-gongrips.jpg
http://i169.photobucket.com/albums/u...gonPattern.jpg
Out of the grip material, cut a 6 ¼ long piece. You might want to make it longer, and then even out the edges. The bottom should be flush with the bottom end of the grip slot in the 1.5 sink tube. Now you need to test fit it onto the 1.25 tube. The bottom of the grips will need to be dremmeled out a little bit with a sanding drum so it will fit over the flare out section. I didnt do this on the one in the picture, but I figured it out afterwards. My brother did it when he made his. With the bottom of the grips flush with the bottom of the 1.5 tube, you should be able to slide it down the 1.25 tube until the bottom edge of the 1.5 is flush with the threads on the 1.25 tube.
To cut out the slots, take the grips back off of and out of the sink tubes. Use the pattern to make slots in the grips with a cut off wheel on the dremmel. (Remember, the grey is the area you want to keep.) Youll want to clean up the edges with a utility knife. Next, youre going to want to paint it, so roll up a piece of paper, and stick it on the inside before you spray it, so as not to get any paint on the inside of the tubing.
For the pommel, take the screw-on piece that comes with the 1.25 tube, and grind all the ridges off so that it is smooth. I used a bench grinder, but if you dont have access to one, a dremmel will probably work. Take the end cap, cut off the teeth, and epoxy it into the screw-piece. This you will spray with the truck-bed liner. The one in the pictures has slots in it to let out the sound. If you are doing one with sound, keep the teeth on and they can hold the 1 1/8 speaker from Radio Shack nicely.
Now you can put the grips and tubes back together. When youve done that, drill and tap the 8-32 hole for the covertech clip, and screw the screw in to keep things from moving around. Make a mark in the top of the grip material for the switch hole, and drill it out. You will probably have to use a dremmel to make it big enough for the switch to fit.
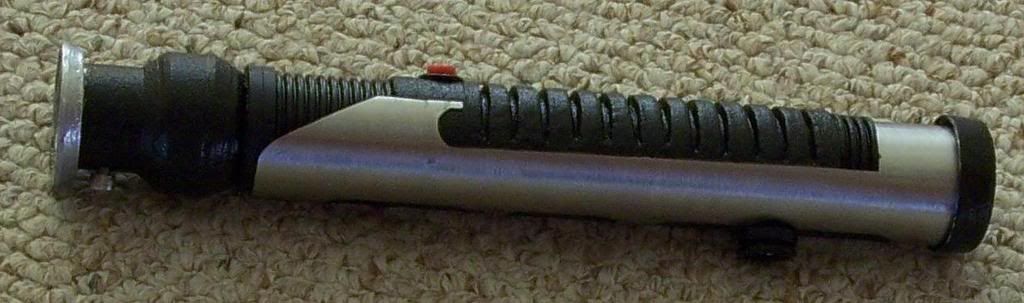
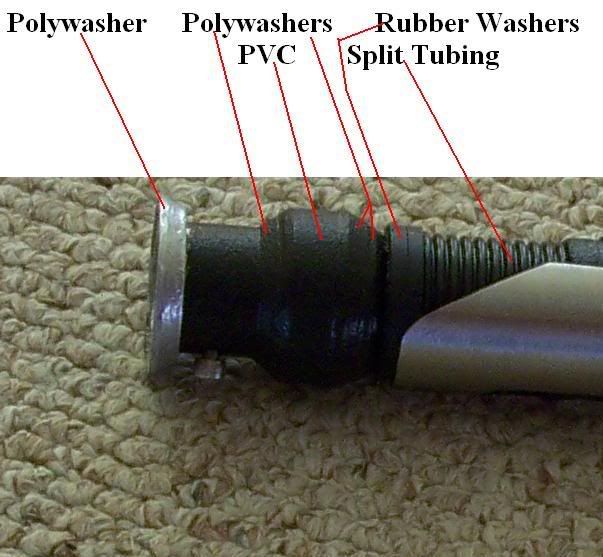
Now look at the picture, and cut some split tubing for the area above the switch. Slide the rubber washers down like you see, and then epoxy the split tubing in place so it doesnt slide around. Next comes a 1.25 polywasher, then one of the 1.25x1.5 polywashers, then the pvc/sink tube ring on top of two 1.25 polywashers, then another 1.25 polywasher. This is for the flare-out section near the top. For mine, I used some epoxy to fill in any cracks before spraying it black. The other 1.25x1.5 polywasher is epoxied to the washer for the emitter. This can be painted chrome or silver. With the hilt assembled as it is so far, cover with tape all the areas you dont want black, and give it several coats of truck bed liner to get between the grips and the flared section at the top. Epoxy on the emitter, add the covertech clip, screw on the pommel, and its done! You now have a very nice Qui-gon hilt!
http://i169.photobucket.com/albums/u...her/3Three.jpg
http://i169.photobucket.com/albums/u...cher/4Four.jpg
http://i169.photobucket.com/albums/u...cher/5Five.jpg
http://i169.photobucket.com/albums/u...rcher/6Six.jpg
http://i169.photobucket.com/albums/u...her/7Seven.jpg
http://i169.photobucket.com/albums/u...her/8Eight.jpg
http://i169.photobucket.com/albums/u...cher/9Nine.jpg
http://i169.photobucket.com/albums/u...cher/10Ten.jpg
If you have any questions, feel free to ask!
-Luke


 Reply With Quote


Bookmarks