Page 1 of 3 1 2 3 LastLast
Results 1 to 10 of 28

Thread: Andrew's personal saber

  1. #1

    Default Andrew's personal saber

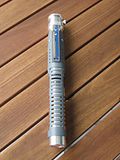
    Hello, everyone. I’d like to present my newest saber, and this one I’m keeping for myself.

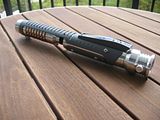
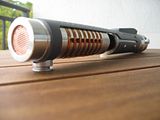
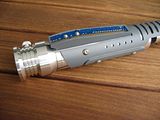
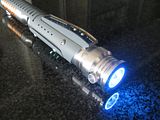
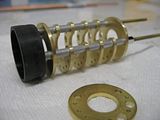
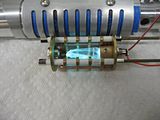
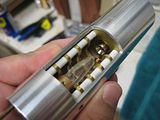
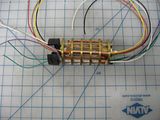
    It’s my first crystal chamber, and it’s a reverse sound configuration so hiding all the wires was a priority as originally the chamber was to have been in the back of the saber. During a trip to the hardware store I found some brass washers that fit the MHS interior perfectly, so it got a quick hardware store redesign and got further massaged during the build. I was going for a radiator-style chamber, with copper tubing snaking through the brass fins and around some hollow copper pipe that were the wire chases. I repeated that material scheme through copper tubing wrapped in grooves in the extension, and some copper mesh in the pommel.

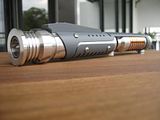
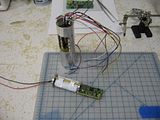
    I asked Tim to add the grove to the pommel, and he did the copper orange powder coating on the ribbed grooved extension as well. The SD card actually sits a smidge proud of the end of the extension, so it’s really easy to access by removing the pommel. The control box I designed and had 3D printed in “stainless steel” so it’d be durable. And darn hard to drill through… The card insert is friction fit and came from a RAM card pulled from on old computer. I cut the shrouds, and painted and baked them and the control box. Finally, the choke has a black pigskin suede wrap where the recharge port is mounted.

    Alright, enough of me babbling on. Here’s the fun stuff…


    Specs:

    Petit Crouton 2.0 with Madcow’s “Hero” font
    7.4V 14500 battery pack, recharge port in the choke
    LED Engin configured for “Sky Blue” blade w/ RW FOC
    Semi-exposed Quartz crystal chamber
    Custom switch box
    Reverse sound configuration
    Accent leds – turquoise behind the crystal, wired as a power indicator, with white and turquoise keister blinkies


    Video:


    Photos:


    Details and in-process photos:


    Thanks for looking, and I eagerly await comments and criticisms.
    Last edited by amwolf; 10-13-2012 at 03:23 PM.

  2. #2

    Default

    I love it. The crystal chamber is beautiful. That shroud is amazing. Definitely one to be proud of. Congrats!!!
    There's a difference between knowing the path.....and walking the path.


  3. #3

    Default

    Slick, very Old Republic looking. I'd buy it.
    "Because your own strength is unequal to the task, do not assume that it is beyond the powers of man; but if anything is within the powers and province of man, believe that it is within your own compass also."
    -Marcus Aurelius, one of the Five Good Emperors of Rome


  4. #4
    Youngling madmaxx's Avatar
    Join Date
    Jan 2012
    Location
    Dagobah Brisbane
    Posts
    205

    Default

    thats a really nice looking saber well done. Love the chamber
    ....Don't fear the Reaper....
    ....He's just a Sith Lord that has lost his lightsaber....


  5. #5
    Jedi Padawan
    Jedi Padawan
    Boj-Vaati Mau's Avatar
    Join Date
    Oct 2010
    Location
    United States
    Posts
    608

    Default

    Well done! Many interesting features in this saber. But it's definitely not a spinner with the cool activation box where it is. Keep up the excellent work!

    Knowledge must be balanced by Practice.
    Practice must be balanced by Experience.
    Through Knowledge, Practice, and Experience
    we gain Wisdom.

    -Boj-Vaati Mau
    Jedi Sentinel, Jar'Kai practitioner,
    and Instctor at Strafe Plains Temple


    Saber Guild: Strafe Plains Temple
    The Rebel Legion

  6. #6

    Default

    Yes, spin well it does not. Also, I'm hemmed in by 8ft ceilings, which tend to limit experimentation. Thanks everyone!

  7. #7

    Default

    Wow, beautiful work! Love the crystal chamber with the "fins". How did you get the washers so uniform, don't tell me you did that by hand?!

    Okay, and I have to ask... the stick of RAM, how did you manage to curve it for the switch box? It looks amazing! As a longtime tech, I have more RAM sitting around than I care to count... would love to try something like this.

  8. #8

    Default

    First, I've got a dremel, and 6" flat file, and a drill press, and I'm not afraid to use them. I drilled out holes for the brass 4-40 rod in all the washers in a big stack (I had a few extra in there in case I screwed up) with a bolt running through the center, so I'd have them aligned correctly. Then I drilled one of them as a template, then things got unfortunate when I tried the bolt trick again. I snapped off a 1/16" bit which was the size of the pipe holes during the first attempt, and had to pull the whole thing apart and curse my way through separating the last now stuck together 3 plates. After that I just mated the template to one fin, pinned together with some short rod sections and some longer hex-bolts I found at a computer supply store, and set into a wood block with matching recesses drilled to hold the bolts. The parts didn't move, allowed for quick alignment, and was easier to reassembly when I snapped off bits. I went through something like one bit per 1.5 fins. The open section was cut with my dremel then filed by hand and mark-1 eyeball to an offset of the aluminum rod cover's radius.

    As for the RAM, it was an older card (my wife's office has a room full of discarded PC's, so asking the IT office for parts was no problem). I was only about 1/16" thick, and once it had been cut to width it actually had some bend to it. It's a friction fit, so I cut wide then checked for fit, followed by one lengthwise pass with my file, check for fit, lather, rinse, repeat till it snapped into place. Getting it back out during dry fit was a real pia; I had to pry my smallest allen key into the open slots in the card and convince it to pop one end out. Drilling it out after that for the switches was the nerve racking part - I'd made 4 concept attempts out of generic plastic sheet before tackling the card and I knew I did not want to mess up and have to start over. Pushed in the switches, added a smidge of hot glue to hold them in place, wired it up, and shove-fu'd that bad boy into place.

  9. #9
    Jedi Padawan
    Jedi Padawan
    Boj-Vaati Mau's Avatar
    Join Date
    Oct 2010
    Location
    United States
    Posts
    608

    Default

    Quote Originally Posted by amwolf View Post
    Yes, spin well it does not. Also, I'm hemmed in by 8ft ceilings, which tend to limit experimentation. Thanks everyone!
    LOLZ! As am I, my friend! There are a couple of maks on the celing that my wifewill disdainfully look at when I start swinging a saber in the living room.

    Knowledge must be balanced by Practice.
    Practice must be balanced by Experience.
    Through Knowledge, Practice, and Experience
    we gain Wisdom.

    -Boj-Vaati Mau
    Jedi Sentinel, Jar'Kai practitioner,
    and Instctor at Strafe Plains Temple


    Saber Guild: Strafe Plains Temple
    The Rebel Legion

  10. #10
    Council Member
    Jedi Master
    FenderBender's Avatar
    Join Date
    Jul 2008
    Location
    Earth System - Rhode Island
    Posts
    1,531

    Default

    Nice job! Everything 'flows' well with this one. I love the ramped box up front, helps with the aforementioned "flowing". Do some more!

    If you're new, please take the time we all consider just as precious as you and READ!

    GET LATHED!

    Official BMF and LORD OF THE STRINGS

Bookmarks

Posting Permissions

  • You may not post new threads
  • You may not post replies
  • You may not post attachments
  • You may not edit your posts
  •