Page 1 of 3 1 2 3 LastLast
Results 1 to 10 of 26

Thread: MWS 700mA Buckpuck with Charge Port

  1. #1

    Default MWS 700mA Buckpuck with Charge Port

    Hi guys

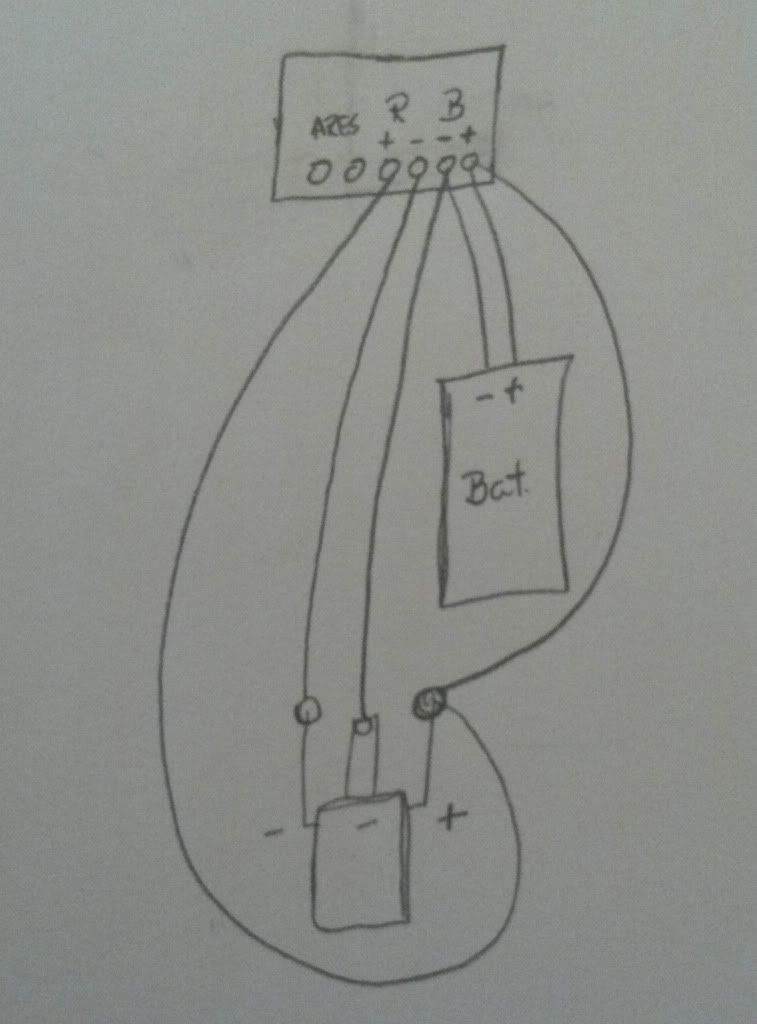
    I have recently built a new saber with a Rebel Deep Red, 4 AAs, red ring AV switch, and the MWS 700mA buckpuck. My question is how would one hook up the standard charge port?

    The puck description says there is a hookup for the port, but it only has two wires. How do you attach this to the 3 prong port?

    Thanks in advance

  2. #2

    Default

    Go to this thread, http://forums.thecustomsabershop.com...Wiring-Diagram, and look at the hand drawn diagram made by SlothFurnace 5 posts down on the page.

  3. #3
    Owner of the Custom Saber shop Strydur's Avatar
    Join Date
    Oct 2005
    Location
    USA
    Posts
    3,521

    Default

    Not that it is hard to wire as shown on sloths diagram but you do not need to use the 3 pins with the MWS buckpuck as long as you only charge when the saber is turned off. This is because with the saber off the power to the buckpuck is cut off unlike how it would be with a PC for instance. I am not sure that charging with it on would even hurt the buckpuck but I figured better safe than sorry and why charge with it on anyways.
    Tim
    The Custom Saber Shop

  4. #4

    Default

    So looking at that diagram... I would use the center negative lead to connect to the puck?

  5. #5

    Default

    I would wire it up just like Sloth's picture, regardless of the buckpuck's ability, for several reasons. 1) it will allow for the use of a kill key, which helps save battery life when not using the saber. 2) If one day you decide to upgrade to a PC soundboard you won't have to make changes to how the port is wired. 3) If you ever sell your saber and the new owner wants to upgrade it, they won't find something unusual under the hood.

  6. #6

    Default

    Quote Originally Posted by Darth Animus View Post
    So looking at that diagram... I would use the center negative lead to connect to the puck?
    Center negative goes to the battery, Left-hand negative goes to buckpuck, Right-hand positive goes to both battery and buckpuck.

  7. #7
    Owner of the Custom Saber shop Strydur's Avatar
    Join Date
    Oct 2005
    Location
    USA
    Posts
    3,521

    Default

    1) it will allow for the use of a kill key, which helps save battery life when not using the saber

    This is not true as the MWS buckpuck setup completely kills the circuit when the switch is off unlike a PC or some other device that has to stay awake enough to sense if the power switch it turned on. But like I said, no reason not to wire it up the way sloth shows.
    Tim
    The Custom Saber Shop

  8. #8

    Default

    Ok, I just want to be sure. Where I'm confused is the puck has an R+ and an R- connection, which came with a JST connector pre-attached. (Currently not connected to anything.)

    The description says "Recharge Port (R+ and R-) This simply goes straight to the battery. Only charge with switch turned off."

    Should I unhook that JST, and wire it up like this? Soldering to the port, but using the screw connectors on the puck?


  9. #9

    Default

    I forgot that the buckpuck had a separate input for recharge port. Eliminate the extra wires going from B+ and B- to the + and - on the recharge port and you have what you need. All you need is R+ and R- going to the port.
    Last edited by DarkarNights; 06-23-2012 at 10:07 PM.

  10. #10

    Default

    Thank you, kind folk of the interweb, you are most kind and helpful!

Bookmarks

Posting Permissions

  • You may not post new threads
  • You may not post replies
  • You may not post attachments
  • You may not edit your posts
  •