Page 2 of 2 FirstFirst 1 2
Results 11 to 17 of 17

Thread: Custom Saber Build Log: Azaz'el

  1. #11
    Jedi Council Member cardcollector's Avatar
    Join Date
    Jan 2009
    Location
    I am A proud American.
    Posts
    2,567
    Blog Entries
    3

    Default

    Six weeks into construction of this saber... reaching the homestretch.

    The Client changed his mind on the Main LED setup, so I have to wait for that in the mail the next few days... So I will got some prepping wire work done.


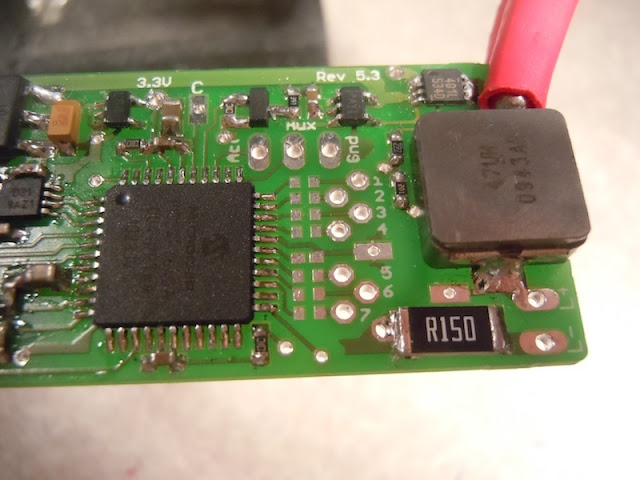
    Time to add some SMD resistors to the Crystal Focus v5.1....


    Done. Tiny little buggers aren't they?


    Speaker all ready to go.


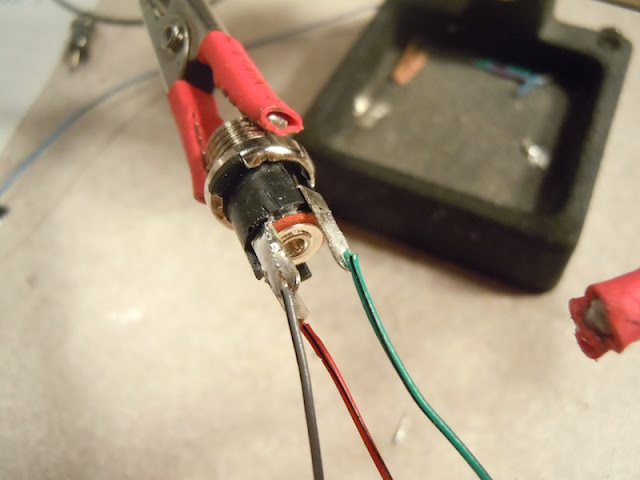
    the recharge port...


    And the Aux switch....

    So now, when the LED gets here, I will be able to slap the top section together, and beging final assembly of the Chassis... Wire up the CF. and she will be done.

    Oh, and here is the hilt, completely assembled and ready for install.


    Got a Question? There's a thread for that...
    ~Do what you can, with what you have, where you are.~Teddy Roosevelt

    SollusVir everywhere else... FXsabers, Youtube, etc...

  2. #12

    Default

    Looking really good!
    Yub Yub Commander.

  3. #13

    Default

    May I ask how you disassembled the AV switch and assemble please, I would like to add to knowledge.
    "The force is everywhere, it binds us togeather"

  4. #14
    Jedi Council Member cardcollector's Avatar
    Join Date
    Jan 2009
    Location
    I am A proud American.
    Posts
    2,567
    Blog Entries
    3

    Default

    Quote Originally Posted by Xanatos1986 View Post
    May I ask how you disassembled the AV switch and assemble please, I would like to add to knowledge.
    All you have to do is remove the metal lip around the base of the switch, and the entire assembly slides right out. I just glued it back together after the weathering.
    Got a Question? There's a thread for that...
    ~Do what you can, with what you have, where you are.~Teddy Roosevelt

    SollusVir everywhere else... FXsabers, Youtube, etc...

  5. #15

    Default

    How did you accomplish soldering those tiny SMD resistors? And what is the pad in the middle that looks to have solder on the pads but no resistor ? Im talking about the one next to the Accent LED ground pad. Do you have to bridge that too or is there just solder on there for no reason ? I would love to know so I dont mess my CF up. Thanks

    Terrific work by the way ! Very interesting build !

  6. #16

    Default

    Man that's a sweet build. I love that middle section with the ribbed section/angled sections. The weather also looks really good

  7. #17
    Jedi Council Member cardcollector's Avatar
    Join Date
    Jan 2009
    Location
    I am A proud American.
    Posts
    2,567
    Blog Entries
    3

    Default

    Quote Originally Posted by StickStickly View Post
    How did you accomplish soldering those tiny SMD resistors? And what is the pad in the middle that looks to have solder on the pads but no resistor ? Im talking about the one next to the Accent LED ground pad. Do you have to bridge that too or is there just solder on there for no reason ? I would love to know so I dont mess my CF up. Thanks

    Terrific work by the way ! Very interesting build !
    That sir, is a loaded question.
    I have had three years of soldering practice first and foremost, on various boards and components. so experience really cam into play soldering those resistors.
    Also, I have a good solder Iron. It is an anti-static $40 iron from MPJA. I bought some of the smallest tips, and work with that almost every day.

    Then, I read the instructions in the CF manual, and went at it. Previously soldering the SMD LEDs helped some. You have to have patience, a steady hand, and use very little solder. I can't stress enough how important it is to keep a clean tip. I use a brass sponge, and it works the best IMO. A clean tip means instant solder flow.
    Watch Erv's soldering tutorials too!

    The empty space is an extension of the LED-, I was just going down the pads and didn't check till after to see what they went. :P

    Good luck if you decide to try it out. Definitely the toughest solder job ever. If you can pull it off... you can solder pretty much any other saber related component.
    Got a Question? There's a thread for that...
    ~Do what you can, with what you have, where you are.~Teddy Roosevelt

    SollusVir everywhere else... FXsabers, Youtube, etc...

Bookmarks

Posting Permissions

  • You may not post new threads
  • You may not post replies
  • You may not post attachments
  • You may not edit your posts
  •