Page 1 of 4 1 2 3 ... LastLast
Results 1 to 10 of 33

Thread: fau-pa's first saber (erv's petite crouton/ledengin 10w)

  1. #1

    Post fau-pa's first saber (erv's petite crouton/ledengin 10w)

    Sup guys and gals, its been a long time. I got into this hobby back in 07' but I was a kid and didn't have the funds to follow up on any of my designs. Around the time I did have funds for projects I had fallen pretty heavily into motor sports. I spent about four years building cars and practicing my mechanical skills. Responsibility came knocking though and I found myself putting my cars in storage and set out in search of a less...taxing hobby. Soon after I was scouring this forum and was very pleased with how far you all have brought this hobby.

    I have been employed as a CNC machinist for four years now and decided i would start focusing more on that skill set, naturally, the best way I could think to do that was to start my first saber project using manual machines. Throughout this thread i will be posting up my build. Hope you enjoy -Pat

    I decided to start with one of the more simple designs. I apologize for the picture quality (i was using my cell) and the kinder-gardener sketches. These were all quick doodles in between machine cycles at work. For this design I decided to use a 1-5/8" bar of 6061 aluminum we had lying around. As far as this material machines I think the stuff is the bee's knees.


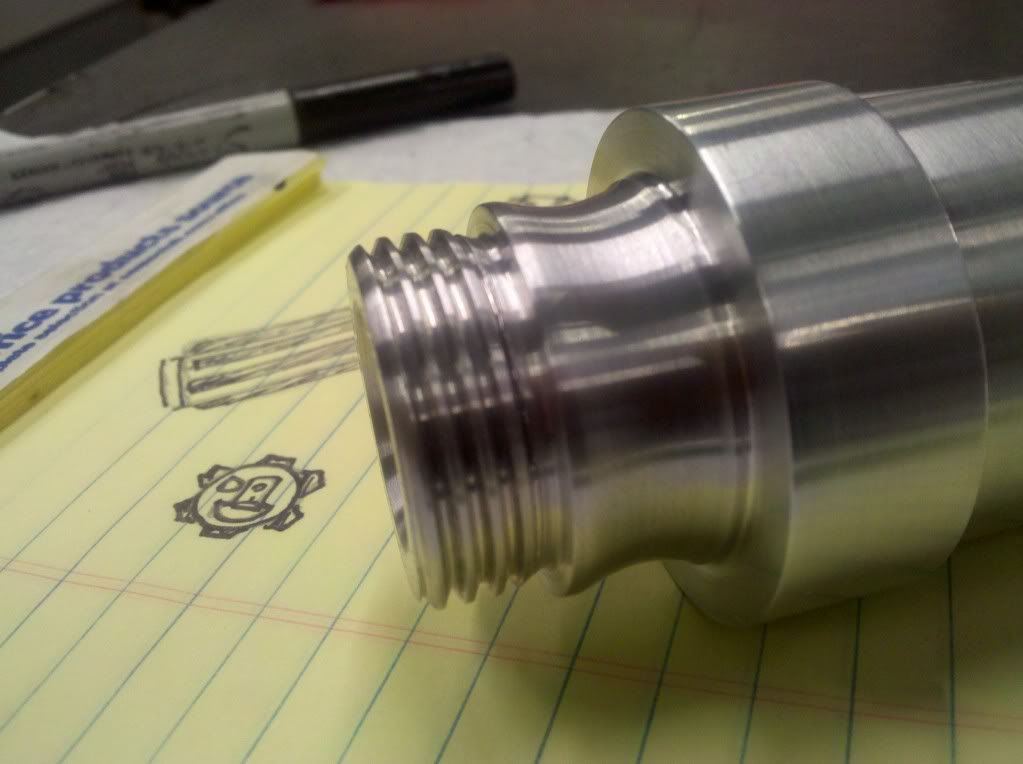
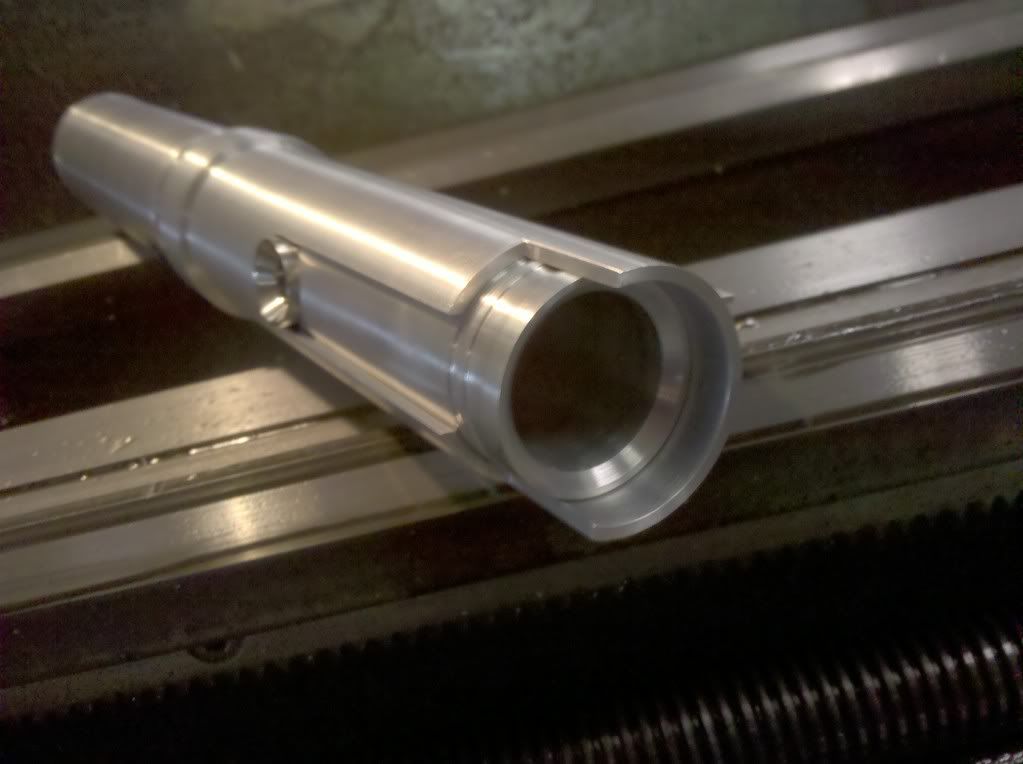
    Roughed the outer and inner diameter out using the lathe today. I am basing the more critical demensions an old TCSS hilt me and my brother got when I was a kid. Mainly outer diameter and inner diameter. I was afraid I was going to get a lot of tool chatter because how far it was sticking out from the face of the chuck. so I just cut it off after the outer diameter was finished. Thinking back it probably would have been easier if I would have roughed out the ID before parting it off. After most of the material was moved from the inside i flipped it over, skimmed it down, and tapered the back end for threads. there is a small thread relief in the back of the soon to be threads with a shoulder to help the two parts lock together. i am hoping that the gap is enough for me to stop the tool from crashing into the shoulder as i have never cut external threads manually. all in all i think it was a pretty productive lunch period though.


  2. #2

    Default

    Looks like a great start.
    Yub Yub Commander.

  3. #3

    Default

    thank you knighthammer. i think i am starting to get the hang of this manual machine. i feel more comfortable on it. still a lil' nervous but i'm sure it will pass.

    today i got a lot done and i think it is finally starting to look like a saber. i wish i took more pictures but i was a bit short on time. started work on the bottom section of the main body. i also bored out the inner diameter of both pieces and made a cap to go in the pommel. (sorry i don't have many pictures of the cap by itself i will try and get some more uploaded tomorrow night)

    this is the top section bored out.


    here is the pommel end of the bottom section. i started having problems with chatter due to the fact i had the boring bar hanging out so far.


    this is the part that is going to get the female threads. there is a shallow shoulder cut out so that the parts will lock together nicely. the inner diameter of this shoulder was a big concern to me. i wanted there to be little to no gap at the point where the bottom and top parts lock together. its something that probably no one else would notice but it would bother me if it was there.


    the two parts layed out prior to threading.


    i stayed a bit after work and got the two peices threaded so i could put them together. the pommel section was pretty easy. i did the femal threads first so i could use it as a guage to make sure my threads fit together nice and snug. this was easy all i had to do there was tap it. the male threads were alot more difficult. you have to time it right and be pretty quick to start and stop the feed at the right times or you will scrap the part. stop it to soon and you mess the threads up (you have to start over). stop it to late and you crash the tool into the part (shortly after things can get really ugly plus you still have to start over). it all worked out though and nothing was broken.

    this shot is the closest i have to a profile shot. i will get better one tomorrow.


    here is a final shot of the pommel cap fitment.


    tomorrow i am going to try and get some of the mill work out of the way. if i am lucky i will be able to get the blade holder all sorted out. (i will also try and get some better shots of the saber) -pat

  4. #4
    Jedi Padawan
    Jedi Padawan
    Boj-Vaati Mau's Avatar
    Join Date
    Oct 2010
    Location
    United States
    Posts
    608

    Default

    I like the design and your machine work is quite clean. I look forward to seeing this one complete.

    Knowledge must be balanced by Practice.
    Practice must be balanced by Experience.
    Through Knowledge, Practice, and Experience
    we gain Wisdom.

    -Boj-Vaati Mau
    Jedi Sentinel, Jar'Kai practitioner,
    and Instctor at Strafe Plains Temple


    Saber Guild: Strafe Plains Temple
    The Rebel Legion

  5. #5

    Default

    thanks Boj i take that as a very high compliment. i was a bit nervous about posting my stuff up on a forum full of very skilled machinists.

    today i got more pics so you guys wouldn't be so in the dark. first things first i knocked out the blade holder. i am getting pretty comfortable with the lathe so its not taking as long to get the parts to size. i was stopping pretty frequently to measure the parts as i was making them. reading the dials is getting easier and i am not having to second guess myself so much. the fun part today was that i got to use the mill for the first time. i think i like it more then the lathe. its more involved and helped the day go by faster.

    this is the basic sketch how the blade holder is going to play out.


    and here it is done. its pretty simple and strait forward.


    i am sure you probably couldn't tell from the sketch but i wanted to integrate an "eye" into the design. sort of throw back to the original trilogy. so i got a scrapped piece of 316 stainless form the back of the shop. you can get a really nice shine from 316 and its a different color then aluminum. kind of a darker shade of shinny if that makes any sense. i want it to thread into the heat sync and run a 5mm led into it. hopefully this will help create the illusion that the blade is traveling through the saber.


    the real fun part of today was milling out the top half of the saber to sort of make a shroud over the blade holder. this really turned out a lot better then i thought it was going to. i was afraid the top section was a bit to short and it would look silly once it was all assembled. all in all i am very pleased with how it all turned out.


    the back part also has a hole for the wires from the switch-box to run through and the threaded holes to hold the box on.


    the last thin i did was tackle the switch-box. its pretty simple and is just roughed out for now. i will do more work on this later once i get the switch placement and everything figured out. i really want to do a bar graph in it to but we will have to see if i can fit it all in there.


    here is all the bits assembled.


    and here is a picture of the threads that were cut yesterday as promised.


    a final few shots of everything that is done so far all assembled. i tried to get some better lighting this time but they are still a bit blurred. i asked my pops if he would take pictures of it with his fancy camera. so if you will bear with me a bit longer i can get some really detailed shots of the future work.


  6. #6

    Default

    Lookin sharp!
    Sith Happens

  7. #7

    Default

    Very nice! You're off to a fantastic start here. I'm excited to see how this one looks when it is finished.
    We all have to start somewhere. The journey is all the more impressive by our humble beginnings.

    http://led.linear1.org/1led.wiz for the lazy man's resistor calculator!
    http://forums.thecustomsabershop.com...e-to-Ohm-s-Law for getting resistor values the right way!

  8. #8

    Default

    Thanks TD and silver. I am still in my element though. We will see what happens when we get to the electronic side of things.

    I am going to be working on the grips today. Not a big step forward but I'm a bit nervous. This could make or break my build. I took the windshield wipers of of one of the cars I have in storage. I am having trouble getting them all the same. I will probly end up buying some from Tim.

    As far as placement i am gonna see if my boss will let me cheat and put it in the cnc mill to get he spacing right. I could probably do it just fine manually but I am feeling a Tad lazy. When you are staring at a math problem and you have a calculator in your pocket its kind of hard not to use it.

  9. #9

    Default

    Keep up the good work, I'm liking where this is going!
    Yub Yub Commander.

  10. #10

    Default

    got my wish! the boss man let me use the cnc to get the holes for the grips drilled and tapped.


    the grips were pretty simple at that point. you just measure them and cut them to size. these were the back side of a single piece flex windshield wiper. i am a bit undecided on them. i would actually like some opinions on whether they look good or if i need to try something else. my dad took these last pics so i would have something more high res. still a ton to do such as weathering but this is basically how its going to look. (i tried weathering the grips a bit)


    all the electronic guts for this saber have been trickling in over the past few weeks. my petite crouton came in yesterday and i have been tinkering with the Hakko fx-888 soldering station i skooped up the other day. i am blown away by it. this thing makes soldering so much easier. i feel much more comfortable about soldering the board now that i have the right tools. prior to this hakko thing i have been practicing soldering with an old 30w radio shack iron we had at the house. i didn't think it was going to be that much of a difference but i wasn't about to try and solder a battery pack together without one of the higher quality irons. it is a night and day difference. i would highly recommend a good iron of some sort.

Bookmarks

Posting Permissions

  • You may not post new threads
  • You may not post replies
  • You may not post attachments
  • You may not edit your posts
  •