Results 1 to 8 of 8

Thread: New Saber Design of Mine, just wanted to ask some questions and get some feedback.

  1. #1

    Default New Saber Design of Mine, just wanted to ask some questions and get some feedback.

    Hello saber building community, I think its about time I stopped lurking and finally posted some content.

    Ok so I've wanted to build something along the lines of a Graflex, but I didn't want to have it look so cumbersome that a Graflex does. I wanted something more of a streamlined saber that would be comfortable for dueling, but would also look great on my shelf for display. after going through many designs and researching into what I envisioned I stumbled upon Madcow's Nuevo Graflex. Needless to say I was in love at first sight with it, as I am with much of his work. The overall design was pretty complicated and wasn't really suited for dueling, with the separate rotating body, but the outward appearance was something I really wanted to mimic.

    I really liked the milled grip slots, the crystal chamber (also another thing I have wanted to do for a while), and the forward placement of the activation switch. These ideas became the mainstays for my saber design.

    After a bit of fiddling with the TCSS MHS builder I came up with a design that I thought would suit my needs well.


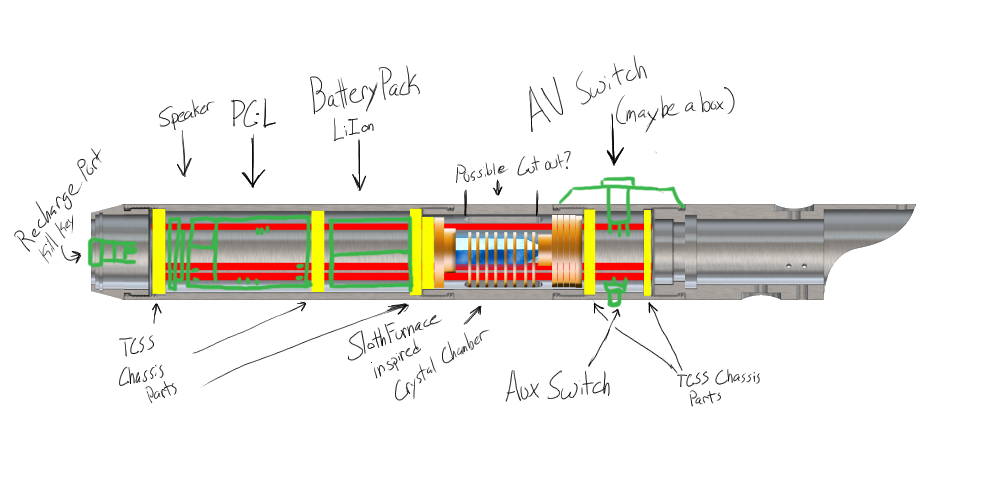
    The Blade-holder style 20 was exactly what i was looking for. I quickly realized that some modification was necessary if I was going to put a box about where the 2 inch extension was. The new style heat-sink was definitely going to have to be cut down or routed out to fit my planned illuminated AV switch in. (Unless the switch fits nicely into the box with little sticking into the hilt. I'm planning on using the shorter Illuminated AV switches and a Box style 4.) The smaller switch that im planning on using for an AUX switch is a small tactile switch, so it should be able to fit into the extension around the heat-sink nicely.
    I knew that if I wanted to have the activation box so far forward I would probably have to drill and tap into threads of the MHS parts so once everything was in the front, it stood a chance to be stuck there from damaged threads, unless I was careful drilling.

    The front had been designed and engineered pretty definitively so i moved onto the crystal chamber. I truly love SlothFurnace's chambers and radiator plates, so I decided to use this build to test out my schools new metal shop (I'm still in college so I don't have many tools of my own.). I created a few designs of a crystal chamber that looked nice but was also strong and capable of dueling, so I decided on making the chamber as the anchor for the chassis, made from the TCSS parts, that would house the LiIon setup along with the speaker, PC-L, and the in-hilt recharge port. Taking another cue from Madcow i wanted to make a chassis that locked into the hilt securely, but was easily accessible by the removal of the 5-inch extension and pommel.

    The only problem I could think of as to why this wouldn't work, other than my developing skills in cram-fu, was that the TCSS chassis disks made for the ID of regular pieces might not fit once I place the grips through the milled slots of the 5-inch extension. I'm worried that the rubber of the grips will reduce the ID of the extension and the disks won't fit.

    So I really only have a few questions after all that.

    1) How far into a piece does the "new Style" heat-sink protrude? and how much would I have to alter it to be able to accommodate an AV switch?

    2) How much of the switch does Activation Box 4 take up on the smaller illuminated AV switches? and if it takes up a bunch do you think if I would have to modify the heat-sink?

    3) How will putting Graflex-style grips through the milled slots affect the ID of the extension? And will it be enough to make the Chassis disk style 2 not fit properly in the extension?

    Thanks for any answers in advance. Also any constructive criticism and build innovations, ideas, or links to sabers relative to what I'm trying to do here are greatly appreciated.

  2. #2

    Default

    You could use the old style heat sink + adapter?

  3. #3

    Default

    you could also use the assembly in this thread http://forums.thecustomsabershop.com...t=darth+midian, it'll save you a lot of space in your hilt. if you don't have a drill and tap set, you can have Tim drill/tap the hole for you for a little extra $ when you order your parts
    (\__/)
    (='.'=) Remember, if we get caught....
    (")_(") You're deaf, and I don't speak english

  4. #4

    Default

    I'm gonna be totally wrong with this... of course... because so many others have done it with more success than I have...

    You're gonna regret putting the recharge port down there in the pommel... The wiring you'll need to do to get past the speaker is gonna give you heartaches, griefs, and sorrows...

    Looks good otherwise!


    Remember, your LED will ALWAYS look brighter in pics and vids... If you're not playing with it at night, it's not gonna impress you...

  5. #5
    Jedi Council Member cardcollector's Avatar
    Join Date
    Jan 2009
    Location
    I am A proud American.
    Posts
    2,567
    Blog Entries
    3

    Default

    Quote Originally Posted by captain_mills View Post
    You're gonna regret putting the recharge port down there in the pommel... The wiring you'll need to do to get past the speaker is gonna give you heartaches, griefs, and sorrows...
    QFT. It is a pain to get a recharge port properly housed in a pommel.

    For your box, you will want to move it down about a 1/2" to steer clear of the threads on the saber. This will mean re working your design, but trust me, While it is possible to drill through and tap threaded sections... it is more trouble than it is worth. Plus, there is an increased chance you can ruin you part going that route too...
    Got a Question? There's a thread for that...
    ~Do what you can, with what you have, where you are.~Teddy Roosevelt

    SollusVir everywhere else... FXsabers, Youtube, etc...

  6. #6

    Default

    Thanks guys, looking at it again it does seem that I would much rather mount the recharge port further in the hilt. I'll probably try and get it to work how Madcow usually does his.

    I also did some rough estimates with the dimensions of activation box 4 and the smaller AV switches that the MHS builder has scaled. If everything fits as the builder shows then I probably wont have to modify the heat-sink, and the screws holding the box on will only dig into the very bottom of the MHS pieces threads.

    I still don't really have an idea about the grips mounted on the inside. I've only seen a few people here do it.

  7. #7

    Default

    Another option you might consider is reverse sound with the speaker mounted forward rather than toward the pommel thus the sound venting from the slots on the crystal chamber.

  8. #8

    Default

    Quote Originally Posted by Devilblade0 View Post
    I still don't really have an idea about the grips mounted on the inside. I've only seen a few people here do it.
    I don't think what you suggested will work. Having build a few removable grip sections, my most recent a Slothfurnace inspired crystal chamber similar to your design, You need all that ID for the batteries, board, and chassis. The grips will reduce your ID significantly, 3/16 to 1/4 inch.
    Last edited by Ari-Jaq Xulden; 01-08-2012 at 06:43 PM. Reason: typo

    Hokey religions and ancient weapons are no match for a good blaster at your side, kid.

Tags for this Thread

Bookmarks

Posting Permissions

  • You may not post new threads
  • You may not post replies
  • You may not post attachments
  • You may not edit your posts
  •