Page 3 of 3 FirstFirst 1 2 3
Results 21 to 30 of 30

Thread: Your Battery Preference with a PC or CF

  1. #21

    Default

    NiMH don't need a protection circuit. 6 of them in a pack is 7.2v, right at the sweet spot for the PC.

    You may consider using the 14500s instead of the 18650s. They'll fit side-by-side in an MHS section without modification, and still give decent runtime.

    They're also in stock. http://www.thecustomsabershop.com/Li...0mAh-P480.aspx
    We all have to start somewhere. The journey is all the more impressive by our humble beginnings.

    http://led.linear1.org/1led.wiz for the lazy man's resistor calculator!
    http://forums.thecustomsabershop.com...e-to-Ohm-s-Law for getting resistor values the right way!

  2. #22

    Default

    Thanks for the heads-up. I suppose I'll try making these work, then. 14500s do need the PCB, correct? I also found out (too late, I might add) that there are two completely different PCBs. I'll have to look up which one I got with my last order and determine if it's the right one.

    I suppose it wouldn't be that difficult to swap them out for a new pack if I leave room for it in my design.

    EDIT: I got the PCB for the 3.7v battery instead of the 7.2v pack. ~facepalm~ I can't order the 7.2v, as it's out of stock. So, literally, no matter what I do I'm stuck.
    Last edited by Weaver; 12-28-2011 at 10:32 AM.

  3. #23

    Default

    Quote Originally Posted by BlessedWrath View Post
    Thanks for the heads-up. I suppose I'll try making these work, then. 14500s do need the PCB, correct? I also found out (too late, I might add) that there are two completely different PCBs. I'll have to look up which one I got with my last order and determine if it's the right one.

    I suppose it wouldn't be that difficult to swap them out for a new pack if I leave room for it in my design.

    EDIT: I got the PCB for the 3.7v battery instead of the 7.2v pack. ~facepalm~ I can't order the 7.2v, as it's out of stock. So, literally, no matter what I do I'm stuck.
    Are you buying the protected cells or the unprotected cells?

    Protected cells will not need a PCB. Each cell already has its own PCB. These SHOULD be removed from the hilt and charged in a charger like the one Tim sells in the store. It is not a good idea to make a pack out of these as when one PCB senses that its cell is charged it will cut current preventing the other cell from finishing its charge if it wasn't complete already. Which over time will result in reduced run time.

    Un-Protected cells need the PCB. Which PCB you need depends on the number of cells you are using to make your pack.

    So for protected cells just stick them in a AA battery pack but remove them from the saber and charge them in a stand alone charger when needed.
    For un-protected cells get the proper PCB, wire up your pack (there is a tutorial stickied here somewhere) and you can use a recharge port to charge them without removing them from the hilt.

  4. #24

    Default

    ZZan,

    Protected cells are out of stock. I can get some unprotected, but the PCBs are out of stock. At this point, it's literally NiMH or nothing. That can change, later, when the Li-Ion stock is replenished, but we have no idea when that's going to happen.

    I'm still in the R&D phase, here, so I don't have to worry about hilt space limitations yet. I don't necessarily need a power source for anything but testing circuits and making sure my connections are all right. My theory is to wire a JST to the battery inputs and swap out the pack when I can get some proper batteries. To that end, I'm sure that three 2xAA battery holders will work for the short-term. Voltage is nearly the same and the current shouldn't be anywhere near the board's maximum (2A, if I remember correctly).

    At least that will allow me to continue hooking up components. Anything is better than watching them just sit on the shelf. As always, I will reread everything before I reach for my tools.

  5. #25
    Council Member
    Sith Lord
    Lord Dottore Matto's Avatar
    Join Date
    May 2008
    Location
    On the Black Mat
    Posts
    3,289

    Default

    Quote Originally Posted by BlessedWrath View Post
    Thanks for the heads-up. I suppose I'll try making these work, then. 14500s do need the PCB, correct? I also found out (too late, I might add) that there are two completely different PCBs. I'll have to look up which one I got with my last order and determine if it's the right one.

    I suppose it wouldn't be that difficult to swap them out for a new pack if I leave room for it in my design.

    EDIT: I got the PCB for the 3.7v battery instead of the 7.2v pack. ~facepalm~ I can't order the 7.2v, as it's out of stock. So, literally, no matter what I do I'm stuck.
    No you aren't. Just wire the two cells in // to the 3.7V PCB then you will have an 1800mAh 3.7V battery pack. Unless you are going w/a 10W LEDengin with FoC, you will run a PC just fine. For 10W/FoC, you would need the 7.4V.
    All n00bs READ these first (PLEASE)!!!:1. LDM's Basic Saber-build Step-by-Step Tutorial 1A. Maul's Saber Dictionary 1B. THREAD INDEX 1C. Econo Sound Diagrams
    TCSS the #1 Part supplier of LDM customsabers!

  6. #26

    Default

    Quote Originally Posted by Lord Dottore Matto View Post
    Unless you are going w/a 10W LEDengin with FoC, you will run a PC just fine. For 10W/FoC, you would need the 7.4V.
    That's actually exactly what I'm running. >_<

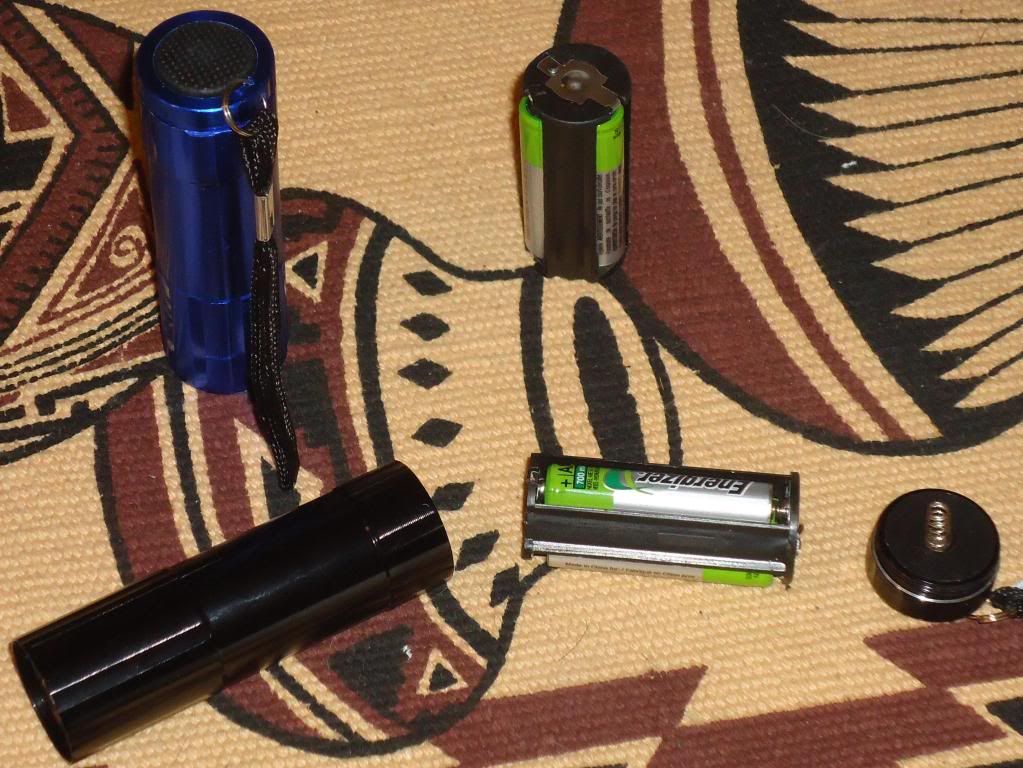
    EDIT: I went back to the drawing board, convinced that I would never lay hands on a pair of 18650s, and tried to come up with some other way to power my components. NiMH seemed to be the only available option, so I went with those. While I was out, I picked up a combo pack of cheap aluminum flashlights; because I knew, immediately upon seeing them, what kind of battery compartment they use.


    For a bit less than $12US, I now have eight 3xAAA battery holders. There's no modding necessary; you just unscrew the tail cap and pull them out. I'm not sure what the OD is, but a bit of resourceful repurposing should yield some manner of PVC-type carrier that can be fitted to the inside of an MHS hilt. It may even fit with a custom chassis (if I can prevent the parts shorting against each other). The drawback is the length.

    Six NiMH AAAs, mentioned above in a recommendation by another user, measures out at 7.75v on my voltmeter when series-stacked (end to end). They're easily extracted for charging, can be compatible with a carrier, and are available locally. Unless there's a problem with exceeding my board's input current, I think I'm ready to try wiring things up.

    EDIT: These battery modules are extremely useful in containing a set of NiMHs. Before you solder the contacts, it is essential that you remove them (carefully) from the plastic housing first. The plastic will quickly overheat and melt otherwise. Be careful not to damage the plastic tab which holds the contacts in place, as you will need them to secure the contacts after soldering.

    I wired these modules in series, with a JST quick-connect, by soldering a short bit of red wire between the positive of one module and the negative of the second. The positve JST wire, of course, goes to the positive contact on one module, and the negative on the negative contact of the second module.

    These batteries measured 7.75v constant on my voltmeter, fresh out of the package. I have no doubt that they will perform adequately if fully charged. I am also exploring other options for AA size battery holders (for more runtime).

    This post can be added to any tutorial threads concerning the making or modification of battery holders, if the mods or admins think it's worthwhile. I'm glad to share the information with anyone who can benefit from it. I will create a step-by-step tutorial if needed.
    Last edited by Weaver; 12-29-2011 at 08:07 PM.

  7. #27

    Default

    Quote Originally Posted by Zzan View Post
    Are you buying the protected cells or the unprotected cells?

    Protected cells will not need a PCB. Each cell already has its own PCB. These SHOULD be removed from the hilt and charged in a charger like the one Tim sells in the store. It is not a good idea to make a pack out of these as when one PCB senses that its cell is charged it will cut current preventing the other cell from finishing its charge if it wasn't complete already. Which over time will result in reduced run time.

    Un-Protected cells need the PCB. Which PCB you need depends on the number of cells you are using to make your pack.

    So for protected cells just stick them in a AA battery pack but remove them from the saber and charge them in a stand alone charger when needed.
    For un-protected cells get the proper PCB, wire up your pack (there is a tutorial stickied here somewhere) and you can use a recharge port to charge them without removing them from the hilt.
    If each cell has its own PCB doesn't that mean the cut off voltage would be something like - 2.8v and 4.2v - but if you wire two batteries in series (increasing your voltage to 7.2-7.6v or there abouts) then isn't THAT voltage going through each PCB? and wouldn't that automatically trigger a disconnect? I don't know how the PCBS actually work, but it seems to me that one would need to do some advanced wiring, or use unprotected Li-ions with a 7.2 pcb (or the appropriate voltage). OR run everything at 3.7v.

  8. #28

    Default

    I've looked around, what kind of battery set up is ideal for a Full Power 10w build? Anyone have any idea what kind of run time http://www.thecustomsabershop.com/74...Pack-P725.aspx would offer?
    The 18650 stick would be too large. Of course I've seen a few interesting set ups with 18650 side by sides, but that might be above my skill level.

  9. #29

    Default

    Quote Originally Posted by const View Post
    I've looked around, what kind of battery set up is ideal for a Full Power 10w build? Anyone have any idea what kind of run time http://www.thecustomsabershop.com/74...Pack-P725.aspx would offer?
    The 18650 stick would be too large. Of course I've seen a few interesting set ups with 18650 side by sides, but that might be above my skill level.
    You'd likely get a little over an hour with a full power set up using that battery pack. A side by side 18650 pack would work best if you need a longer run time. If you desing the saber properly, getting a pack into one is fairly easy, but you'd have to make the pack yourself.

    Got a question? Start Here. Have you tried the Thread Index yet? Most questions can be answered there.

  10. #30

    Default

    I think I'll go with the 14500 pack set up and just change it out as needed considering the nifty quick disconnects. Thanks Jay!

Bookmarks

Posting Permissions

  • You may not post new threads
  • You may not post replies
  • You may not post attachments
  • You may not edit your posts
  •