Results 1 to 9 of 9

Thread: AV Switch Wiring Questions

  1. #1

    Default AV Switch Wiring Questions

    Hello everyone...i have noticed plenty of question pertaining to wiring with sound, and I am not embarassed to say that looking at some of the wiring diagrams makes my brain hurt...however, for what i want to do (just basic hilt electronics and no sound until i get my skills up), the schematics on the shop homepage are wonderful...now here is my boggle...

    I wish to use an AV latching switch on a design i am creating, but i do not wish to have the light on the switch powered. Since the only non lighting av switches available are momentary (and currently out of stock), i figure i can use the av latching ones instead without using an extra resistor...is my assumption correct? i preferr to have the on/off capability is the main reason why i am doing it this way (and the AV switches are just too beautiful to pass up). So, according to the diagram that is on the AV latching switch product description page, does the positive and negative wires still go straight to the corresponding posts or is there some wierd looping that goes on?
    Temporis

    "Execute Order 66!"

  2. #2

    Default

    If you don't want the AV switch to light up, it's as simple as ignoring the LED terminals on the switch. The switching mechanism and the LED are completely separate.
    We all have to start somewhere. The journey is all the more impressive by our humble beginnings.

    http://led.linear1.org/1led.wiz for the lazy man's resistor calculator!
    http://forums.thecustomsabershop.com...e-to-Ohm-s-Law for getting resistor values the right way!

  3. #3

    Default

    Quote Originally Posted by Silver Serpent View Post
    If you don't want the AV switch to light up, it's as simple as ignoring the LED terminals on the switch. The switching mechanism and the LED are completely separate.
    What he said, but with a pretty picture


    Wire the Green as normal and the leave the Red unwired.

  4. #4

    Default

    Sorry if this is getting a redundant, i just want to make sure. Some people would say I will never learn until I try, but i like to get things done right the first time

    So I the wiring would be from battery pack (+/-) to respected NC1 and C1, then from NC2 to and C2 to the LED (with the resistor properly placed)?
    Last edited by Darth Mortis; 09-01-2011 at 07:27 AM.
    Temporis

    "Execute Order 66!"

  5. #5
    Council Member
    Jedi Council Member
    Jedi-Loreen's Avatar
    Join Date
    Dec 2005
    Location
    Not of this Earth
    Posts
    6,077

    Default

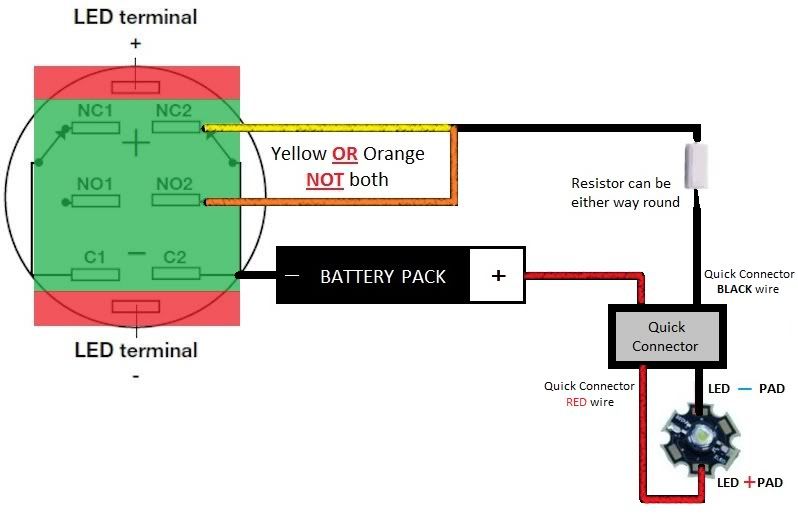
    No, you only use one side of the switch, just like a regular switch.

    That is a double pole, double throw switch, so that you can use it for 2 separate circuits. Just use one side, or the other.
    In order to see the Light,
    you must sometimes risk the Dark.
    TCSS MODERATOR


    BLUE 8 Ready to ROCK and ROLL!

  6. #6

    Default

    1. From battery (+) to the C1, then from NC1 to your LED (+). You may put the resistor between NC1 and the LED (+).
    2. From battery (-) to the LED (-). You can put the resistor here IF you didn't already put it on the (+) line. Either way will work, but don't do both.

    You can put in a quick disconnect to your LED if you like as well. I recommend it, both for ease in changing to different colored LEDs, and for ease of assembly.
    We all have to start somewhere. The journey is all the more impressive by our humble beginnings.

    http://led.linear1.org/1led.wiz for the lazy man's resistor calculator!
    http://forums.thecustomsabershop.com...e-to-Ohm-s-Law for getting resistor values the right way!

  7. #7

    Default

    I'm guessing you're fairly new to electronics? It's fine if you are, we all have to start somewhere right?

    Anyway the folllowing diagram was designed for someone with pretty much zero electonics experience (so should be pretty much idiot proof )


    and while there are certain thing that only experience can teach you, I agree that you should do as much research as you need in order to not to explode something
    Last edited by Jay-Kento; 09-01-2011 at 09:46 AM.

  8. #8

    Default

    Awesome, thank you all for the diagrams and help, it is really appreciated, now all i have to do is get my parts list and with the force on my side put in my order this evening, once again THANK YOU ALL!!!
    Temporis

    "Execute Order 66!"

  9. #9

    Default

    I second that about reading!! i didn't do enough reading about my pool filter and i blew the top off of my filter housing...300 bucks down the drain.

Bookmarks

Posting Permissions

  • You may not post new threads
  • You may not post replies
  • You may not post attachments
  • You may not edit your posts
  •