Results 1 to 9 of 9

Thread: Cardcollector's "Thunderbolt" Build thread

  1. #1
    Jedi Council Member cardcollector's Avatar
    Join Date
    Jan 2009
    Location
    I am A proud American.
    Posts
    2,567
    Blog Entries
    3

    Default Cardcollector's "Thunderbolt" Build thread

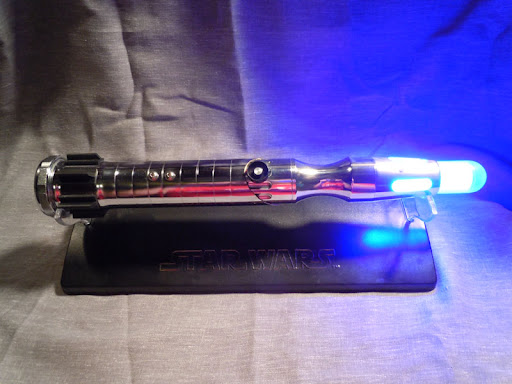
    This build is for a Client who contacted me over email. It is a lower end build, because a low price was the main objective. The hilt consists of TCSS and Sinktube.


    The Stck MHS parts


    I cut the tube, and forgot the change blades... hence the mess of brass still on the tube.


    Deburred and test fit. Do not pay attention to the mace conversion BH... that isn't important.


    Drilling the screws to hold the MHS pieces in place. I have found it quicker to measure and drill my own screw holes... rather than try to align the ones that come with the piece.


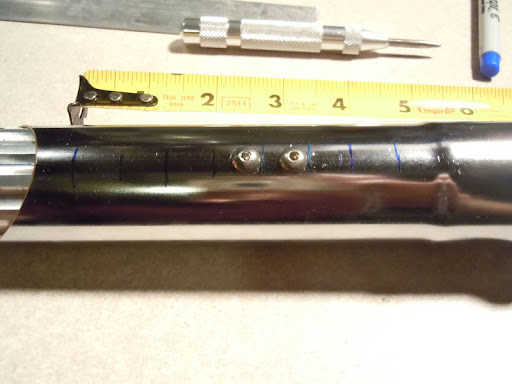
    Simply tapping one of the holes. The lines used to make sure everything is straight will come off when I polish the tube.


    The lines for the grip marked and ready to be scored.


    Lines are scored in the sinktube, the pipe cutter didn't line up every time... but It looks good to the client, so the lines are staying the way they are.
    The top piece is to see what the MHS pieces look like before polishing...


    The Fluted section sanded and lathered up with polish...


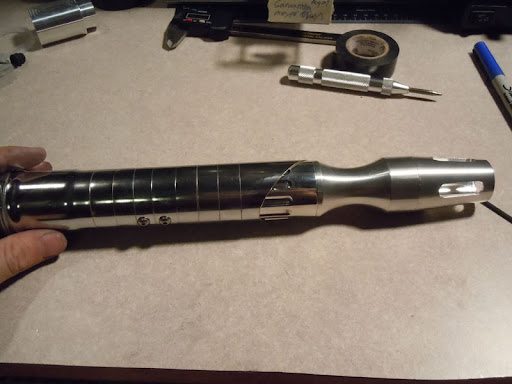
    Polished and installed. It matches the sink tube perfectly.


    Pic of the hilt as it is now.

    For the electronics, it is going to be a stunt setup. Meaning no sound. in addition, there won't be a recharge funtion... so here is how I am going to secure the pack so it doesn't rattle.


    This is a piece of 1" PVC that has electrical tape wrapped around it to fill the space.
    The battery pack has a washer that is glued the bottom of said holder....


    simply insert the pack in to the pvc...


    and then the PVC into the tube....

    Viola, anti-rattle battery pack on a budget.
    Attached Images Attached Images
    Last edited by cardcollector; 08-07-2011 at 12:22 PM.
    Got a Question? There's a thread for that...
    ~Do what you can, with what you have, where you are.~Teddy Roosevelt

    SollusVir everywhere else... FXsabers, Youtube, etc...

  2. #2

    Default

    this isnt done yet right?

  3. #3
    Jedi Council Member cardcollector's Avatar
    Join Date
    Jan 2009
    Location
    I am A proud American.
    Posts
    2,567
    Blog Entries
    3

    Default

    Correct, there will be more pics as I get the chance to work on it this week.
    Got a Question? There's a thread for that...
    ~Do what you can, with what you have, where you are.~Teddy Roosevelt

    SollusVir everywhere else... FXsabers, Youtube, etc...

  4. #4
    Jedi_Knight_Zekk
    Guest

    Default

    Looking great so far! Looks like a nice saber for a low budget! What LED is going in this saber?

  5. #5
    Jedi Council Member cardcollector's Avatar
    Join Date
    Jan 2009
    Location
    I am A proud American.
    Posts
    2,567
    Blog Entries
    3

    Default

    The LED will be a Blue P4.
    Got a Question? There's a thread for that...
    ~Do what you can, with what you have, where you are.~Teddy Roosevelt

    SollusVir everywhere else... FXsabers, Youtube, etc...

  6. #6
    Jedi Council Member cardcollector's Avatar
    Join Date
    Jan 2009
    Location
    I am A proud American.
    Posts
    2,567
    Blog Entries
    3

    Default

    I was able to finish the saber up last night, so here are the rest of the build pics... The wiring is really simple, but I figured I would show you how i solder my stuff together...


    Tinned the switch lead and wire.


    Soldered. the key to getting good joints like this is a hot iron, and fresh solder on the tip.


    Heatshrunk.


    Switch installed and bolted into the hilt. I didn't want to force fit this one because of the amount of dueling this one will face, and the thinness of the metal holding the switch in place.


    Tada... Centered with the tube and the flutes, looks quite nice actually.


    Next thing I did was attach the grips to the Pommel end of the saber.There are eight grip pieces in all, and are for the TCSS grip material.


    Resistor soldered and insulated.

    I forgot to take pics of the LED assembly, because I wanted to finish it and move on to another project I have... So, here is a pic of the finished product...


    Hope you enjoyed it!
    Got a Question? There's a thread for that...
    ~Do what you can, with what you have, where you are.~Teddy Roosevelt

    SollusVir everywhere else... FXsabers, Youtube, etc...

  7. #7

    Default

    Very nice build. I like the sleek look of the hilt. Question for you. What did you use to polish your MHS part there? I'm looking for a good solution for doing the same thing for my own MHS parts to get that nice chrome look. Plus, once you get it all nice and shiny, do you have a way of sealing it with a protective coat to keep it looking that way?

    Any advice would be most appreciated! Thanks so much.
    Follow Your Bliss

  8. #8
    Jedi Council Member cardcollector's Avatar
    Join Date
    Jan 2009
    Location
    I am A proud American.
    Posts
    2,567
    Blog Entries
    3

    Default

    Quote Originally Posted by psab keel View Post
    Very nice build. I like the sleek look of the hilt. Question for you. What did you use to polish your MHS part there? I'm looking for a good solution for doing the same thing for my own MHS parts to get that nice chrome look. Plus, once you get it all nice and shiny, do you have a way of sealing it with a protective coat to keep it looking that way?

    Any advice would be most appreciated! Thanks so much.
    The way I polish all of my MHS pieces is I first go over the oart with 400 wet sandpaper, then 1000 wet, then 1500wet. After that I lather it in mothers chrome polish. (the paste- not liquid) and go over it with my dremel polishing wheel. For the final polish I use a liquid polish (mothers or turtle wax) with a soft cloth.

    I do not clear my parts, and I feel the look is diminished somewhat. If you want get rid of finger prints you can just go over the hilt with a light buffing of polish again.
    Got a Question? There's a thread for that...
    ~Do what you can, with what you have, where you are.~Teddy Roosevelt

    SollusVir everywhere else... FXsabers, Youtube, etc...

  9. #9

    Default

    Thanks for the tips! That will definitely come in handy with my builds!
    Follow Your Bliss

Bookmarks

Posting Permissions

  • You may not post new threads
  • You may not post replies
  • You may not post attachments
  • You may not edit your posts
  •