


Hi, so i'm new to saber building but have always wanted to build my own, i have a diploma in engineering and a city and guilds level two in fitting, milling and turning, so usually i know what i'm doing, but since I've never don this before i thought i'd pass this by the experts firstany help would be grateful, any missing parts or anything, please let me know!
Bmbutton Black machined button for Covertec clip
8-32Cov 8-32 x 1/4" socket head
1/8Heat 1/8" Heatshrink tubing
26Black 26 gauge wire (Black)
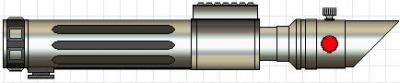
Shilt4G Hilt style 4 with guarded style switch hole
Sledholder12 Screw on LED blade holder style 12 "new style"
MHSchokeS MHS choke style 1 short
MPS3v1 MPS Pommel style 3 v1
MPSI12 MPS insert style 12
Cclip MPS Clip
DF4DEEPFL 4" Deep fluted double female threaded connector
doublemale Double ended male threaded connector style 1
box4 Activation box style 4
Box4Holes Box 4 Mounting holes service
location: standard button hole on hilt style 4
MBPC Main Body Powder Coating (SH41)
Color: Black Matte Tuscan (Flat Black)
BHPC Blade Holder Powder Coating (B121)
Color: Black Matte Tuscan (Flat Black)
CPC Choke Powder Coating (C1S1)
Color: Black Matte Tuscan (Flat Black)
PPC Pommel Powder Coating (PM31)
Color: Black Matte Tuscan (Flat Black)
ADPC Adapter Powder Coating (DME1)
Color: Black Matte Tuscan (Flat Black)
DrillTap Drill & Tap Hole (8-32)
location: covertec clip hole in bottom of 4" deep fluted double female threaded connector
DrillTap Drill & Tap Hole (8-32)
location: blade retention hole in screw on led blade holder style 12.
SeoulP4Kit Build Your Own Seoul P4 Electronics Kit
4AA Battery holder
Seoul P4 (Green)
Collimator Lens 5° viewing angle
3.3ohm 5w resistor
Push on/push off switch with red button
Seoul P4 Lens Holder
Corb1Battle LED "Corbin style" Battle blade 1" OD (36 inches)
** Quad Wrap
** Bullet Shaped
8-32box 8-32 x 3/8" socket head
83238WTS 8-32 x 3/8" aluminum thumb screw
8323TSR 8-32 x .3" red thumb screw
LDNG DPDT Latching green illuminated switch
also, the heatsink, does that come with the kit? because i couldn't find it anywhere :S

 Reply With Quote


.exe's Avatar")


Bookmarks