


Well, I couldn't wait to see the results of the contest and am proud to have been a participant, and I am really proud of how I placed.
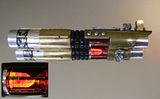
After seeing some of the Starkillers out there, I wanted to try my hand at making one. With that, I didn't want to make it exactly the same as many of the others out there. It had to be different, so I chose to go with a gold theme using brass. At first I had this buffed out to a mirror shine, but as the build continued, the brass started to patina into something nice. I then decided to make this a weathered Starkiller, which seems to fit the game better.
This was based off of MHS parts completely. The blade holder, ribbed extension modified by Tim at TCSS, the 4" double female, and the pommel were straight from TCSS. Many have said that an MHS Starkiller would not look right, but hopefully this build shows that is can be done.
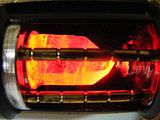
Something to note is that I kept with the game spirit in that it has only 2 graflex short pins on the correct side. On the other side I used part of the brass graflex replica top cut out from the crystal chamber to make a round insert. It is held on by a bit of epoxy. It can be seen nicely in this pic:
Since I used the brass graflex top, I wanted to have bunny ears that matched the ones on a graflex. I purchased a graflex off of ebay that came with an extra graflex head with the bunny ears, but it supposedly got lost in the mail. That meant that I would either have to find another graflex or just make my own. I made them out of a brass kick plate. They are curved to match the curve of graflex bunny ears. They were a real pain to make, since they are one piece. I cut them out and bent them around. They took a lot of filing and sanding to have the curves look right. They are held on with a brass screw, and the threading is covered by a section of aluminum tubing.
The graflex top fit over the MHS parts because Tim lathed them down after customizing the ribbed section. I lathed the crystal chamber parts and a new heatsink out of aluminum to hold the crystal in place. The brass rods in the crystal chamber are held in place by holes in the heatsink and the crystal mount. They spin freely, but will not come out unless the crystal mount or the heatsink is removed (basically unless you take the entire thing apart). The crystal was taken from my very first build. The grips are made from brass key stock and held on with two 0-80 set screws each. I broke one of my 0-80 thread taps and had to hope for the best with my spare. The allen key for these things is a .035 allen wrench. The control box is made out of aluminum U channel I got at Lowes and a piece of brass stock I had on hand. The buttons are machined brass. The top is held on with epoxy, but can be popped off if needed.
PC-L Darkmeat
2 14500 Li-ion Batteries
5W LED Engine Red
Premium speaker
Momentary tactile switches
Custom Brass Covertec Kill Key
Custom Brass Bunny Ears
Lathed TCSS Blade Plug
Crystal Pommel
Red Button Thumbscrew as Blade Retention
Glass Eye thumbscrew for looks
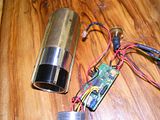
I shorted the custom battery pack I had made after I installed it, so this is running on 2 14500 li-ions in a 2AA battery pack holder. It actually made screwing the back parts on a lot easier. It works for now, and has the recharge port connected. The kill key was made out of a brass covertec from TCSS with a little brass washer and a plastic tube (I think from a mechanical pencil).
The wires run from the main led up through a hole behind the heatsink up under the brass graflex top/under the control box and back down through a hole through the first rib to the main area. There are two wires barely visible underneath the point of the heatsink that touches the crystal. I barely had enough room to squeeze the wires up and around, so I am fine with the curve of a wire showing. If I were to do this again, I would make sure to make the heatsink larger to cover the hole, but in this case I did not have enough stock aluminum. If I were to replace the heatsink, the entire saber would need to be taken apart, and I do mean the entire thing, except for the grips.
And here are the pics. Enjoy.


Any comments and or questions are welcome!


 Reply With Quote


Bookmarks