Page 1 of 3 1 2 3 LastLast
Results 1 to 10 of 21

Thread: Serenity V2

  1. #1

    Default Serenity V2

    A few years back I built the original Serenity (build thread is here). Unfortunately I ran into a severe lack of funds and sold it to a coworker. Who promptly butchered it. Several months later I bought the mhs parts and shroud back, and used most of them in other projects.

    That was the only saber that I've built that created even a little buzz. Most people really liked the overall design, and it was my favorite build. With all the new parts TCSS is offering now, I decided I would revisit this one with some new parts. Hopefully having a build thread will give me some motivation to get this thing done, as I've already had most of the parts now since February. All I am waiting on now is the PC to be restocked, and then I can really get moving. So onto the build.

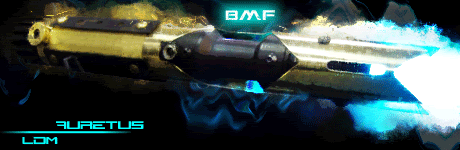
    Originally I used a main hilt #4, double male adapter, and a two inch extention. Since I wanted to use the new control box, this wouldn't work easily. So I had Tim replicate the hilt #4 on a 9" extention. This gave me plenty of room to work with. I also wanted to try out the new shroud material TCSS has so the pics are showing the original sink tube shroud. I can't/don't want to use it, because it's slightly tweaked. The red led in the box is going to be replaced, not sure with what color yet. I am also trying to decide what I want to use for the grip section. The original was adhesive backed craft foam, I'm hoping to use some type of leather or suede. What I've found so far has been to thick, so we'll see what turns up. I'm also making a few adjustments to the shroud, hoping it turns out a little sleeker/aggressive. Anyway, here's the pics of the hilt minus the sled I have built so far.


  2. #2
    Sith Minion bk_renesis's Avatar
    Join Date
    May 2010
    Location
    Melbourne Australia
    Posts
    358

    Default

    Pretty cool looking saber. This would look sweet if it was weathered slightly. Sort of like the evolution of v1. I'll be following this one.
    "The Sith grew past the use of lightsabers. But we continue to use them, if only to humiliate the Jedi."―Darth Sidious

  3. #3
    Jedi Padawan Ronan's Avatar
    Join Date
    Jul 2010
    Location
    Montreal, QC
    Posts
    529

    Default

    Oh wow... i had a dream about a similar based saber...

    Ackward... I guess great minds think (and dream) alike
    Corbin_Das: If I got a tattoo below my waist, it'd say "Found someone you have I would say, hmmmm?"

  4. #4

    Default

    YAY! A rebuild of a classic saber!
    I've always loved serenity.

    Looking forward to this

    Click here to learn all about me!
    The Shoutbox: The only place you can double post!
    Anybody who spells it Lightsabre is dyslexic
    "Yeah, if I had Skotts face I'd hit it too" ~ Fenderbender
    "You didn't buy a toy saber just to break it. You bought an economy sound card with a really complicated wrapping scheme." ~ Silver Serpent

  5. #5

    Default

    I personally don't like the brushed effect on the shroud and how clean the rest of the saber is. I would rub down the shroud with some wd40 and ultra fine wet and dry sand paper, then polish it once you have gotten rid of the brushed effect.
    Obi-Wan: "If you spent as much time practicing your saber techniques as you did your wit, you'd rival Master Yoda as a swordsman"

    Anakin: " I thought I already did"

    Obi-Wan: "Only in your mind, my very young apprentice"


  6. #6

    Default

    it looks pretty cool ....simple yet elegant design

    I would clean the shroud up a bit to get rid of the brushed look

    overall looks good

  7. #7

    Default

    Nice start - I like the shround shape...I kinda agree with others, I think it might look better polished out.
    Yub Yub Commander.

  8. #8

    Default

    That shroud is not going to be used. I have some of the aluminum tube in the store for a new one. The shroud and control box are both going to be polished.

  9. #9
    Council Member
    Sith Lord
    Lord Dottore Matto's Avatar
    Join Date
    May 2008
    Location
    On the Black Mat
    Posts
    3,289

    Default

    I also like this design. Simple & elegant. Bravo!
    All n00bs READ these first (PLEASE)!!!:1. LDM's Basic Saber-build Step-by-Step Tutorial 1A. Maul's Saber Dictionary 1B. THREAD INDEX 1C. Econo Sound Diagrams
    TCSS the #1 Part supplier of LDM customsabers!

  10. #10

    Default

    It's about time I bring this thread back from the dead.
    I finally took some time to work on my saber this weekend. Since I had never used the aluminum as a shroud before, I had a few issues at first. My Dremel burned up, and the Black & Decker that was replacing it kept over heating. I never would have thought cranking the speed up would make it easier. Because I'm used to using sink tubes, the aluminum tube was a unique learning experience for sure. I spent alot of time with my jeweler files rounding all the edges off, so there are no sharp edges.

    I also started polishing it. There were a few deep scratches and pits in the tube. Now I was thinking about making this saber weathered as was mentioned earlier in the thread, so the faults in this tube would have been a good addition. But the more I thought about it, I have another shroud that's not being used I originally started with 200 grit, then went back to 100, as the pits were just too deep. Working my way up to 2000 so far. But my hands are just too tired to sand anymore, so I wont finish until next weekend. And I'm out of Mothers Aluminum polish.

    I'm very happy with the way it turned out, so hope you all like it too


Bookmarks

Posting Permissions

  • You may not post new threads
  • You may not post replies
  • You may not post attachments
  • You may not edit your posts
  •