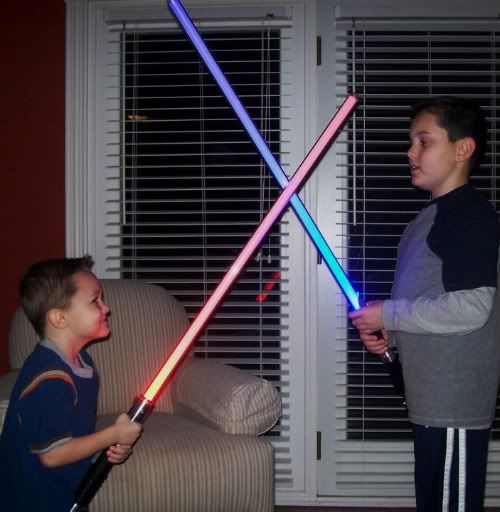
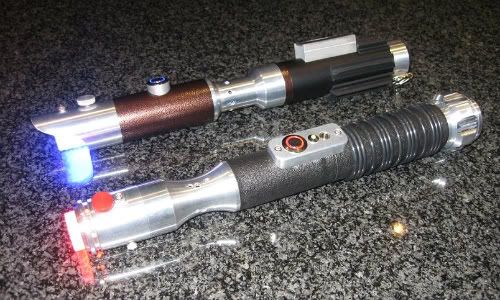
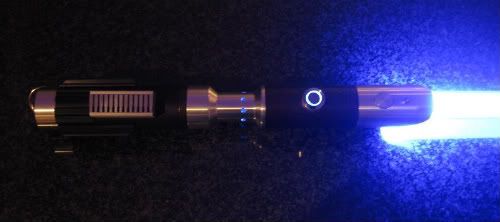
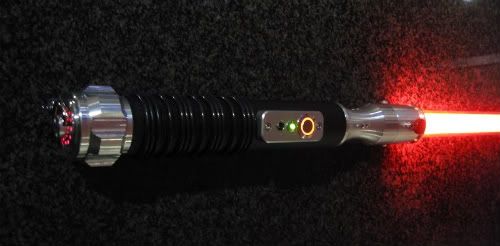
Page 1 of 2 1 2 LastLast
Results 1 to 10 of 19

Thread: Late posting for Christmas sabers

  1. #1

    Default Late posting for Christmas sabers

    I made these sabers for my wife’s nephews (aged four and eight) for Christmas and have been lazy about posting them… so here they are for the community’s critique. They’re both powder coated MHS assemblies equipped with Hasbro economy sound board setups (2010 Obi-Wan) w/ reverse sound, 4.8v NiMh battery packs, AV switches, an internal accent LED, and 32” TCSS thick-walled blades (also TCSS blade plugs and belt clips). Blade and switch color is the respective boy’s favorite color: a Royal Blue Rebel for the 8-year old, and a Red P4 for the 4-year old. For the record, the little one is Sith-in-training.

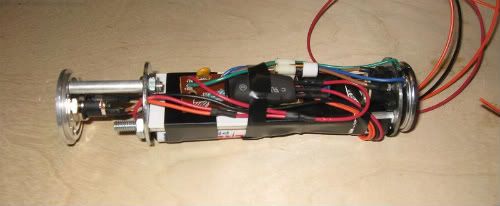
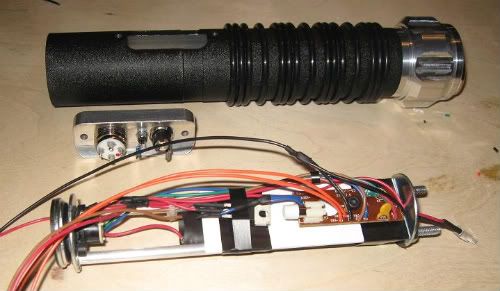
    These were my fourth and fifth sabers; my first attempts at building chassis' and reverse sound, and I still have to work on tightening up and securing my wiring or my sabers are going to have to be served with a side of marinara. My drill press skills need some work as well (I knew I should have asked Tim to drill the holes in the curved choke) – anyone have any tips to keep the bit from wandering? Both sabers are bright and loud, but I should have wired the resistor for the P4 in the body not the choke as it dulls the sound when compared to the other one.

    The boys were really excited… the little one (whose hands barely fit around the choke) howled a battle cry and gave his saber a swing back over his head – and nearly poked out his mother’s eye. Honey, uh, I’ll be in the car…


  2. #2
    Jedi Padawan Ronan's Avatar
    Join Date
    Jul 2010
    Location
    Montreal, QC
    Posts
    529

    Default

    Man... if someone gave me a saber like that.... for christmas... at that age...

    WOOOOOOOOOOOOOOOOOOOOOOOOOOOOOOOOOOOOOOOOOOW

    Corbin_Das: If I got a tattoo below my waist, it'd say "Found someone you have I would say, hmmmm?"

  3. #3

    Default

    Not bad at all. Over all they look pretty cool. I like the S curve one the best. Lucky kids!

    On the S curve the retention screw would be better on the shorter side so it presses against max surface area. For drilling the chokes I'd suggest to use a punch and start with a really small bit. The placement of the switches in relation to the chokes makes it difficult for me to imagine how to grip them comfortably unless you held them with switch facing opponent or away from your palm.

    Glad you posted these...it's been a bit quiet here in the gallery section.

  4. #4

    Default

    Nice sabers...
    have the lads wear gloves, to minimize chance of broken fingers.

  5. #5

    Default

    Realy Nice sabers!!!

    Was just wondering what AV switches You were using? They look realy "short", just what I need!!!

  6. #6

    Default

    Quote Originally Posted by amwolf View Post
    I
    anyone have any tips to keep the bit from wandering?
    Get a good vise, and clamp the part in a v-block or v-shaped groove (which you can make yourself in a piece of wood or plastic). A suitable vise can be had for < $20. Make sure you protect the part with something gentler (I use a scrap of the rubber shelf/drawer liner stuff).
    Then, as CC suggests, to locate the hole, use a center punch. Note that punches come in different sizes/angles, so pick one that matches the angle on the drill bit you're using. If your punch is too pointy, it just raises a dimple that allows the bit to skitter off anyway.

  7. #7

    Default

    oh yeah a v shaped tray and/or a suitable clamp is ideal and I should add that on the few I've had wander I was able to straighten it out while enlarging the hole with a round file.

  8. #8

    Default

    Use a jig to hold the round stock.
    155700_lg.jpg
    Use a quick center finder to make sure you are drilling straight in.
    33696.JPEG
    Then use center drill bits to drill your starter holes.
    200px-CenterDrills123456.jpg

  9. #9

    Default

    Thanks for the feedback, everyone! The tips on bit wandering is very helpful - I had thought about a punch but couldn't find one in my cousin's shop. Once again, impatience leads to disaster.

    Quote Originally Posted by Crystal Chambers View Post
    On the S curve the retention screw would be better on the shorter side so it presses against max surface area.
    You mean 180 degrees from where I've got the large headed screw? I can see how that would be better. The small screws on both sabers are just greeblies, cut short and trying to be used for texture. The AV switches are here in here in the store - although the short one in the box died a horrible death and had to be swapped out for a longer one I had. Don't forget to hook up those resistors or bad things will happen...

  10. #10

    Default

    Wow! You put me to shame! The ones I made for my kids were little PVC ones... Spent $30 total for all four! Those are spectacular!

    Ditto the comment on the switches being in an awkward spot, but otherwise, nice!


    Remember, your LED will ALWAYS look brighter in pics and vids... If you're not playing with it at night, it's not gonna impress you...

Bookmarks

Posting Permissions

  • You may not post new threads
  • You may not post replies
  • You may not post attachments
  • You may not edit your posts
  •