Page 1 of 2 1 2 LastLast
Results 1 to 10 of 16

Thread: My new chassis - documented with pics

  1. #1

    Default My new chassis - documented with pics

    The last thread I started, about PVC hilts and decorative fluting, got some nice responses, so when I decided to gut the saber and rebuild the insides to be more neat and durable, I decided to document it as well.

    I've seen plenty of posts showing sleds/chassis but I hadn't seen a step-by-step so maybe this will be helpful to someone. This was all done with simple tools; a drill, a bench grinder (you could use a file if you don't have a grinder and you're patient), a hacksaw, a sharpie, needle-nose pliers.

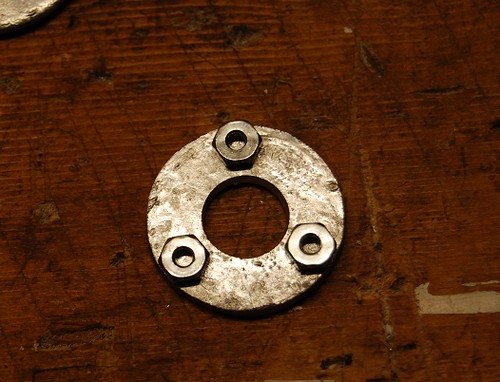
    I started by finding some fender washers that were the same diameter or bigger then the inside diameter of the 1 1/4" PVC tubing that I used for the grip section of my hilt. Here's a pic of the washers I found, some 6-32 threaded rod bits, and a piece of PVC I'm using to check the fit.


    The washers are just a bit too big - this is good because I want them very snug. So, off to the bench grinder. I'm rotating them slowly as I grind to take off material evenly. Goggles, mask, and cut-resistant gloves here, folks... work safe.


    Once the washers just slide into the PVC, its time to drill some holes for the chassis rails. I place nuts on the washer and locate them (I did it by eye) where I want the rails to be. Note that the nuts are positioned so that they don't overhang the washers - this is important so they don't stick out and drag against the inside of the PVC. I marked where the holes will be with a sharpie. Stack the washers, drill the holes - this will give you matching holes on both washers.


    Use drill bits intended for metal here. If you try to use the ones you had kicking around for making holes in drywall for hanging picture frames or whatever, you'll be at it all day. A drop of oil on the tip of the bit helps too.

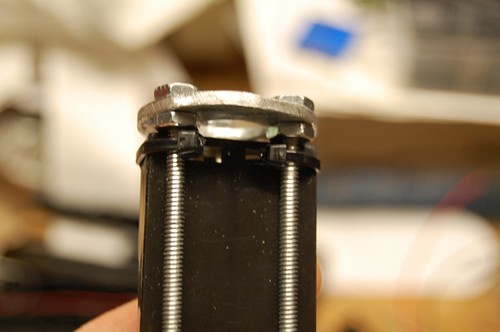
    Once you have your holes, you can put the chassis together - on each rail you have a nut, the washer, another nut, and then repeat on the other end. Some thread locker (loctite, whatever) will keep the nuts in place.


    Some heat-shrink on the threaded tubing might be good for avoiding shorts, but I don't plan to have exposed circuits so I'm not worried.

    So that's all great, but then I figured out that there wasn't enough inside space to cram three single AA holders. I know I was being ambitious, but... well, anyway, I decided to make another chassis using the same steps, but long enough to hold a 4xAA battery box. No biggie, I cut longer pieces of 6-32 threaded rod. They are the length of the battery box, plus two times the stack height of the end hardware. Each combo of nut-washer-nut is 1/4", so the rods are the length of the box plus 1/2".


    Now its time for some cram-fu. The tolerances for the battery box in the chassis with any sort of holding apparatus (I'm thinking zip-ties) are very tight. Thankfully the inside nuts for the rails grip the box quite snugly, I almost don't need the zip-ties. Here's a shot of the box zip-tied to the rails.


    And once I get it attached on all 4 corners, I pop the batteries in and test the fit. I've made the mistake before of only doing test-fitting with the holder, not with batteries, and that caused problems since the batteries can extend past the corners of the box. Looks good:


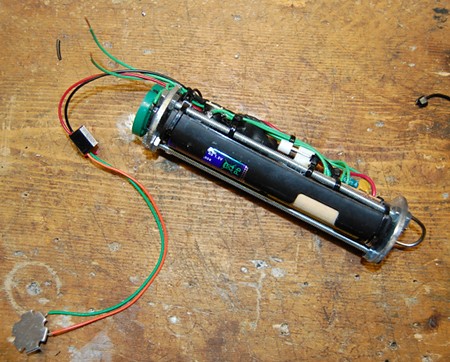
    I've wired up an econo-board with a tip42 transistor and a micro-puck driven Cree LED. Using tight runs of wire, I zip-tie the board to the rails on the back of the battery box. The wave sensor is hot-glued. I made a notch in the washer to pass wires through, for the switch, LED, and speaker. The magnet for the crappy speaker that came in the Hasbro saber nestled nicely in the inside washer opening, so I hot-glued it there.


    I put a D-ring on the pommel end of the chassis to help pull it out since the fit is so snug.


    That's about it - now the saber guts, aside from the switch and LED, are contained in one unit that is easy to slide in and out for battery changes or repair.

    Fun stuff.
    Last edited by jgunn; 11-29-2010 at 08:18 AM.

  2. #2
    Council Member
    Sith Lord
    Lord Maul's Avatar
    Join Date
    Jun 2006
    Location
    Seattle area, Washington
    Posts
    5,169

    Default

    Nice job! Isn't it a great feeling when everything fits *just* perfect? Your wiring is nice and clean too. No spaghetti at all. I have to remember the zip-tie trick, I usually just superglue my batteries in place
    Aluke123 on every other forum - Old grumpy moderator here

    Thread Index, The Saber Building Dictionary, and The Basic Saber-Build Tutorial - Read Them!

  3. #3

    Default

    Great tut, brudda! Thanks for the quick down and dirty!

  4. #4

    Default

    Very impressive.
    Yub Yub Commander.

  5. #5
    Jedi Initiate
    Jedi Initiate
    equinox13's Avatar
    Join Date
    Oct 2010
    Location
    Zama City, Japan
    Posts
    493
    Blog Entries
    1

    Default

    very very well done! thanks for the great documentation. i know i'll be stealing an idea or two later. ^_^
    Now known as Azmaria Dei
    i really need "meow on clash" mya! =^_^=

    duel - to fight someone 1 on 1
    dual - 2 of something in line with each other

  6. #6

    Default

    A great job and a really well presented tutorial.
    Well done!

  7. #7

    Default

    @equinox: steal away, that's the idea... everyone contributes, and we move the art forward.

    @everyone else - thanks for the supportive comments!

    A few things I thought of after I posted...

    1) in some of the pics, you can see one of the AA batteries looks like its made from wood (like the 3rd to last pic). That was a dummy battery I made from a wooden dowel with a drywall screw through the middle. I only wanted 4.5v out of the pack but the 2x2 arrangement of batteries made sense for my layout, so that was the easy compromise.

    2) You can see in the last pic that the nut holding the D-ring on is barely gripping, that's because I didn't think to add it till long after I had cut the threaded rod. I may replace just that one rod which won't be hard since that rail runs over the battery box and nothing is attached to it.

    3) I'll add some pics of the chassis in an actual saber soon, I realized after the fact that my shot showing the final fit at the end looks a bit like my saber is a used sewer pipe. :/

    Aaaaaanyway, carry on.

    -J

  8. #8
    Sith Adept dgdve's Avatar
    Join Date
    Aug 2009
    Location
    Virginia (near DC)
    Posts
    647

    Default

    That is nearly exactly what I do for my chambers, I really like to use a 4 post system and switch to 3 posts at the battery compartment.. another thing to note is that you can cover the 6-32 coarse threaded (all thread) with brass 3/16 o.d x0.014 tubing... makes it have that real finished look and then your chassis is "display ready" also I use 1.25 nylon washers instead of flats because they have different thickness's and you can fill spaces by using the really thick ones (I mean thick they make them up to 1/4"..thats thick) or thin ones if you need them to be slim, then you can paint them if you like. ONLY thing is dont over tighten the nylon washers as they will warp and misalign IF your using thin ones.. aside from that your tut is A++

  9. #9

    Default

    Quote Originally Posted by jgunn View Post
    1) in some of the pics, you can see one of the AA batteries looks like its made from wood (like the 3rd to last pic). That was a dummy battery I made from a wooden dowel with a drywall screw through the middle. I only wanted 4.5v out of the pack but the 2x2 arrangement of batteries made sense for my layout, so that was the easy compromise.

    I do the same thing for dummy batteries! Dowel rod with two flat metal thumb tacks.

  10. #10
    Sith Adept dgdve's Avatar
    Join Date
    Aug 2009
    Location
    Virginia (near DC)
    Posts
    647

    Default

    I'm sry but I keep saying to myself... is that a chassis.. in a Pvc...
    (I need to see the emperor immediatly...) the force is strong in this one... great great job, I'm watching you

Bookmarks

Posting Permissions

  • You may not post new threads
  • You may not post replies
  • You may not post attachments
  • You may not edit your posts
  •