Page 1 of 5 1 2 3 ... LastLast
Results 1 to 10 of 47

Thread: Rhyen Skytracker's Darth Nihilus custom sabers

  1. #1
    Council Member
    Jedi Council Member
    Rhyen Skytracker's Avatar
    Join Date
    Feb 2009
    Location
    Covington, GA
    Posts
    2,550

    Default Rhyen Skytracker's Darth Nihilus custom sabers

    Here are 4 Darth Nihilus sabers that I am currently working on. I thought I would post progress pics and try to track the time it takes to make them. That way people can see how long it takes to make custom sabers.

    Day 1: (8 hours) So far I have most of the parts cut to size, faced off and bored out. The blade holders are bored out to accomidate a 1" blade on one end and have the optics/holder/LED and heat sink on the other. So far I have spent 3 hours cutting all the parts and 5 hours facing off all the parts and to bore some of the parts out. All that is left on the blade holder is to thread it and shape it. Here are pics of Day 1.

    Parts cut to size and faced off:


    Parts bored out: this included the blade holder to fit a 1" blade and the bottom side of the BH to hold the optics/LED and heatsink

    First bore of parts:


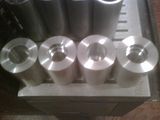
    Final bore of Blade holders:


    Last edited by Rhyen Skytracker; 10-13-2010 at 05:20 PM.

    Live long and...I mean May the force be with you. http://saberconcepts.50.forumer.com/index.php

  2. #2
    Council Member
    Jedi Council Member
    Rhyen Skytracker's Avatar
    Join Date
    Feb 2009
    Location
    Covington, GA
    Posts
    2,550

    Default

    Day 2: (7 Hours) I got all of the male threaded parts threaded today. (16 sets of male threads) This included the prep work too like turning down the parts to the right size for the threads and cutting a thread relief in each part. The parts with male threads include the Blade holders, the core parts and the pommels. The picture quality is not too good because I was using my cell phone camera.

    Here are pics of the prepped parts:


    Here are pics of the threaded parts: (I included some close up pics too)


    Live long and...I mean May the force be with you. http://saberconcepts.50.forumer.com/index.php

  3. #3
    Council Member
    Jedi Council Member
    Rhyen Skytracker's Avatar
    Join Date
    Feb 2009
    Location
    Covington, GA
    Posts
    2,550

    Default

    Day 3: (4 hours) My project for today was to work on the milled slots in the grip sections. This took a while to do. I was at the shop for 4 hours and only got 3 of the 4 grips done. Part of that time was set up on the mill. Here are some pics of what I got accomplished today and some pics of the set up I use on my mill. I am using a 1" expanding mandrel to hold the part from the inside and put it in the indexer and set it up for 24 spaces.

    Here are pics of the set up:


    Pics of the parts I milled and deburred:


    And better pictures of the other parts:


    Live long and...I mean May the force be with you. http://saberconcepts.50.forumer.com/index.php

  4. #4
    Council Member
    Jedi Council Member
    Rhyen Skytracker's Avatar
    Join Date
    Feb 2009
    Location
    Covington, GA
    Posts
    2,550

    Default

    Day 4: (4 hours) I finished milling the last grip part and got all of them bored out today. I had to bore out all of the IDs to make room for electronics. The ID of the grip section now is 1.153" the ID of the rest of the hilt is 1.25". This part was the most time consuming part other than the pommel. So it should move a little faster after the pommels.


    Live long and...I mean May the force be with you. http://saberconcepts.50.forumer.com/index.php

  5. #5
    Jedi Padawan Ronan's Avatar
    Join Date
    Jul 2010
    Location
    Montreal, QC
    Posts
    529

    Default

    I appreciate the WIP pics, it shows just HOW MUCH WORK goes into a saber!
    Corbin_Das: If I got a tattoo below my waist, it'd say "Found someone you have I would say, hmmmm?"

  6. #6
    Council Member
    Jedi Council Member
    Rhyen Skytracker's Avatar
    Join Date
    Feb 2009
    Location
    Covington, GA
    Posts
    2,550

    Default

    Day 5: (3 hours) I hand washed these parts to make sure they were nice, clean and oil free then I powder coated the grip parts vulcan black. It is a low gloss textured black PC.

    Here is a pic of the oven I use for my PC and on top is a custom holder I made to help hold parts in the oven.


    And here is some progress pics of the parts. The first pic is after I handwashed them.


    And now a pic of them fresh out of the oven with high temp tape protecting the threads.


    And now the final pics:


    Live long and...I mean May the force be with you. http://saberconcepts.50.forumer.com/index.php

  7. #7

    Default

    very nice ...look frwd to the rest being done...great wip pics..

  8. #8
    Council Member
    Jedi Council Member
    Rhyen Skytracker's Avatar
    Join Date
    Feb 2009
    Location
    Covington, GA
    Posts
    2,550

    Default

    Day 6: (2 Hours) I didn't get too much work done today because my shoulder is bothering me pretty bad, but I had to at least get something done. So, I drilled and bored out the hilt side of the pommel. I bored it out to 1" ID so that I can use a 1" expanding mandrel to hold the part while I machine the rest of it. You will see that a smaller hole goes all the way through. This is so that I can use an allen wrench to tighten the expanding mandrel. Here are the pics of what I did today. (The parts wrapped in the white paper towel are the powder coated grip pieces.)


    Live long and...I mean May the force be with you. http://saberconcepts.50.forumer.com/index.php

  9. #9
    Council Member
    Jedi Council Member
    Rhyen Skytracker's Avatar
    Join Date
    Feb 2009
    Location
    Covington, GA
    Posts
    2,550

    Default

    Day 7: (9 hours) Today I worked on milling the U shape out of the pommel. That took just over 2 hours per pommel to do. That was the most time consuming part of this saber so at least that is out of the way. I still have to work on them with the belt sander, files and sand paper to get them to the final shape. Plus, I still have to mill the holes around the pommel and lathe the grooves on each side of the holes. Anyway, enough talk, here are some pictures. Keep in mind that these are not the final shape of the pommel.


    Live long and...I mean May the force be with you. http://saberconcepts.50.forumer.com/index.php

  10. #10
    Council Member
    Jedi Council Member
    Rhyen Skytracker's Avatar
    Join Date
    Feb 2009
    Location
    Covington, GA
    Posts
    2,550

    Default

    Day 8: (4 hours) Worked on the pommels some more and am almost done with them. I used a belt sander to round off the top part. I put them on my indexer and milled 12 evenly spaced holes around the pommel for sound. I also used the lathe to add some grooves on either side of the holes. Now all that is left is to use a file and sand paper to clean up and touch up the edges. That will be most of the hardest parts done on this saber. Only shaping the emitters, threading the 8 double female parts, 2 more angle pieces (I already have 2 done) and them to make the low profile switch plates. It sounds like a lot left to do but the hardest and most time consuming parts are already done. Here is some pics of what I have done today.


    Live long and...I mean May the force be with you. http://saberconcepts.50.forumer.com/index.php

Bookmarks

Posting Permissions

  • You may not post new threads
  • You may not post replies
  • You may not post attachments
  • You may not edit your posts
  •