


Hello Saberpals
Lately, we've been getting a lot of requests for sabers based on past works. It is a very flattering thing and gives us great satisfaction in the work that we do. Last summer, we made a CF saber named Ferus Gladius. That saber had a multi-layer shroud design and a mid choke body. It was a complex install and lots of detail work on the shrouds. Well, a few months ago we got a request from a mother in the UK that wanted one made for her son for his 16th birthday. They wanted it as faithful as possible to the original but powered by a US 2.5 instead of a CF. They also wanted a crystal chamber in the choke and wanted to make sure that the blinkie LEDs in the forward body stayed intact, and that we use ones that change from red to green.
I must say, that doing the multi layered shrouds and getting them to look right is a real PITA. Those gill slits are the bane of my existence and required hours of hand filing aloneBut, I had done them once, and I knew that I could do them again. I am actually more pleased with the way they came out this time than last. I also felt that the rear of Ferus Gladius was unbalanced compared to the front half, so I added a second shroud layer to the lower grip to spice things up there. We also used our low profile activation box which sits 1/8th inch lower than the prototype box that was on the original. Also added was a custom pommel. These things combined made for a sleeker look to the new version.
The 8 blinking accent LEDs were a must for the customer and since the US doesn't pimp the bling like the CF, I tried to wire them PPO with the main LED. Well, as it turns out, some blinking LEDs don't like PWM. Namely the ones that turn from red to green. Turns out they need a constant voltage supply to run right. So after some dicsussions with Erv' on this perplexing and frustrating problem, I decided that it would be easiest to wire them direct off the battery pack and turn on when the kill key is pulled.
I am also kicking myself for installing the electronics in this saber without getting pics of the internals. One of the hardest parts of this build was the crystal chamber in the choke....in the middle of the saber. This makes it hard to both secure the crystal properly and be able to sneak wires past it without being visible. I had to build the crystal chamber in two pieces. The actual crystal and LED holder was made from 1/2" copper pipe lathed for detail and attached to the head of the chassis that also holds the soundboard underneath the control box. The top half of the crystal chamber has a barbed brass hose fitting that is secured to the male threaded end of the choke and is the perfect length to hold the crystal in, plus it looks way cool with the copper. This set up resulted in a VERY secure crystal chamber that looks good even in the little tiny window that the small choke allows.
Quick Specs:
Custom MHS hilt
Custom double layer overlays in brass and aluminum
Custom low profile switch box
Mid choke crystal chamber with real quartz crystal
8 accent LEDs all blinking 4 blue, 4 red/green
US 2.5
LEDengin 5W green
4.8v NiMh battery pack.
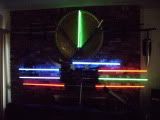
Pics:
Video:
http://www.youtube.com/watch?v=PhVIN9EG8IM


 Reply With Quote


Bookmarks