Page 1 of 2 1 2 LastLast
Results 1 to 10 of 13

Thread: Need some advice on my project

  1. #1

    Default Need some advice on my project

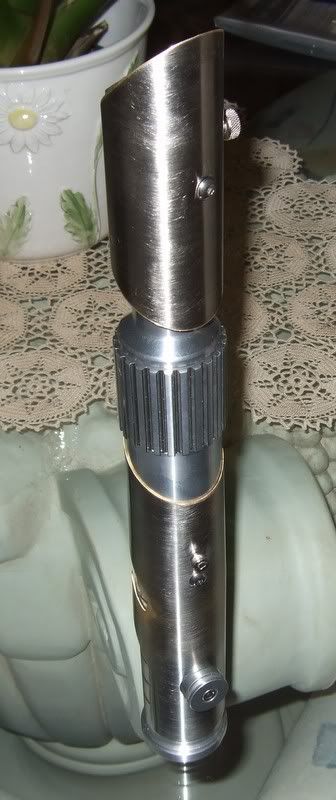
    Hey guys. Ive been hard at work with my saber, but I need some help with my shroud. Here is what I have done so far, you kind of get the idea of what Im going for here:


    And Here:


    If you guys notice though, I had some scratching and slips on the Shroud, as well as some Powder coating scuffs and nicks on the blade emitter and the pommel trying to fit it properly (pipe was REALLY stubborn).

    My question is does anyone have any ideas as to how to get this saber looking tops? I want to strip some of the PC off in the ribbed emitter and and that ring on the pommel, and I want to cover up the nicks on the shroud, But I'm really unsure how to do this. Any suggestions would be helpful!
    I'm Gonna Ride My Krayt Dragon To Valhalla!

  2. #2
    Jedi Council Member cardcollector's Avatar
    Join Date
    Jan 2009
    Location
    I am A proud American.
    Posts
    2,567
    Blog Entries
    3

    Default

    Why not weather it?

    OR give the shroud a brushed metal look all over...

    on my first saber (alpha) the overlay was really rough, so I took some 220 grit sandpaper and lightly sanded the overlay top to bottom. It looked really nice afterwards.
    Got a Question? There's a thread for that...
    ~Do what you can, with what you have, where you are.~Teddy Roosevelt

    SollusVir everywhere else... FXsabers, Youtube, etc...

  3. #3

    Default

    The gouge may me a bit deep to fix with sanding but you can definitely clean up the shroud overall and make it shine. As Cardcollector stated just use fine grit sandpaper and work over it with increasing fine grit... start with a 120 to remove some of the deeper scratches and then work your way finer. 220/240 to 320 to 400/500... when you're at the point where your grit becomes more of a polishing application it's time for an aluminum polishing agent rubbed and buffed with a cloth. It's a bit labor intensive but you'll get the results you're after on the shroud.

    Good looking hilt by the way.
    Last edited by B5813; 02-01-2010 at 10:39 PM.

  4. #4

    Default

    for the hilt/sections..

    spin them on a drill with some sand paper to revome pc wher you want (unless you have a lathe.. then turn down where you want)

    for the shroud.. you have already been given great advice.

    but going the opposite way..maybe some decorative/ornamental edging? wdie enough to cover the gouge?

    maybe some brass strips from Ace Hardware.. it is VERY thin strips, polished and come in a variety of widths.

    Im sure you could trim it match the curve/corners of the bottom shroud and cover the scratch.

    Id show you some pics..but the project I have that does this same things isnt done.

  5. #5
    Youngling
    Join Date
    Dec 2009
    Location
    Sunny & Hot Florida
    Posts
    188

    Default

    I did the same thing on my first shroud. Ended up making it brushed brass from the original chrome sinktube.

    Easiest way is what was stated previously - start with 150 sandpaper, then 220, then 320, then 400. Rub it in 1 direction only! I usually cradle the tube in the sandpaper and rotate it around. If you have a paint roller holder it might be the perfect size for a 1.5" tube - mine was. You can also rub up and down which creates a different look.

    The lighting is bad but here's how mine turned out:


    Its actually better now since I went over it with 400 grain sandpaper some more which smoothed it out.
    "This is the weapon of a Jedi Knight. Not as clumsy or random as a blaster; an elegant weapon for a more civilized age."

  6. #6
    Banned Sith Lord
    Join Date
    Feb 2009
    Location
    the darkest places of your mind
    Posts
    1,873

    Default

    400 grit is okay. i usually go 400 then 600 then 1400. THAT makes it shine. also try this stuff.


    once you get it sanded to have rather fine micro scratches, this semi chrome has some compounds in it that help break down on those, thus polishing to a very brilliant chrome finish, (if your patient) i also really helps if you have a lathe. thats what i do. but i also just use a rag and it does the same thing, allthough takes longer.

    you can also use 4000 grit sand paper. my machine shop teacher had some. never told me were he got it but BOY that stuff was intense!

  7. #7
    Jedi Knight cannibal869's Avatar
    Join Date
    Sep 2008
    Location
    Home of NUCLEAR JEDI SABERS
    Posts
    1,027

    Wink

    The shroud itself already looks pretty good!
    Reminds me of Mass Effect 2 for some strange reason...
    <scratches head walking away>...
    LOCKHEED

  8. #8
    Council Member
    Jedi Council Member
    Jedi-Loreen's Avatar
    Join Date
    Dec 2005
    Location
    Not of this Earth
    Posts
    6,077

    Default

    I know you already asked this in the Shoutbox and Ace/True Value Hardware was suggested.

    You can get super fine grits, like up to 2000, at automotive parts stores.
    In order to see the Light,
    you must sometimes risk the Dark.
    TCSS MODERATOR


    BLUE 8 Ready to ROCK and ROLL!

  9. #9

    Default

    thanks for all the advice guys!!! I knew I could count on you! Ill throw this bad boy in the gallery one i get it done
    I'm Gonna Ride My Krayt Dragon To Valhalla!

  10. #10
    Council Member
    Jedi Council Member
    Jedi-Loreen's Avatar
    Join Date
    Dec 2005
    Location
    Not of this Earth
    Posts
    6,077

    Default

    My post seems a little out of context, because Dakarn deleted his post above mine when he got his question answered in the Shoutbox earlier today. I tried to tell him to just leave it up, because my info could be for other people too, but I was too late.
    In order to see the Light,
    you must sometimes risk the Dark.
    TCSS MODERATOR


    BLUE 8 Ready to ROCK and ROLL!

Bookmarks

Posting Permissions

  • You may not post new threads
  • You may not post replies
  • You may not post attachments
  • You may not edit your posts
  •